Dev Environment in AWS
Introduction
In this lab, we'll build the following resources in AWS
- VPC
- Route Table
- Internet Gateway
- Public Subnet
- Security Group
- EC2 Instance
Diagram:
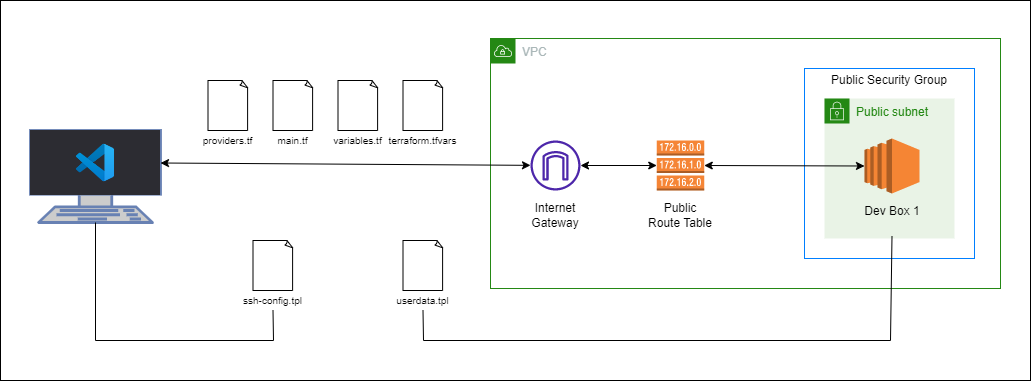
Local environment used for this lab.
- Windows machine/laptop
- Visual Studio Code v1.67.2 (VSCode)
- WSL on Visual Studio Code
- Amazon Web Services (AWS) resources
Pre-requisites
- Setup Keys and Permissions
- Setup your Local Environment and Install Extensions
- Configure the Credentials File
- Install Terraform
Configure AWS Provider
From the Hashicorp's documentation::
Use the Amazon Web Services (AWS) provider to interact with the many resources supported by AWS. You must configure the provider with the proper credentials before you can use it.It is recommended to use variables for configuration files instead of hardcoding any credentials. Another option is to specify the credentials file path.
### provider.tf
terraform {
  required_providers {
    aws = {
      source  = "hashicorp/aws"
      version = "~> 3.0"
    }
  }
}

provider "aws" {
  region                   = "ap-southeast-1"
  shared_credentials_file  = "/mnt/c/Users/Eden.Jose/.aws/credentials"
  profile                  = "vscode-dev"
}
Initialize.
terraform init
Provision a VPC
From the Hashicorp documentation, we could see various AWS resources can be deployed. For this step, we'll be using aws_vpc to provide a VPC resource.
Let's start with creating a main file. Here we'll specify the following:
- VPC name "tf-vpc" after the aws_vpc
- cidr block of 10.123.0.0/16
- enable hostname
- enable dns support, optional
resource "aws_vpc" "tf-vpc" {
   cidr_block = "10.123.0.0/16"
   enable_dns_hostnames = true
   enable_dns_support = true

   tags = {
       Name = "tf-vpc-dev"
   }
}
To get a "preview" without actually provisioning the resources,
terraform plan
This should return a list of resources that would be created if the template is ran. Below is an example output.
terraform plan

Terraform used the selected providers to generate the following execution plan. Resource actions are indicated with the
following symbols:
  + create

Terraform will perform the following actions:

  # aws_vpc.tf-vpc will be created
  + resource "aws_vpc" "tf-vpc" {
      + arn                                  = (known after apply)
      + cidr_block                           = "10.123.0.0/16"
      + default_network_acl_id               = (known after apply)
      + default_route_table_id               = (known after apply)
      + default_security_group_id            = (known after apply)
      + dhcp_options_id                      = (known after apply)
      + enable_classiclink                   = (known after apply)
      + enable_classiclink_dns_support       = (known after apply)
      + enable_dns_hostnames                 = true
      + enable_dns_support                   = true
      + id                                   = (known after apply)
      + instance_tenancy                     = "default"
      + ipv6_association_id                  = (known after apply)
      + ipv6_cidr_block                      = (known after apply)
      + ipv6_cidr_block_network_border_group = (known after apply)
      + main_route_table_id                  = (known after apply)
      + owner_id                             = (known after apply)
      + tags                                 = {
          + "Name" = "tf-vpc-dev"
        }
      + tags_all                             = {
          + "Name" = "tf-vpc-dev"
        }
    }

Plan: 1 to add, 0 to change, 0 to destroy.
To actually provision the resources,
terraform apply
Notice that this will do another terraform plan, after which you'll be asked if you want to perform the actions.
To run the command above without the interactive prompt,
terraform apply -auto-approve
When the command is finished running, it should return the following message:
Plan: 1 to add, 0 to change, 0 to destroy.
aws_vpc.tf-vpc: Creating...
aws_vpc.tf-vpc: Still creating... [10s elapsed]
aws_vpc.tf-vpc: Creation complete after 15s [id=vpc-00203af585d54c4f0]

Apply complete! Resources: 1 added, 0 changed, 0 destroyed.
On the Explorer tab on the left in VSCode, you should still see the available resources for Asia Pacific region when you click the AWS icon on the left panel. Scroll at the bottom and then click,
Resources --> Enable resources types... --> AWS::EC2::VPC --> OK

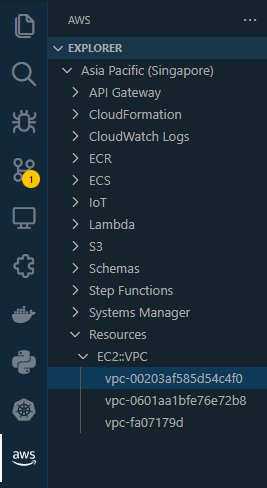
When you click the VPC ID, it should open the configuration file.
{
    "VpcId": "vpc-00203af585d54c4f0",
    "InstanceTenancy": "default",
    "CidrBlockAssociations": [
        "vpc-cidr-assoc-0546f97f1de6e8d65"
    ],
    "CidrBlock": "10.123.0.0/16",
    "DefaultNetworkAcl": "acl-0b52f6d2d6f4c8339",
    "EnableDnsSupport": true,
    "Ipv6CidrBlocks": [],
    "DefaultSecurityGroup": "sg-06fc3a39cbe08b627",
    "EnableDnsHostnames": true,
    "Tags": [
        {
            "Value": "tf-vpc-dev",
            "Key": "Name"
        }
    ]
}
terraform state
From the Hashicorp documentation page on terraform state :
Terraform must store state about your managed infrastructure and configuration. This state is used by Terraform to map real world resources to your configuration, keep track of metadata, and to improve performance for large infrastructures.
This state is stored by default in a local file named "terraform.tfstate", but it can also be stored remotely, which works better in a team environmen
To access the state through the CLI,
terraform state list

aws_vpc.tf-vpc
To see details of the VPC through the CLI, run the command below. This will return the same information that you see on the state file.
terraform state show aws_vpc.tf-vpc
To see the entire state,
terraform show
terraform destroy
From Hashicorp documentation page on terraform destroy:
The terraform destroy command is a convenient way to destroy all remote objects managed by a particular Terraform configuration.
While you will typically not want to destroy long-lived objects in a production environment, Terraform is sometimes used to manage ephemeral infrastructure for development purposes, in which case you can use terraform destroy to conveniently clean up all of those temporary objects once you are finished with your work.
To see a "preview" of the resources that will be destroyed before actually deleting them,
terraform plan -destroy
To actually delete the resource without being prompted to confirm,
terraform destroy -auto-approve
Deploy a Public Subnet
From Hashicorp documentation page on AWS VPC Subnets:
Provides an VPC subnet resource.
The documentation page is straightforward and we could simply the basic usage example. Note that we're launching a public subnet, we will need map_public_ip_on_launch set to true to ensure EC2 instances that will be launched in the public subnet will be assigned a public IP.
Back on the main file, we'll add the resource aws_subnet and name it tf-public-subnet-1
resource "aws_vpc" "tf-vpc" {
   cidr_block = "10.123.0.0/16"
   enable_dns_hostnames = true
   enable_dns_support = true

   tags = {
       Name = "tf-vpc-dev"
   }
}

resource "aws_subnet" "tf-public-subnet-1" {
  vpc_id     = aws_vpc.tf-vpc.id
  cidr_block = "10.123.1.0/24"
  map_public_ip_on_launch = true
  availability_zone = "ap-southeast-1a"

  tags = {
    Name = "tf-public-subnet-1"
  }
}
Review.
terraform plan
Once you've reviewed, apply.
terraform apply -auto-approve
Note that you cannot view the newly created subnet in the VSCode Explorer tab but you can verify them through the CLI.
terraform state list

aws_subnet.tf-public-subnet-1
aws_vpc.tf-vpc
Similarly, you can also check them on the AWS console.


Deploy an Internet Gateway
To allow internet access to our VPC, we would need to provision an internet gateway. You can read more on the Hashicorp documentation.
Back in our main file, we'll add another resource aws_internet_gateway and name it tf-igw-1.
resource "aws_vpc" "tf-vpc" {
   cidr_block = "10.123.0.0/16"
   enable_dns_hostnames = true
   enable_dns_support = true

   tags = {
       Name = "tf-vpc-dev"
   }
}

resource "aws_subnet" "tf-public-subnet-1" {
  vpc_id     = aws_vpc.tf-vpc.id
  cidr_block = "10.123.1.0/24"
  map_public_ip_on_launch = true
  availability_zone = "ap-southeast-1a"

  tags = {
    Name = "tf-public-subnet-1"
  }
}

resource "aws_internet_gateway" "tf-igw-1" {
  vpc_id = aws_vpc.tf-vpc.id

  tags = {
    Name = "tf-igw-1"
  }
}
Review.
terraform plan
Once you've reviewed, apply.
terraform apply -auto-approve
Verify through the VSCode Explorer tab on the left panel.
Resources --> Show Resources --> AWS::EC2::InternetGateway --> OK

Verify through the CLI.
terraform state list

aws_internet_gateway.tf-igw-1
aws_subnet.tf-public-subnet-1
aws_vpc.tf-vpc
Terraform Format
This is a neat feature which will correct any formatting errors that you may have on your template files.
terraform fmt
Create the Route table
After you've provisioned an internet gateway, you need to create a route table to route traffic from the public subnet to the internet gateway.
When you search for the route table on the Hashicorp documentation, you'll see two resources, aws_route_table and aws_route
From the Hashicorp documentation on aws_route_table:
Provides a resource to create a VPC routing table.
From the Hashicorp documentation on aws_route:
Provides a resource to create a routing table entry (a route) in a VPC routing table.
On both page, you'll see the following,
NOTE on Route Tables and Routes: Terraform currently provides both a standalone Route resource and a Route Table resource with routes defined in-line. At this time you cannot use a Route Table with in-line routes in conjunction with any Route resources. Doing so will cause a conflict of rule settings and will overwrite rules.
Back in our main file, we'll be using both resources. To allow our public subnet to access internet, we should specify the destination as 0.0.0.0/0
resource "aws_vpc" "tf-vpc" {
  cidr_block           = "10.123.0.0/16"
  enable_dns_hostnames = true
  enable_dns_support   = true

  tags = {
    Name = "tf-vpc-dev"
  }
}

resource "aws_subnet" "tf-public-subnet-1" {
  vpc_id                  = aws_vpc.tf-vpc.id
  cidr_block              = "10.123.1.0/24"
  map_public_ip_on_launch = true
  availability_zone       = "ap-southeast-1a"

  tags = {
    Name = "tf-public-subnet-1"
  }
}

resource "aws_internet_gateway" "tf-igw-1" {
  vpc_id = aws_vpc.tf-vpc.id

  tags = {
    Name = "tf-igw-1"
  }
}


resource "aws_route_table" "tf-rt-table" {
  vpc_id = aws_vpc.tf-vpc.id

  tags = {
    Name = "tf-rt-1-public"
  }
}

resource "aws_route" "tf-rt-route" {
  route_table_id         = aws_route_table.tf-rt-table.id
  destination_cidr_block = "0.0.0.0/0"
  gateway_id             = aws_internet_gateway.tf-igw-1.id
}
Review.
terraform plan
Once you've reviewed, apply.
terraform apply -auto-approve
Verify through the VSCode Explorer tab on the left panel.
Resources --> Show Resources --> AWS::EC2::Route --> OK

Verify through the CLI.
terraform state list
Create the Route Table Association
From the Hashicorp documentation on route table association:
Provides a resource to create an association between a route table and a subnet or a route table and an internet gateway or virtual private gateway.
Back in our main file, add another resource called aws_route_table_association and name it tf-rt-assoc-1
resource "aws_vpc" "tf-vpc" {
  cidr_block           = "10.123.0.0/16"
  enable_dns_hostnames = true
  enable_dns_support   = true

  tags = {
    Name = "tf-vpc-dev"
  }
}

resource "aws_subnet" "tf-public-subnet-1" {
  vpc_id                  = aws_vpc.tf-vpc.id
  cidr_block              = "10.123.1.0/24"
  map_public_ip_on_launch = true
  availability_zone       = "ap-southeast-1a"

  tags = {
    Name = "tf-public-subnet-1"
  }
}

resource "aws_internet_gateway" "tf-igw-1" {
  vpc_id = aws_vpc.tf-vpc.id

  tags = {
    Name = "tf-igw-1"
  }
}


resource "aws_route_table" "tf-rt-table" {
  vpc_id = aws_vpc.tf-vpc.id

  tags = {
    Name = "tf-rt-1-public"
  }
}

resource "aws_route" "tf-rt-route" {
  route_table_id         = aws_route_table.tf-rt-table.id
  destination_cidr_block = "0.0.0.0/0"
  gateway_id             = aws_internet_gateway.tf-igw-1.id
}

resource "aws_route_table_association" "tf-rt-assoc-1" {
  subnet_id      = aws_subnet.tf-public-subnet-1.id
  route_table_id = aws_route_table.tf-rt-table.id
}
Review.
terraform plan
Once you've reviewed, apply.
terraform apply -auto-approve
Similar with subnet, we also can't view the newly created resource through the VSCode Explorer tab on the left panel.
Instead, we could verify through the CLI.
terraform state list

aws_internet_gateway.tf-igw-1
aws_route.tf-rt-route
aws_route_table.tf-rt-table
aws_route_table_association.tf-rt-assoc-1
aws_subnet.tf-public-subnet-1
aws_vpc.tf-vpc
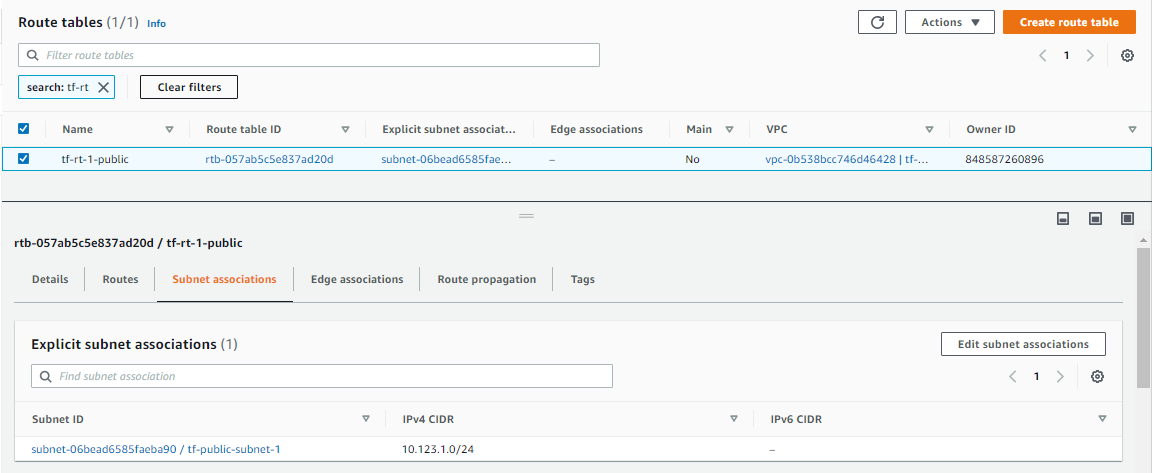
Check on the console.
Create the Security Group
From the Hashicorp documentation on aws_security_group:
Provides a security group resource.
From the Hashicorp documentation on aws_security_group_rule:
Provides a security group rule resource. Represents a single ingress or egress group rule, which can be added to external Security Groups.
For our setup, we can simple use aws_security_group. Make sure to get your IP through whatsmyip and set it fro cidr_blocks under ingress.
resource "aws_vpc" "tf-vpc" {
  cidr_block           = "10.123.0.0/16"
  enable_dns_hostnames = true
  enable_dns_support   = true

  tags = {
    Name = "tf-vpc-dev"
  }
}

resource "aws_subnet" "tf-public-subnet-1" {
  vpc_id                  = aws_vpc.tf-vpc.id
  cidr_block              = "10.123.1.0/24"
  map_public_ip_on_launch = true
  availability_zone       = "ap-southeast-1a"

  tags = {
    Name = "tf-public-subnet-1"
  }
}

resource "aws_internet_gateway" "tf-igw-1" {
  vpc_id = aws_vpc.tf-vpc.id

  tags = {
    Name = "tf-igw-1"
  }
}

resource "aws_route_table" "tf-rt-table" {
  vpc_id = aws_vpc.tf-vpc.id

  tags = {
    Name = "tf-rt-1-public"
  }
}

resource "aws_route" "tf-rt-route" {
  route_table_id         = aws_route_table.tf-rt-table.id
  destination_cidr_block = "0.0.0.0/0"
  gateway_id             = aws_internet_gateway.tf-igw-1.id
}

resource "aws_route_table_association" "tf-rt-assoc-1" {
  subnet_id      = aws_subnet.tf-public-subnet-1.id
  route_table_id = aws_route_table.tf-rt-table.id
}

resource "aws_security_group" "tf-sg-1" {
  name        = "tf-sg-1"
  description = "Allow inbound traffic"
  vpc_id      = aws_vpc.tf-vpc.id

  ingress {
    from_port   = 0
    to_port     = 0
    protocol    = "-1"
    cidr_blocks = ["1.2.3.4/32"]
  }

  egress {
    from_port   = 0
    to_port     = 0
    protocol    = "-1"
    cidr_blocks = ["0.0.0.0/0"]
  }

  tags = {
    Name = "tf-sg-1"
  }
}
Review.
terraform plan
Once you've reviewed, apply.
terraform apply -auto-approve
Verify through the CLI.
terraform state list

aws_internet_gateway.tf-igw-1
aws_route.tf-rt-route
aws_route_table.tf-rt-table
aws_route_table_association.tf-rt-assoc-1
aws_security_group.tf-sg-1
aws_subnet.tf-public-subnet-1
Check on the AWS console.

Get the AMI Datasource
From the Hashicorp documentation on Data Source-aws_ami:
Use this data source to get the ID of a registered AMI for use in other resources.
Before we proceed, we need to get the AMI ID which can be found in the EC2 menu through the AWS Console
EC2 --> Select AMI Catalog on the left panel --> Search Ubuntu --> Copy AMI ID
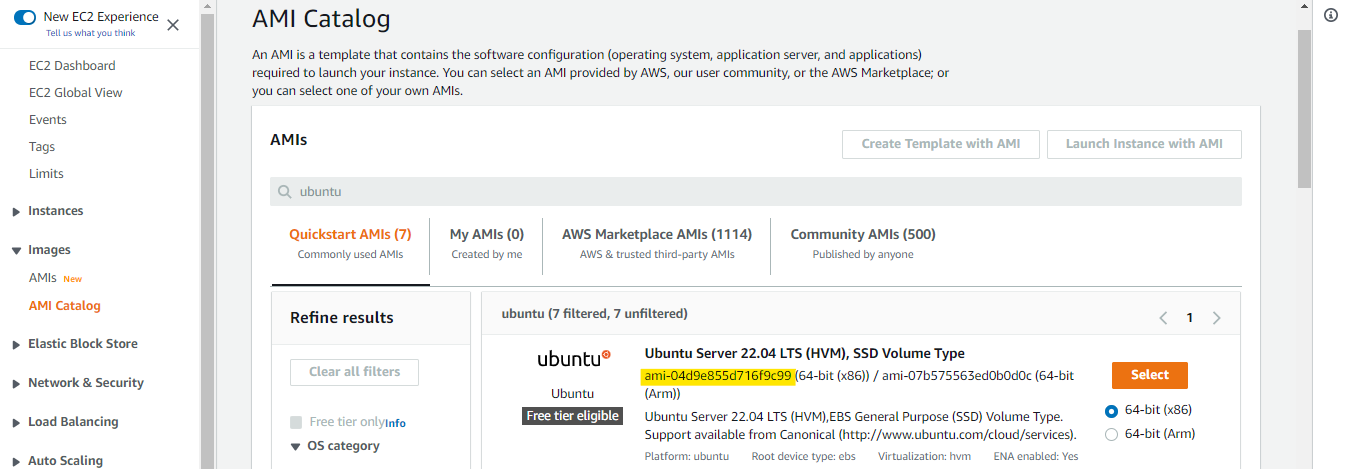
Then select AMI on the left panel again and on the drop-down bar, choose Public ../Images.
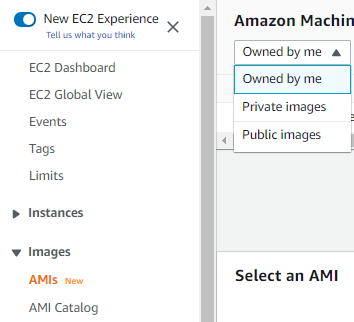
Paste the AMI ID on the search bar and from the result, copy the owner ID and AMI name
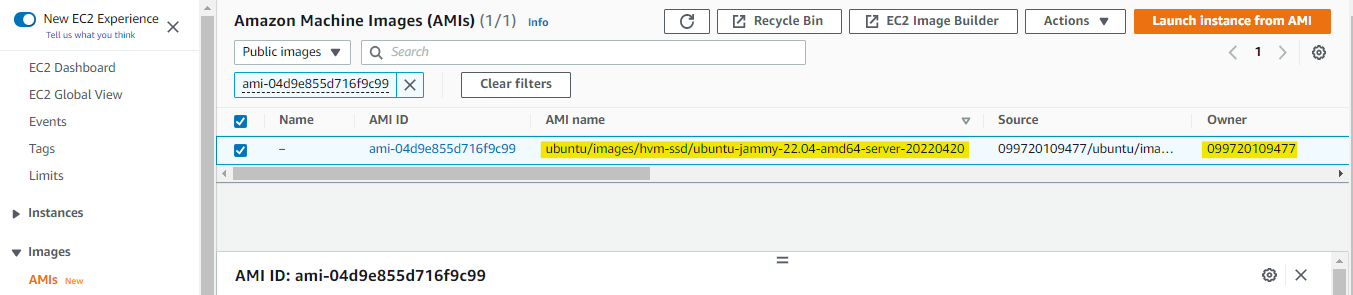
Back on our lab directory, create another file called datasource.tf. On the values field under filter, put in the AMI name. To ensure that it will pull the most recent one, replace the 8-digits at the end of the AMI name with '*'
vim datasources.tf

data "aws_ami" "tf-ami" {
  most_recent = true
  owners      = ["099720109477"]

  filter {
    name   = "name"
    values = ["ubuntu//img/docs/hvm-ssd/ubuntu-jammy-22.04-amd64-server-*"]
  }
}
Review.
terraform plan
Once you've reviewed, apply.
terraform apply -auto-approve
Create a Keypair
For this step, we'll create a keypair that we'll be use by the EC2 instance to be created.
From the Hashicorp documentation on aws_keypair:
Provides an EC2 key pair resource. A key pair is used to control login access to EC2 instances.
Currently this resource requires an existing user-supplied key pair. This key pair's public key will be registered with AWS to allow logging-in to EC2 instances.
To start with, we'll need a keypair locally.
ssh-keygen -t ed25519

Generating public/private ed25519 key pair.
Enter file in which to save the key (/home/joseeden/.ssh/id_ed25519): /home/joseeden/.ssh/tf-keypair
Back in our main.tf file, we'll add the resource aws_keypair and name it tf-keypair at the bottom.
resource "aws_vpc" "tf-vpc" {
  cidr_block           = "10.123.0.0/16"
  enable_dns_hostnames = true
  enable_dns_support   = true

  tags = {
    Name = "tf-vpc-dev"
  }
}

resource "aws_subnet" "tf-public-subnet-1" {
  vpc_id                  = aws_vpc.tf-vpc.id
  cidr_block              = "10.123.1.0/24"
  map_public_ip_on_launch = true
  availability_zone       = "ap-southeast-1a"

  tags = {
    Name = "tf-public-subnet-1"
  }
}

resource "aws_internet_gateway" "tf-igw-1" {
  vpc_id = aws_vpc.tf-vpc.id

  tags = {
    Name = "tf-igw-1"
  }
}

resource "aws_route_table" "tf-rt-table" {
  vpc_id = aws_vpc.tf-vpc.id

  tags = {
    Name = "tf-rt-1-public"
  }
}

resource "aws_route" "tf-rt-route" {
  route_table_id         = aws_route_table.tf-rt-table.id
  destination_cidr_block = "0.0.0.0/0"
  gateway_id             = aws_internet_gateway.tf-igw-1.id
}

resource "aws_route_table_association" "tf-rt-assoc-1" {
  subnet_id      = aws_subnet.tf-public-subnet-1.id
  route_table_id = aws_route_table.tf-rt-table.id
}

resource "aws_security_group" "tf-sg-1" {
  name        = "tf-sg-1"
  description = "Allow inbound traffic"
  vpc_id      = aws_vpc.tf-vpc.id

  ingress {
    from_port   = 0
    to_port     = 0
    protocol    = "-1"
    cidr_blocks = ["1.2.3.4/32"]
  }

  egress {
    from_port   = 0
    to_port     = 0
    protocol    = "-1"
    cidr_blocks = ["0.0.0.0/0"]
  }

  tags = {
    Name = "tf-sg-1"
  }
}

resource "aws_key_pair" "tf-keypair" {
  key_name   = "tf-keypair"
  public_key = file("/home/joseeden/.ssh/tf-keypair.pub")
}
Notice that instead of specifying the entire key in the public_key field as shown in the documentation, we use the file function to pass the path of the key instead.
Review.
terraform plan
Once you've reviewed, apply.
terraform apply -auto-approve
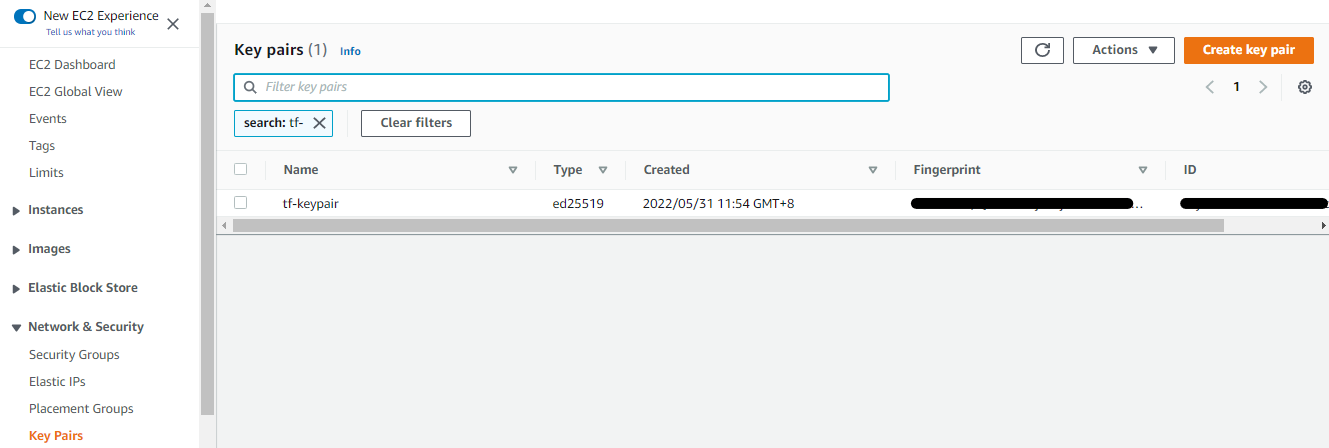
Keypairs aren't a visible resource in the VSCode AWS extension so we'll just verify through CLI and the AWS Console.
terraform state list

data.aws_ami.tf-ami
aws_internet_gateway.tf-igw-1
aws_key_pair.tf-keypair
aws_route.tf-rt-route
aws_route_table.tf-rt-table
aws_route_table_association.tf-rt-assoc-1
aws_security_group.tf-sg-1
aws_subnet.tf-public-subnet-1
aws_vpc.tf-vpc
Deploy the EC2 Instance
From the Hashicorp documentation on aws_instance:
Provides an EC2 instance resource. This allows instances to be created, updated, and deleted. Instances also support provisioning.
Back in our main.tf file, we'll add a resource called aws_instance and name it tf-node-1
resource "aws_vpc" "tf-vpc" {
  cidr_block           = "10.123.0.0/16"
  enable_dns_hostnames = true
  enable_dns_support   = true

  tags = {
    Name = "tf-vpc-dev"
  }
}

resource "aws_subnet" "tf-public-subnet-1" {
  vpc_id                  = aws_vpc.tf-vpc.id
  cidr_block              = "10.123.1.0/24"
  map_public_ip_on_launch = true
  availability_zone       = "ap-southeast-1a"

  tags = {
    Name = "tf-public-subnet-1"
  }
}

resource "aws_internet_gateway" "tf-igw-1" {
  vpc_id = aws_vpc.tf-vpc.id

  tags = {
    Name = "tf-igw-1"
  }
}

resource "aws_route_table" "tf-rt-table" {
  vpc_id = aws_vpc.tf-vpc.id

  tags = {
    Name = "tf-rt-1-public"
  }
}

resource "aws_route" "tf-rt-route" {
  route_table_id         = aws_route_table.tf-rt-table.id
  destination_cidr_block = "0.0.0.0/0"
  gateway_id             = aws_internet_gateway.tf-igw-1.id
}

resource "aws_route_table_association" "tf-rt-assoc-1" {
  subnet_id      = aws_subnet.tf-public-subnet-1.id
  route_table_id = aws_route_table.tf-rt-table.id
}

resource "aws_security_group" "tf-sg-1" {
  name        = "tf-sg-1"
  description = "Allow inbound traffic"
  vpc_id      = aws_vpc.tf-vpc.id

  ingress {
    from_port   = 0
    to_port     = 0
    protocol    = "-1"
    cidr_blocks = ["1.2.3.4/32"]
  }

  egress {
    from_port   = 0
    to_port     = 0
    protocol    = "-1"
    cidr_blocks = ["0.0.0.0/0"]
  }

  tags = {
    Name = "tf-sg-1"
  }
}

resource "aws_key_pair" "tf-keypair" {
  key_name   = "tf-keypair"
  public_key = file("/home/joseeden/.ssh/tf-keypair.pub")
}

resource "aws_instance" "tf-node-1" {
  instance_type          = "t2.micro"
  ami                    = data.aws_ami.tf-ami.id
  key_name               = aws_key_pair.tf-keypair.id
  vpc_security_group_ids = [aws_security_group.tf-sg-1.id]
  subnet_id              = aws_subnet.tf-public-subnet-1.id

  root_block_device {
    volume_size = 10
  }

  tags = {
    Name = "tf-node-1"
  }
}
Review.
terraform plan
For this step, we'll just review. We'll pass the userdata next and then we apply.
Bootstrap EC2 with Userdata
We'll install the Docker engine on the EC2 instance using the userdata. To start with, let's first create the userdata script.
cat > userdata.tpl

#!/bin/bash
sudo apt-get update -y &&
sudo apt-get install -y \
apt-transport-https \
ca-certificates \
curl \
gnupg-agent \
software-properties-common &&
curl -fsSL https://download.docker.com/linux/ubuntu/gpg | sudo apt-key add - &&
sudo add-apt-repository "deb [arch=amd64] https://download.docker.com/linux/ubuntu $(lsb_release -cs) stable" &&
sudo apt-get update -y &&
sudo sudo apt-get install docker-ce docker-ce-cli containerd.io -y &&
sudo usermod -aG docker ubuntu
Back on our main.tf, add the user_data under the aws_instance resource.
resource "aws_vpc" "tf-vpc" {
  cidr_block           = "10.123.0.0/16"
  enable_dns_hostnames = true
  enable_dns_support   = true

  tags = {
    Name = "tf-vpc-dev"
  }
}

resource "aws_subnet" "tf-public-subnet-1" {
  vpc_id                  = aws_vpc.tf-vpc.id
  cidr_block              = "10.123.1.0/24"
  map_public_ip_on_launch = true
  availability_zone       = "ap-southeast-1a"

  tags = {
    Name = "tf-public-subnet-1"
  }
}

resource "aws_internet_gateway" "tf-igw-1" {
  vpc_id = aws_vpc.tf-vpc.id

  tags = {
    Name = "tf-igw-1"
  }
}

resource "aws_route_table" "tf-rt-table" {
  vpc_id = aws_vpc.tf-vpc.id

  tags = {
    Name = "tf-rt-1-public"
  }
}

resource "aws_route" "tf-rt-route" {
  route_table_id         = aws_route_table.tf-rt-table.id
  destination_cidr_block = "0.0.0.0/0"
  gateway_id             = aws_internet_gateway.tf-igw-1.id
}

resource "aws_route_table_association" "tf-rt-assoc-1" {
  subnet_id      = aws_subnet.tf-public-subnet-1.id
  route_table_id = aws_route_table.tf-rt-table.id
}

resource "aws_security_group" "tf-sg-1" {
  name        = "tf-sg-1"
  description = "Allow inbound traffic"
  vpc_id      = aws_vpc.tf-vpc.id

  ingress {
    from_port   = 0
    to_port     = 0
    protocol    = "-1"
    cidr_blocks = ["1.2.3.4/32"]
  }

  egress {
    from_port   = 0
    to_port     = 0
    protocol    = "-1"
    cidr_blocks = ["0.0.0.0/0"]
  }

  tags = {
    Name = "tf-sg-1"
  }
}

resource "aws_key_pair" "tf-keypair" {
  key_name   = "tf-keypair"
  public_key = file("/home/joseeden/.ssh/tf-keypair.pub")
}

resource "aws_instance" "tf-node-1" {
  instance_type          = "t2.micro"
  ami                    = data.aws_ami.tf-ami.id
  key_name               = aws_key_pair.tf-keypair.id
  vpc_security_group_ids = [aws_security_group.tf-sg-1.id]
  subnet_id              = aws_subnet.tf-public-subnet-1.id
  user_data              = file("userdata.tpl")

  root_block_device {
    volume_size = 10
  }

  tags = {
    Name = "tf-node-1"
  }
}
Review.
terraform plan
Once you've reviewed, apply.
terraform apply -auto-approve
Provisioning the EC2 instance and running the userdata script will take a few minutes. Go to the AWS Console and verify that the EC2 instance is in "running" status.

Verify through the CLI.
terraform state list

data.aws_ami.tf-ami
aws_instance.tf-node-1
aws_internet_gateway.tf-igw-1
aws_key_pair.tf-keypair
aws_route.tf-rt-route
aws_route_table.tf-rt-table
aws_route_table_association.tf-rt-assoc-1
aws_security_group.tf-sg-1
aws_subnet.tf-public-subnet-1
aws_vpc.tf-vpc
Next step is to SSH to the newly created instance. You can get the IP from the AWS Console or you can also get it from the CLI.
terraform state list

data.aws_ami.tf-ami
aws_instance.tf-node-1
aws_internet_gateway.tf-igw-1
aws_key_pair.tf-keypair
aws_route.tf-rt-route
aws_route_table.tf-rt-table
aws_route_table_association.tf-rt-assoc-1
aws_security_group.tf-sg-1
aws_subnet.tf-public-subnet-1
aws_vpc.tf-vpc

terraform state aws_instance.tf-node-1

public_ip                            = "18.141.234.50"
Connect to the instance.
ssh -i ~/.ssh/tf-keypair ubuntu@18.141.234.50

ubuntu@ip-10-123-1-62:~docker -v
Docker version 20.10.16, build aa7e414
Create SSH Config Scripts - Templatefile
Search the Remote-SSH extensions in your VSCode.

For Windows machines, we can create a file named ssh-windows.tpl.
add-content -path c:/users/derek/.ssh/config -value @'

Host ${hostname}
  HostName ${hostname}
  User ${user}
  IdentityFile ${identityfile}
'@
Since I'm using WSL, I'll be creating a file named ssh-linux.tpl.
cat << EOF >> /mnt/c/Users/Eden.Jose/.ssh/config

Host ${hostname}
  HostName ${hostname}
  User ${user}
  IdentityFile ${identityfile}
EOF
Configure VSCode with Provisioner
From the Hashicorp documentation on Provisioners:
Provisioners can be used to model specific actions on the local machine or on a remote machine in order to prepare servers or other infrastructure objects for service.
Provisioners as last resort
Provisioners are created as a workaround for some functions that can't be directly represented in Terraform's declarative model. This could include:
- Passing data into virtual machines and other compute resources
- Running configuration management software
- First-class Terraform provider functionality may be available
Having said, it is not recommended to use provisioners on every deployment. Provisioner success and failure will not be reported by the terraform state. If something goes wrong, you can't roll back.
For this part of lab, it's okay to use provisioner since we're only modifying our config file through the local terminal.
Back in our main.tf file, we'll add a provisioner under the aws_instance resource.
resource "aws_vpc" "tf-vpc" {
  cidr_block           = "10.123.0.0/16"
  enable_dns_hostnames = true
  enable_dns_support   = true

  tags = {
    Name = "tf-vpc-dev"
  }
}

resource "aws_subnet" "tf-public-subnet-1" {
  vpc_id                  = aws_vpc.tf-vpc.id
  cidr_block              = "10.123.1.0/24"
  map_public_ip_on_launch = true
  availability_zone       = "ap-southeast-1a"

  tags = {
    Name = "tf-public-subnet-1"
  }
}

resource "aws_internet_gateway" "tf-igw-1" {
  vpc_id = aws_vpc.tf-vpc.id

  tags = {
    Name = "tf-igw-1"
  }
}

resource "aws_route_table" "tf-rt-table" {
  vpc_id = aws_vpc.tf-vpc.id

  tags = {
    Name = "tf-rt-1-public"
  }
}

resource "aws_route" "tf-rt-route" {
  route_table_id         = aws_route_table.tf-rt-table.id
  destination_cidr_block = "0.0.0.0/0"
  gateway_id             = aws_internet_gateway.tf-igw-1.id
}

resource "aws_route_table_association" "tf-rt-assoc-1" {
  subnet_id      = aws_subnet.tf-public-subnet-1.id
  route_table_id = aws_route_table.tf-rt-table.id
}

resource "aws_security_group" "tf-sg-1" {
  name        = "tf-sg-1"
  description = "Allow inbound traffic"
  vpc_id      = aws_vpc.tf-vpc.id

  ingress {
    from_port   = 0
    to_port     = 0
    protocol    = "-1"
    cidr_blocks = ["1.2.3.4/32"]
  }

  egress {
    from_port   = 0
    to_port     = 0
    protocol    = "-1"
    cidr_blocks = ["0.0.0.0/0"]
  }

  tags = {
    Name = "tf-sg-1"
  }
}

resource "aws_key_pair" "tf-keypair" {
  key_name   = "tf-keypair"
  public_key = file("~/.ssh/tf-keypair.pub")
}

resource "aws_instance" "tf-node-1" {
  instance_type          = "t2.micro"
  ami                    = data.aws_ami.tf-ami.id
  key_name               = aws_key_pair.tf-keypair.id
  vpc_security_group_ids = [aws_security_group.tf-sg-1.id]
  subnet_id              = aws_subnet.tf-public-subnet-1.id
  user_data              = file("userdata.tpl")

  provisioner "local-exec" {
    command = templatefile("ssh-linux.tpl", {
      hostname     = self.public_ip,
      user         = "ubuntu",
      identityfile = "~/.ssh/tf-keypair"
    })
    # interpreter = ["Powershell", "-Command"]
    interpreter = ["bash", "-c"]
  }

  root_block_device {
    volume_size = 10
  }

  tags = {
    Name = "tf-node-1"
  }
}
Notice that we used a templatefile function to read the file from a given path. After the provisioner reads the config file, it passes the values onto the file. These values are the:
- IP of the instance
- username to be used for login
- identityfile, which is thee public key
Review.
terraform plan
We can see from the output of the plan command that it didn't introduce any change to the state. This is because Terraform didn't detect anything different.
No changes. Your infrastructure matches the configuration.
To update the EC2 instance, we'll use -replace.
terraform state list

data.aws_ami.tf-ami
aws_instance.tf-node-1
aws_internet_gateway.tf-igw-1
aws_key_pair.tf-keypair
aws_route.tf-rt-route
aws_route_table.tf-rt-table
aws_route_table_association.tf-rt-assoc-1
aws_security_group.tf-sg-1
aws_subnet.tf-public-subnet-1
aws_vpc.tf-vpc
terraform apply -replace aws_instance.tf-node-1 -auto-approve
Once it's finish running, check if the config file is created in your directory.
cat /mnt/c/Users/Eden.Jose/.ssh/config

Host 13.229.78.225
  HostName 13.229.78.225
  User ubuntu
  IdentityFile ~/.ssh/tf-keypair
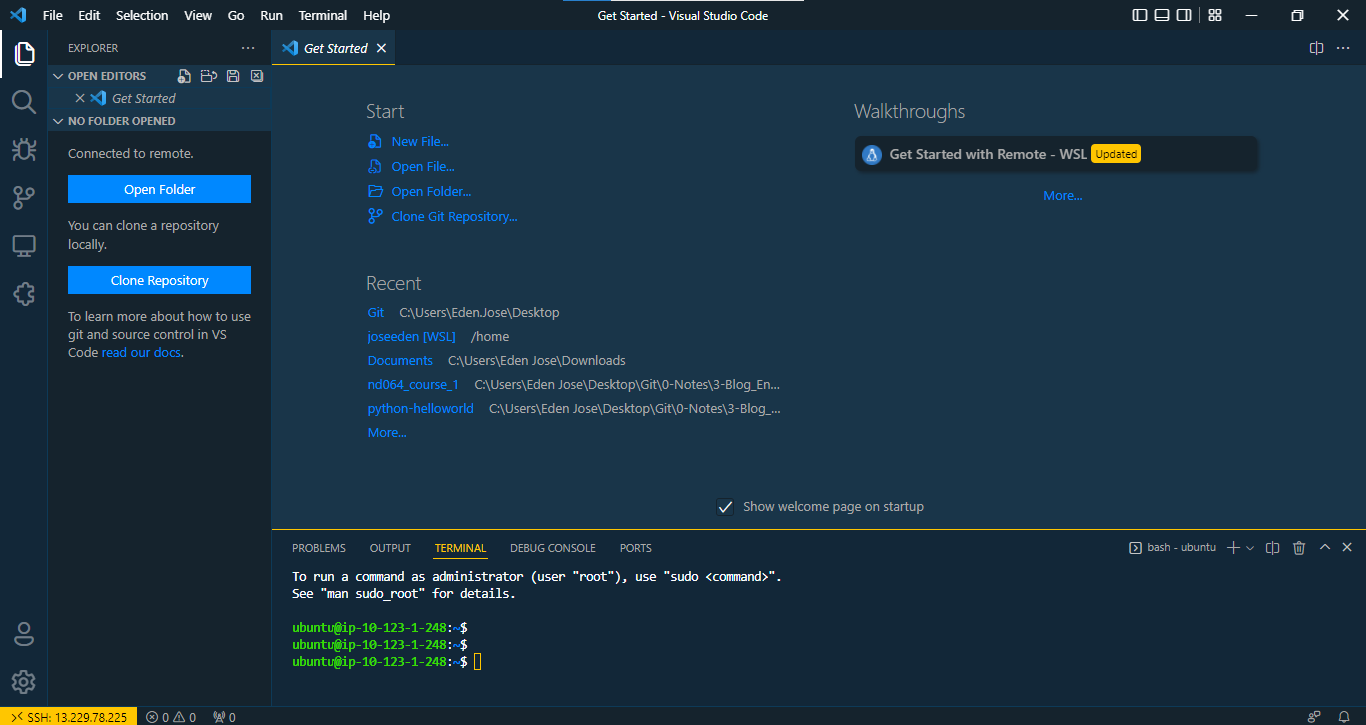
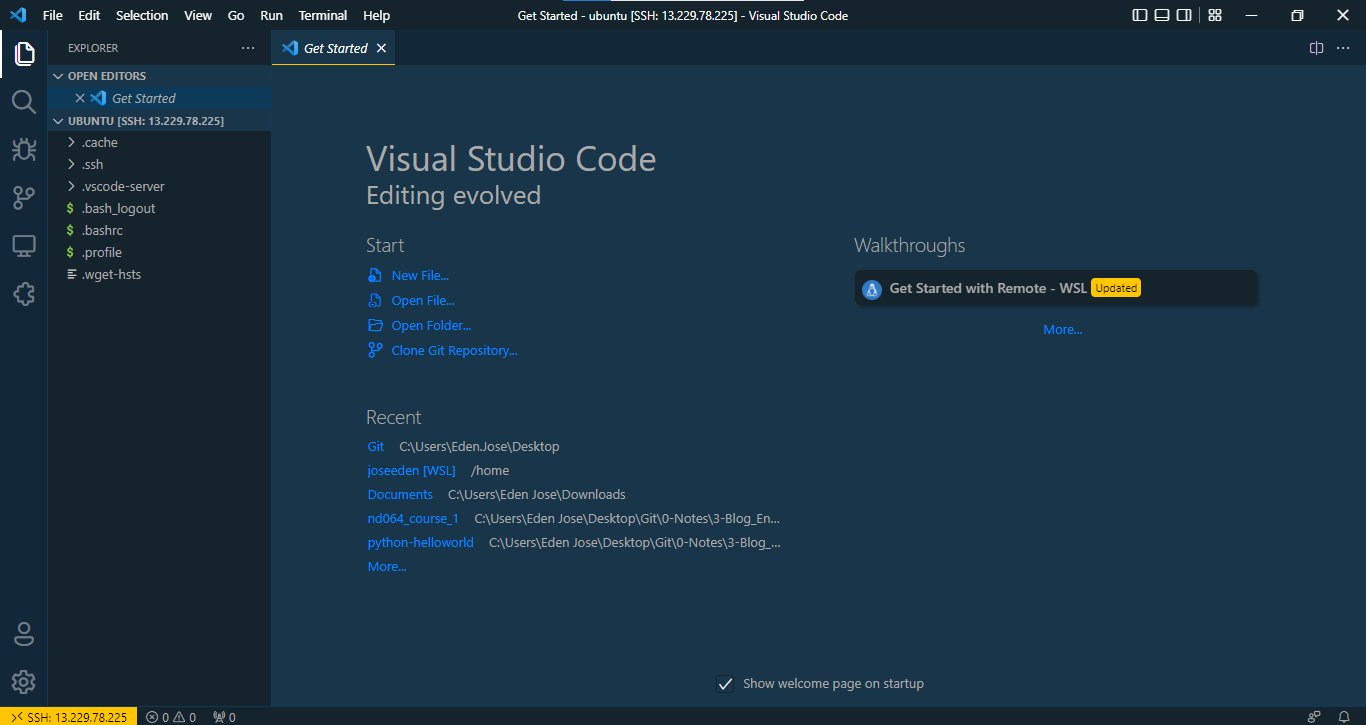
Open Remote-SSH in VSCode. You should see the IP of your instance. When you click the IP, it will open a new VSCode window.
Click View --> Command Palette --> Remote-SSH: Connect to Host

Select Linux, then choose Continue.


On the new VSCode window, open a terminal. You should now see a different prompt.
Click Terminal --> New Terminal
Click the Open Folder on the left panel. Select the home directory and then click Yes. I trust the authors.


Variables and their precedence
From the Hashicorp documentation on Variable Definition Precedence:
Terraform loads variables in the following order, with later sources taking precedence over earlier ones:
- Environment variables
- The terraform.tfvars file, if present.
- The terraform.tfvars.json file, if present.
- Any *.auto.tfvars or *.auto.tfvars.json files, processed in lexical order of their filenames.
- Any -var and -var-file options on the command line, in the order they are provided. (This includes variables set by a Terraform Cloud workspace.)
To check the value of a variable that we currently have, we can use console and then type the variable name. As an example, let's create a variables.tf file.
cat > variables.tf

variables "host_os" {
    type = string
}
Let's now try to check the value of the variable through the CLI by using console. Notice that it will return nothing because we haven't specified a value to the variable yet.
terraform console

> var.host_os
(known after apply)
Let's specify a value to the variable in variables.tf
cat > variables.tf

variable "host_os" {
  type = string
  default = "linux"
Using console again to check the value for the variable,
terraform console

> var.host_os
"linux"
Let's create a new file called terraform.tfvars.
cat > terraform.tfvars

host_os = "windows"
Using console again to check the value for the same variable,
terraform console

> var.host_os
"windows"
Here we can see that terraform gets the value from the terraform.tfvars instead of the variables.tf. This is because the default tfvars takes precedence over tf files.
What if there's multiple tfvars file?
Let's create another.tfvars
cat > another.tfvars

host_os = "debian"
To use this second tfvars file, we have to specify it as a parameter.
terraform console -var-file="another.tfvars"

> var.host_os
"debian"
Finally, we could override these files by specifying the variable through the commandline.
terraform console -var="host_os=unix"

> var.host_os
"unix"
Outputs
From the Hashicorp documentation on outputs:
Output values make information about your infrastructure available on the command line, and can expose information for other Terraform configurations to use. Output values are similar to return values in programming languages.
Let's create outputs.tf and put the value for the instance IP.
cat > outputs.tf

output "tf-node-1-ip" {
  value = aws_instance.tf-node-1.public_ip
}
To apply the change without destroying and recreating the instance,
terraform apply -refresh-only
We can now see the output values "collected".
terraform output

tf-node-1-ip = "13.229.78.225"
Cleanup
To delete all the resources, just run the destroy command.
terraform destroy -auto-approve