Practice Test 01
These labs are based on Sander Van Vugt's O'Reailly course, "Red Hat Certified System Administrator (RHCSA), 3/e"
Lab 01 - Users and Groups
Tasks:
- Set password expiration to 90 days.
- Set password minimum length to 6
- Ensure a new file called "newfile" is created on the user's home directory.
- Create users: ted, robin, barney, mars, lily
- Set password of ted and robin to 'himym'.
- Disable password for lily, mars, and barney.
- Make sure Ted and Robin are in group profs and lily, mars, and barney are in group students.
- Ensure ted is a member of the group 'wheel'
- Verify.
Solution
Start with the settings for new users, for 1 and 2.
$ sudo vim /etc/login.defs

PASS_MAX_DAYS   90
PASS_MIN_DAYS   0
PASS_MIN_LEN    6
PASS_WARN_AGE   7
For 5, create the file in the /etc/skel.
$ sudo touch /etc/skel/newfile
Create users:
$ sudo useradd ted
$ sudo useradd robin
$ sudo useradd barney
$ sudo useradd mars
$ sudo useradd lily
Set password for ted and robin to 'himym'
sudo echo himym | passwd --stdin ted
sudo echo himym | passwd --stdin robin
Disable password for lily, mars, and barney. To disable passwords, we can "lock" them by using the '-l' flag.
passwd -l lily
passwd -l mars
passwd -l barney
Make sure Ted and Robin are in group profs and lily, mars, and barney are in group students. Create the group first.
groupadd profs
groupadd students
Add the users to their approriate groups.
usermod -aG profs ted
usermod -aG profs robin
usermod -aG students lily
usermod -aG students mars
usermod -aG students barney
Verify.
$ id ted
uid=1001(ted) gid=1001(ted) groups=1001(ted),10(wheel),1006(profs)

$ id robin
uid=1002(robin) gid=1002(robin) groups=1002(robin),1006(profs)

$ id lily
uid=1005(lily) gid=1005(lily) groups=1005(lily),1007(students)

$ id mars
uid=1004(mars) gid=1004(mars) groups=1004(mars),1007(students)

$ id barney
uid=1003(barney) gid=1003(barney) groups=1003(barney),1007(students)
Lab 02 - Permissions
Tasks:
- Set others as DENY default permissions to any file that user 'ted' creates.
- We have new directories below. Members of the group should have RW access to their respective directories. Files should also be writable for all members of the group
- /data/profs
- /data/students
- Users can only delete files they have created.
- User Ted as headmaster should be able to delete everything in both /data/profs and /data/students.
- Finally, members of group profs should be able to read all files in /data/students/
Solution
Set user-specific umask 007 for the user 'ted'. This ensures that the User and Group has access to any files that the user creates, but Others don't have access to it.
$ sudo vim /home/ted/.bash_profile

umask 007
Test this.
$ su - ted
$ touch others-cant-access-this.txt
$ ll others-cant-access-this.txt
-rw-rw----. 1 ted ted 0 Mar 12 15:26 others-cant-access-this.txt
Create the new directories.
$ mkdir -p /data/{profs,students}
$ ll /data/
total 0
drwxr-xr-x. 2 root root 6 Mar 12 15:28 profs
drwxr-xr-x. 2 root root 6 Mar 12 15:28 students
Change permissions for the two directories. Note that the sticky bit restricts who can delete files in a directory.
$ sudo chmod 3770 /data/profs
$ sudo chmod 3770 /data/students
$ ll /data
total 0
drwxrws--T. 2 root root 6 Mar 12 15:28 profs
drwxrws--T. 2 root root 6 Mar 12 15:28 students
At this point, the members have RW access to files inside their respective directories. In the next step, we need to grant user 'ted' rights to delete all files inside both directory.
To do this with sticky bit enabled for both directories (recall that the sticky bits only allow members to delete the files that they have created), we need to give user 'Ted' ownership of both directories.
$ sudo chown ted:students /data/students/
$ sudo chown ted:profs /data/profs
$ ll /data/
total 0
drwxrws--T. 2 ted profs    6 Mar 12 15:28 profs
drwxrws--T. 2 ted students 6 Mar 12 15:28 students
Finally, to provide members of the group profs read access to all the files in /data/students, we need configure ACLs.
$ setfacl -m d:g:profs:rx /data/students/
To verify,
$ cd /data/students
$ getfacl .

# file: .
# owner: ted
# group: students
# flags: -st
user::rwx
group::rwx
other::---
default:user::rwx
default:group::rwx
default:group:profs:r-x
default:mask::rwx
default:other::---
Lab 03 - Processes
Tasks:
- Run a background 'dd'job thrice.
- Change the niceness of the first job to "-5". Observe what will happen.
- Still for 'top', send a sigkill 9 to the "top" process.
- Finally, kill all background 'dd' jobs.
Solution
Run the command below, hit Ctrl-z then type bg to run the job in the background.
$ dd if=/dev/zero of=/dev/null
^Z
[1]+  Stopped                 dd if=/dev/zero of=/dev/null

$ bg
[1]+ dd if=/dev/zero of=/dev/null &
To verify that it's running,
$ jobs

[1]+  Running                 dd if=/dev/zero of=/dev/null &
Repeat this two more times.
$ dd if=/dev/zero of=/dev/null
^Z
[2]+  Stopped                 dd if=/dev/zero of=/dev/null

$ bg
[2]+ dd if=/dev/zero of=/dev/null &

$ dd if=/dev/zero of=/dev/null
^Z
[3]+  Stopped                 dd if=/dev/zero of=/dev/null

$ bg
[3]+ dd if=/dev/zero of=/dev/null &
Verify.
$ jobs

[1]   Running                 dd if=/dev/zero of=/dev/null &
[2]-  Running                 dd if=/dev/zero of=/dev/null &
[3]+  Running                 dd if=/dev/zero of=/dev/null &
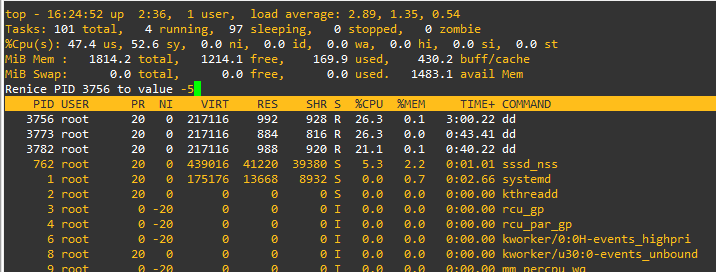
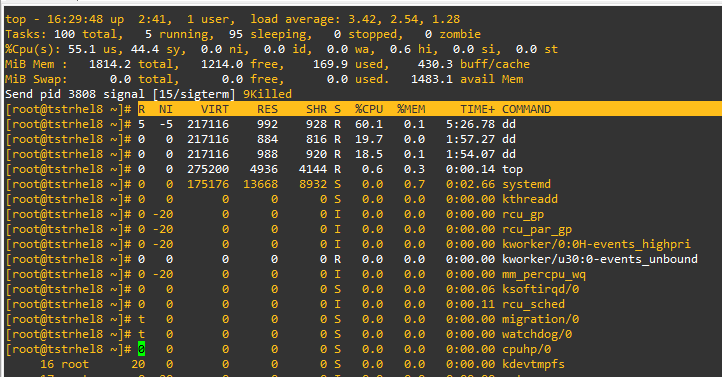
To change the niceness of the first job, run top then hit r to renice the value to "-5".
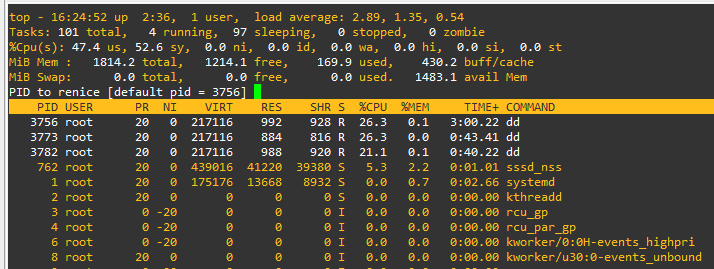
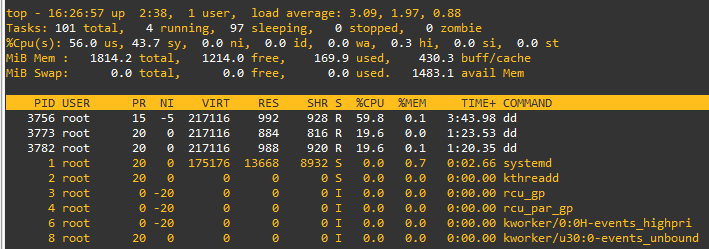
We can now see that the cpu utilization of the first job has increased to 50%.
Still from 'top', send a sigkill signal by pressing 'k' and enter the process ID of 'top' then on the next, enter '9'.
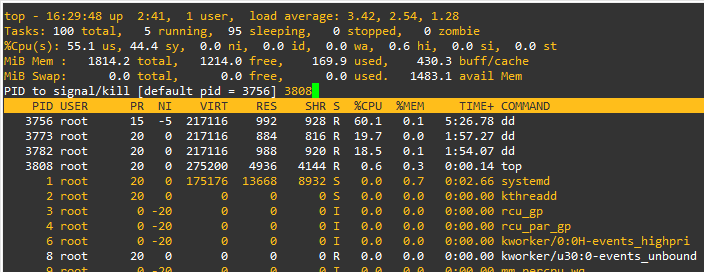
Press enter multiple times. We'll see that the screen didn't immediately cleared.

Finally, kill all background 'dd' jobs.
$ jobs
[1]   Running                 dd if=/dev/zero of=/dev/null &
[2]-  Running                 dd if=/dev/zero of=/dev/null &
[3]+  Running                 dd if=/dev/zero of=/dev/null &

$ killall dd
$ jobs
[1]   Terminated              dd if=/dev/zero of=/dev/null
[2]-  Terminated              dd if=/dev/zero of=/dev/null
[3]+  Terminated              dd if=/dev/zero of=/dev/null
Lab 04 - SSH
Tasks:
- Generate a new RSA key and copy it to the localhost using root.
Solution
Generate the keygen.
$ ssh-keygen
Before we can copy it to the localhost, we must first enable key-based authentication temporarily. Edit the /etc/ssh/sshd_config and add the AllowUsers. Restart sshd afterwards.
$ sudoedit /etc/ssh/sshd_config

AllowUsers root
$ sudo systemctl restart sshd
You should now be able to copy the recently generated RSA key to the localhost.
$ ssh-copy-id localhost
Lab 05 - HTTPD and Systemd
Tasks:
- Install httpd and enable it.
- Configure the service to restart after 5 seconds of being stopped.
Solution
Install and enable httpd.
$ sudo yum install -y httpd
$ sudo systemctl enable --now httpd
$ sudo systemctl status httpd
Configure the service to restart after 5 seconds of being stopped.
$ systemctl edit httpd

[service]
Restart=always
RestartSec=5s
Reload the daemon.
$ systemctl daemon-reload
Enable and restart httpd again. Verify status.
$ sudo systemctl enable --now httpd
$ sudo systemctl status httpd
Kill the httpd service and verify status. The Active line should now show 'activatin' which means systemd is waiting for the 5 seconds timeout before it restarts the service.
$ killall httpd
$ sudo systemctl status httpd

● httpd.service - The Apache HTTP Server
   Loaded: loaded (/usr/lib/systemd/system/httpd.service; enabled; vendor preset: disabled)
  Drop-In: /etc/systemd/system/httpd.service.d
           └─override.conf
   Active: activating (auto-restart) since Sat 2022-03-12 17:02:32 UTC; 1s ago
Lab 06 - Allow HTTP on Firewall
Tasks:
- Ensure firewall is running.
- Configure Firewall to allow http and https. This should persist across reboots.
Solution
Check the firewall.
$ firewall-cmd --list-all
Configure Firewall to allow http. This should persist across reboots.
$ firewall-cmd --add-service={http,https}
$ firewall-cmd --add-service={http,https} --permanent
Verify.
firewall-cmd --list-all
public (active)
  target: default
  icmp-block-inversion: no
  interfaces: eth0
  sources:
  services: cockpit dhcpv6-client http https ssh
  ports:
  protocols:
  forward: no
  masquerade: no
  forward-ports:
  source-ports:
  icmp-blocks:
  rich rules:
Restart firewall and verify again.
$ sudo systemctl restart firewalld.service
$ firewall-cmd --list-all
public (active)
  target: default
  icmp-block-inversion: no
  interfaces: eth0
  sources:
  services: cockpit dhcpv6-client http https ssh
  ports:
  protocols:
  forward: no
  masquerade: no
  forward-ports:
  source-ports:
  icmp-blocks:
  rich rules:
Lab 07 - Configure Logging
Tasks:
- Ensure that systemd journal is stored persistently.
- Journal should be rotated on a monthly basis.
Solution
Ensure that systemd journal is stored persistently. To do this, create first the /var/log/journal directory.
$ mkdir /var/log/journal
Journal should be rotated on a monthly basis. To do this, create a new conf file inside the /etc/logrotate.d.
$ cd /etc/logrotate.d/
$ vim journal

/var/log/journal {
        monthly
        rotate 12
        create
}
Lab 08 - Linux Storage
Tasks:
- Create a primary partition with 1G size
- Still in the same disk, create an extended partition that will use the remaning disk space for the partition.
- Still in the same disk, create 2 more 500M.
- Still in the same disk, create a swap partition. Use the second 500m
- Format partition 1 to EXT4 and mount it to /mount/files.
- Format the first 500M (part of the extended partition) to XFS and mount it to /mount/xfs.
- Mount the swap partition
Solution
I currently have 3 EBS disks (xvdb, xvdc, xvdd) attached to my EC2 instances. We'll be using this for the remainder of the storage labs.
$ lsblk
NAME    MAJ:MIN RM SIZE RO TYPE MOUNTPOINT
xvda    202:0    0  10G  0 disk
├─xvda1 202:1    0   1M  0 part
└─xvda2 202:2    0  10G  0 part /
xvdb    202:16   0  10G  0 disk
xvdc    202:32   0  10G  0 disk
xvdd    202:48   0  10G  0 disk
Create the primary and extended partitions for /dev/xvdb using fdisk. The extended partitions will be shared by the two logical partitions (the two 500M).
[root@tst-rhel ~]# fdisk /dev/xvdb

Welcome to fdisk (util-linux 2.32.1).
Changes will remain in memory only, until you decide to write them.
Be careful before using the write command.


Command (m for help): n
Partition type
   p   primary (0 primary, 0 extended, 4 free)
   e   extended (container for logical partitions)
Select (default p): p
Partition number (1-4, default 1):
First sector (2048-20971519, default 2048):
Last sector, +sectors or +size{K,M,G,T,P} (2048-20971519, default 20971519): +1G

Created a new partition 1 of type 'Linux' and of size 1 GiB.
Command (m for help): n
Partition type
   p   primary (1 primary, 0 extended, 3 free)
   e   extended (container for logical partitions)
Select (default p): e
Partition number (2-4, default 2):
First sector (2099200-20971519, default 2099200):
Last sector, +sectors or +size{K,M,G,T,P} (2099200-20971519, default 20971519):

Created a new partition 2 of type 'Extended' and of size 9 GiB.
Command (m for help): n
All space for primary partitions is in use.
Adding logical partition 5
First sector (2101248-20971519, default 2101248):
Last sector, +sectors or +size{K,M,G,T,P} (2101248-20971519, default 20971519): +500M

Created a new partition 5 of type 'Linux' and of size 500 MiB.

Command (m for help): n
All space for primary partitions is in use.
Adding logical partition 6
First sector (3127296-20971519, default 3127296):
Last sector, +sectors or +size{K,M,G,T,P} (3127296-20971519, default 20971519): +500M

Created a new partition 6 of type 'Linux' and of size 500 MiB.
Command (m for help): p
Disk /dev/xvdb: 10 GiB, 10737418240 bytes, 20971520 sectors
Units: sectors of 1 * 512 = 512 bytes
Sector size (logical/physical): 512 bytes / 512 bytes
I/O size (minimum/optimal): 512 bytes / 512 bytes
Disklabel type: dos
Disk identifier: 0x130c343d

Device     Boot   Start      End  Sectors  Size Id Type
/dev/xvdb1         2048  2099199  2097152    1G 83 Linux
/dev/xvdb2      2099200 20971519 18872320    9G  5 Extended
/dev/xvdb5      2101248  3125247  1024000  500M 83 Linux
/dev/xvdb6      3127296  4151295  1024000  500M 83 Linux
Command (m for help): w
The partition table has been altered.
Calling ioctl() to re-read partition table.
Syncing disks.
$ lsblk

NAME    MAJ:MIN RM  SIZE RO TYPE MOUNTPOINT
xvda    202:0    0   10G  0 disk
├─xvda1 202:1    0    1M  0 part
└─xvda2 202:2    0   10G  0 part /
xvdb    202:16   0   10G  0 disk
├─xvdb1 202:17   0    1G  0 part
├─xvdb2 202:18   0    1K  0 part
├─xvdb5 202:21   0  500M  0 part
└─xvdb6 202:22   0  500M  0 part
xvdc    202:32   0   10G  0 disk
xvdd    202:48   0   10G  0 disk
xvde    202:64   0   10G  0 disk
Create the swap partition. For this one, use the second 500M partition. we have to change the partition type.
[root@tstrhel8 ~]# sudo fdisk /dev/xvdb

Welcome to fdisk (util-linux 2.32.1).
Changes will remain in memory only, until you decide to write them.
Be careful before using the write command.


Command (m for help): m

Help:

  DOS (MBR)
   a   toggle a bootable flag
   b   edit nested BSD disklabel
   c   toggle the dos compatibility flag

  Generic
   d   delete a partition
   F   list free unpartitioned space
   l   list known partition types
   n   add a new partition
   p   print the partition table
   t   change a partition type
   v   verify the partition table
   i   print information about a partition

  Misc
   m   print this menu
   u   change display/entry units
   x   extra functionality (experts only)

  Script
   I   load disk layout from sfdisk script file
   O   dump disk layout to sfdisk script file

  Save & Exit
   w   write table to disk and exit
   q   quit without saving changes

  Create a new label
   g   create a new empty GPT partition table
   G   create a new empty SGI (IRIX) partition table
   o   create a new empty DOS partition table
   s   create a new empty Sun partition table
Command (m for help): t
Partition number (1,2,5,6, default 6):
Hex code (type L to list all codes): L

 0  Empty           24  NEC DOS         81  Minix / old Lin bf  Solaris
 1  FAT12           27  Hidden NTFS Win 82  Linux swap / So c1  DRDOS/sec (FAT-
 2  XENIX root      39  Plan 9          83  Linux           c4  DRDOS/sec (FAT-
 3  XENIX usr       3c  PartitionMagic  84  OS/2 hidden or  c6  DRDOS/sec (FAT-
 4  FAT16 <32M      40  Venix 80286     85  Linux extended  c7  Syrinx
 5  Extended        41  PPC PReP Boot   86  NTFS volume set da  Non-FS data
 6  FAT16           42  SFS             87  NTFS volume set db  CP/M / CTOS / .
 7  HPFS/NTFS/exFAT 4d  QNX4.x          88  Linux plaintext de  Dell Utility
 8  AIX             4e  QNX4.x 2nd part 8e  Linux LVM       df  BootIt
 9  AIX bootable    4f  QNX4.x 3rd part 93  Amoeba          e1  DOS access
 a  OS/2 Boot Manag 50  OnTrack DM      94  Amoeba BBT      e3  DOS R/O
 b  W95 FAT32       51  OnTrack DM6 Aux 9f  BSD/OS          e4  SpeedStor
 c  W95 FAT32 (LBA) 52  CP/M            a0  IBM Thinkpad hi ea  Rufus alignment
 e  W95 FAT16 (LBA) 53  OnTrack DM6 Aux a5  FreeBSD         eb  BeOS fs
 f  W95 Ext'd (LBA) 54  OnTrackDM6      a6  OpenBSD         ee  GPT
10  OPUS            55  EZ-Drive        a7  NeXTSTEP        ef  EFI (FAT-12/16/
11  Hidden FAT12    56  Golden Bow      a8  Darwin UFS      f0  Linux/PA-RISC b
12  Compaq diagnost 5c  Priam Edisk     a9  NetBSD          f1  SpeedStor
14  Hidden FAT16 <3 61  SpeedStor       ab  Darwin boot     f4  SpeedStor
16  Hidden FAT16    63  GNU HURD or Sys af  HFS / HFS+      f2  DOS secondary
17  Hidden HPFS/NTF 64  Novell Netware  b7  BSDI fs         fb  VMware VMFS
18  AST SmartSleep  65  Novell Netware  b8  BSDI swap       fc  VMware VMKCORE
1b  Hidden W95 FAT3 70  DiskSecure Mult bb  Boot Wizard hid fd  Linux raid auto
1c  Hidden W95 FAT3 75  PC/IX           bc  Acronis FAT32 L fe  LANstep
1e  Hidden W95 FAT1 80  Old Minix       be  Solaris boot    ff  BBT
Hex code (type L to list all codes): 82

Changed type of partition 'Linux' to 'Linux swap / Solaris'.

Command (m for help): p
Disk /dev/xvdb: 10 GiB, 10737418240 bytes, 20971520 sectors
Units: sectors of 1 * 512 = 512 bytes
Sector size (logical/physical): 512 bytes / 512 bytes
I/O size (minimum/optimal): 512 bytes / 512 bytes
Disklabel type: dos
Disk identifier: 0x130c343d

Device     Boot   Start      End  Sectors  Size Id Type
/dev/xvdb1         2048  2099199  2097152    1G 83 Linux
/dev/xvdb2      2099200 20971519 18872320    9G  5 Extended
/dev/xvdb5      2101248  3125247  1024000  500M 83 Linux
/dev/xvdb6      3127296  4151295  1024000  500M 82 Linux swap / Solaris
Format partition 1 to EXT4 and mount it to /mount/files. We must first create the mount points
$ mkdir -p /mount/files
$ mkfs.ext4 /dev/xvdb1

mke2fs 1.45.6 (20-Mar-2020)
Creating filesystem with 262144 4k blocks and 65536 inodes
Filesystem UUID: 7871a560-57cd-4cb9-b17f-59025eed3710
Superblock backups stored on blocks:
        32768, 98304, 163840, 229376

Allocating group tables: done
Writing inode tables: done
Creating journal (8192 blocks): done
Writing superblocks and filesystem accounting information: done
Checking the block IDs, we see that there's a UUID set for partition 1. Copy the UUID.
$ blkid

/dev/xvda2: LABEL="root" UUID="eaa1f38e-de0f-4ed5-a5b5-2fa9db43bb38" BLOCK_SIZE="512" TYPE="xfs" PARTUUID="6264d520-3fb9-423f-8ab8-7a0a8e3d3562"
/dev/xvdb5: PARTUUID="130c343d-05"
/dev/xvda1: PARTUUID="fac7f1fb-3e8d-4137-a512-961de09a5549"
/dev/xvdb1: UUID="b5c219d8-6c8f-49fa-8a2f-3953977afdeb" BLOCK_SIZE="4096" TYPE="ext4" PARTUUID="130c343d-01"
/dev/xvdb6: PARTUUID="130c343d-06"
Edit the /etc/fstab to create an entry for the mountpoint.
$ vim /etc/fstab

# EDEN: Ext4
UUID="b5c219d8-6c8f-49fa-8a2f-3953977afdeb"     /mount/files    ext4    defaults        0 0
Mount the partition.
[root@tstrhel8 ~]# lsblk
NAME    MAJ:MIN RM  SIZE RO TYPE MOUNTPOINT
xvda    202:0    0   10G  0 disk
├─xvda1 202:1    0    1M  0 part
└─xvda2 202:2    0   10G  0 part /
xvdb    202:16   0   10G  0 disk
├─xvdb1 202:17   0    1G  0 part
├─xvdb2 202:18   0    1K  0 part
├─xvdb5 202:21   0  500M  0 part
└─xvdb6 202:22   0  500M  0 part
xvdc    202:32   0   10G  0 disk
xvdd    202:48   0   10G  0 disk
[root@tstrhel8 ~]#
[root@tstrhel8 ~]# mount -a
[root@tstrhel8 ~]# lsblk
NAME    MAJ:MIN RM  SIZE RO TYPE MOUNTPOINT
xvda    202:0    0   10G  0 disk
├─xvda1 202:1    0    1M  0 part
└─xvda2 202:2    0   10G  0 part /
xvdb    202:16   0   10G  0 disk
├─xvdb1 202:17   0    1G  0 part /mount/files
├─xvdb2 202:18   0    1K  0 part
├─xvdb5 202:21   0  500M  0 part
└─xvdb6 202:22   0  500M  0 part
xvdc    202:32   0   10G  0 disk
xvdd    202:48   0   10G  0 disk
$ mount | tail -1

/dev/xvdb1 on /mount/files type ext4 (rw,relatime,seclabel)
From the extended partion, format the first 500M partition to XFS and mount it to /mount/xfs.
[root@tstrhel8 ~]# lsblk -a
NAME    MAJ:MIN RM  SIZE RO TYPE MOUNTPOINT
xvda    202:0    0   10G  0 disk
├─xvda1 202:1    0    1M  0 part
└─xvda2 202:2    0   10G  0 part /
xvdb    202:16   0   10G  0 disk
├─xvdb1 202:17   0    1G  0 part /mount/files
├─xvdb2 202:18   0    1K  0 part
├─xvdb5 202:21   0  500M  0 part
└─xvdb6 202:22   0  500M  0 part
xvdc    202:32   0   10G  0 disk
xvdd    202:48   0   10G  0 disk
[root@tstrhel8 ~]# mkfs.xfs /dev/xvdb5
meta-data=/dev/xvdb5             isize=512    agcount=4, agsize=32000 blks
         =                       sectsz=512   attr=2, projid32bit=1
         =                       crc=1        finobt=1, sparse=1, rmapbt=0
         =                       reflink=1
data     =                       bsize=4096   blocks=128000, imaxpct=25
         =                       sunit=0      swidth=0 blks
naming   =version 2              bsize=4096   ascii-ci=0, ftype=1
log      =internal log           bsize=4096   blocks=1368, version=2
         =                       sectsz=512   sunit=0 blks, lazy-count=1
realtime =none                   extsz=4096   blocks=0, rtextents=0
[root@tstrhel8 ~]# lsblk -f
NAME    FSTYPE LABEL UUID                                 MOUNTPOINT
xvda
├─xvda1
└─xvda2 xfs    root  eaa1f38e-de0f-4ed5-a5b5-2fa9db43bb38 /
xvdb
├─xvdb1 ext4         b5c219d8-6c8f-49fa-8a2f-3953977afdeb /mount/files
├─xvdb2
├─xvdb5 xfs          b6a58c0e-4b73-430d-ae79-5502121900ae
└─xvdb6
xvdc
xvdd
Create the mountpoint for xfs and then create an entry on /etc/fstab.
$ mkdir -p /mount/xfs
$ vim /etc/fstab

# EDEN: XFS
UUID=b6a58c0e-4b73-430d-ae79-5502121900ae       /mount/xfs      xfs     defaults        0       0
Mount the partition.
[root@tstrhel8 ~]# lsblk
NAME MAJ:MIN RM SIZE RO TYPE MOUNTPOINT
xvda 202:0 0 10G 0 disk
├─xvda1 202:1 0 1M 0 part
└��─xvda2 202:2 0 10G 0 part /
xvdb 202:16 0 10G 0 disk
├─xvdb1 202:17 0 1G 0 part /mount/files
├─xvdb2 202:18 0 1K 0 part
├─xvdb5 202:21 0 500M 0 part
└─xvdb6 202:22 0 500M 0 part
xvdc 202:32 0 10G 0 disk
xvdd 202:48 0 10G 0 disk
[root@tstrhel8 ~]# mount -a
[root@tstrhel8 ~]# lsblk
NAME    MAJ:MIN RM  SIZE RO TYPE MOUNTPOINT
xvda    202:0    0   10G  0 disk
├─xvda1 202:1    0    1M  0 part
└─xvda2 202:2    0   10G  0 part /
xvdb    202:16   0   10G  0 disk
├─xvdb1 202:17   0    1G  0 part /mount/files
├─xvdb2 202:18   0    1K  0 part
├─xvdb5 202:21   0  500M  0 part /mount/xfs
└─xvdb6 202:22   0  500M  0 part
xvdc    202:32   0   10G  0 disk
xvdd    202:48   0   10G  0 disk
$ mount | tail -2

/dev/xvdb1 on /mount/files type ext4 (rw,relatime,seclabel)
/dev/xvdb5 on /mount/xfs type xfs (rw,relatime,seclabel,attr2,inode64,logbufs=8,logbsize=32k,noquota)
Mount the swap partition. The partition is already created but we need the setup the swap area. After that, we create the entry on /etc/fstab.
[root@tstrhel8 ~]# mkswap /dev/xvdb6
Setting up swapspace version 1, size = 500 MiB (524283904 bytes)
no label, UUID=244f0bab-c8a2-4321-87a0-af66457822c2
$ vim /etc/fstab

# EDEN: Swap
UUID=244f0bab-c8a2-4321-87a0-af66457822c2       swap            swap    defaults        0       0
For the swap, we need to enable the swap.
[root@tstrhel8 ~]# free -m

              total        used        free      shared  buff/cache   available
Mem:           3729         200        1746          17        1782        3266
Swap:             0           0           0
[root@tstrhel8 ~]# swapon -a
[root@tstrhel8 ~]# free -m

              total        used        free      shared  buff/cache   available
Mem:           3729         200        1746          17        1782        3266
Swap:           499           0         499
[root@tstrhel8 ~]# lsblk
NAME    MAJ:MIN RM  SIZE RO TYPE MOUNTPOINT
xvda    202:0    0   10G  0 disk
├─xvda1 202:1    0    1M  0 part
└─xvda2 202:2    0   10G  0 part /
xvdb    202:16   0   10G  0 disk
├─xvdb1 202:17   0    1G  0 part /mount/files
├─xvdb2 202:18   0    1K  0 part
├─xvdb5 202:21   0  500M  0 part /mount/xfs
└─xvdb6 202:22   0  500M  0 part [SWAP]
xvdc    202:32   0   10G  0 disk
xvdd    202:48   0   10G  0 disk
Now, to ensure everything will persist across reboot, restart the EC2 instance.
$ reboot
[eden@tstrhel8 ~]$ lsblk
NAME    MAJ:MIN RM  SIZE RO TYPE MOUNTPOINT
xvda    202:0    0   10G  0 disk
├─xvda1 202:1    0    1M  0 part
└─xvda2 202:2    0   10G  0 part /
xvdb    202:16   0   10G  0 disk
├─xvdb1 202:17   0    1G  0 part /mount/files
├─xvdb2 202:18   0    1K  0 part
├─xvdb5 202:21   0  500M  0 part /mount/xfs
└─xvdb6 202:22   0  500M  0 part [SWAP]
xvdc    202:32   0   10G  0 disk
xvdd    202:48   0   10G  0 disk
Lab 09 - Advanced Storage
Tasks:
- Create an 1G LVM.
- Create a 10TB Thin-provisioned volume
- Create an 1G encrypted volume.
Solution
From our previous lab, we could use the /dev/xvdc to create the LVM.
[eden@tstrhel8 ~]$ lsblk
NAME    MAJ:MIN RM  SIZE RO TYPE MOUNTPOINT
xvda    202:0    0   10G  0 disk
├─xvda1 202:1    0    1M  0 part
└─xvda2 202:2    0   10G  0 part /
xvdb    202:16   0   10G  0 disk
├─xvdb1 202:17   0    1G  0 part /mount/files
├─xvdb2 202:18   0    1K  0 part
├─xvdb5 202:21   0  500M  0 part /mount/xfs
└─xvdb6 202:22   0  500M  0 part [SWAP]
xvdc    202:32   0   10G  0 disk
xvdd    202:48   0   10G  0 disk
Create a 1G partition for the LVM
[eden@tstrhel8 ~]$ sudo fdisk /dev/xvdc

Welcome to fdisk (util-linux 2.32.1).
Changes will remain in memory only, until you decide to write them.
Be careful before using the write command.

Command (m for help): n
Partition type
   p   primary (0 primary, 0 extended, 4 free)
   e   extended (container for logical partitions)
Select (default p):

Using default response p.
Partition number (1-4, default 1):
First sector (2048-20971519, default 2048):
Last sector, +sectors or +size{K,M,G,T,P} (2048-20971519, default 20971519): +1G

Created a new partition 1 of type 'Linux' and of size 1 GiB.
Command (m for help): t
Selected partition 1
Hex code (type L to list all codes): L

 0  Empty           24  NEC DOS         81  Minix / old Lin bf  Solaris
 1  FAT12           27  Hidden NTFS Win 82  Linux swap / So c1  DRDOS/sec (FAT-
 2  XENIX root      39  Plan 9          83  Linux           c4  DRDOS/sec (FAT-
 3  XENIX usr       3c  PartitionMagic  84  OS/2 hidden or  c6  DRDOS/sec (FAT-
 4  FAT16 <32M      40  Venix 80286     85  Linux extended  c7  Syrinx
 5  Extended        41  PPC PReP Boot   86  NTFS volume set da  Non-FS data
 6  FAT16           42  SFS             87  NTFS volume set db  CP/M / CTOS / .
 7  HPFS/NTFS/exFAT 4d  QNX4.x          88  Linux plaintext de  Dell Utility
 8  AIX             4e  QNX4.x 2nd part 8e  Linux LVM       df  BootIt
 9  AIX bootable    4f  QNX4.x 3rd part 93  Amoeba          e1  DOS access
 a  OS/2 Boot Manag 50  OnTrack DM      94  Amoeba BBT      e3  DOS R/O
 b  W95 FAT32       51  OnTrack DM6 Aux 9f  BSD/OS          e4  SpeedStor
 c  W95 FAT32 (LBA) 52  CP/M            a0  IBM Thinkpad hi ea  Rufus alignment
 e  W95 FAT16 (LBA) 53  OnTrack DM6 Aux a5  FreeBSD         eb  BeOS fs
 f  W95 Ext'd (LBA) 54  OnTrackDM6      a6  OpenBSD         ee  GPT
10  OPUS            55  EZ-Drive        a7  NeXTSTEP        ef  EFI (FAT-12/16/
11  Hidden FAT12    56  Golden Bow      a8  Darwin UFS      f0  Linux/PA-RISC b
12  Compaq diagnost 5c  Priam Edisk     a9  NetBSD          f1  SpeedStor
14  Hidden FAT16 <3 61  SpeedStor       ab  Darwin boot     f4  SpeedStor
16  Hidden FAT16    63  GNU HURD or Sys af  HFS / HFS+      f2  DOS secondary
17  Hidden HPFS/NTF 64  Novell Netware  b7  BSDI fs         fb  VMware VMFS
18  AST SmartSleep  65  Novell Netware  b8  BSDI swap       fc  VMware VMKCORE
1b  Hidden W95 FAT3 70  DiskSecure Mult bb  Boot Wizard hid fd  Linux raid auto
1c  Hidden W95 FAT3 75  PC/IX           bc  Acronis FAT32 L fe  LANstep
1e  Hidden W95 FAT1 80  Old Minix       be  Solaris boot    ff  BBT
Hex code (type L to list all codes): 8e
Changed type of partition 'Linux' to 'Linux LVM'.

Command (m for help): w
The partition table has been altered.
Calling ioctl() to re-read partition table.
Syncing disks.
[eden@tstrhel8 ~]$ lsblk
NAME    MAJ:MIN RM  SIZE RO TYPE MOUNTPOINT
xvda    202:0    0   10G  0 disk
├─xvda1 202:1    0    1M  0 part
└─xvda2 202:2    0   10G  0 part /
xvdb    202:16   0   10G  0 disk
├─xvdb1 202:17   0    1G  0 part /mount/files
├─xvdb2 202:18   0    1K  0 part
├─xvdb5 202:21   0  500M  0 part /mount/xfs
└─xvdb6 202:22   0  500M  0 part [SWAP]
xvdc    202:32   0   10G  0 disk
└─xvdc1 202:33   0    1G  0 part
xvdd    202:48   0   10G  0 disk
Create the partition for the encrypted volume.
[root@tstrhel8 ~]# parted /dev/xvdc
(parted) mkpart
Partition type?  primary/extended? primary
File system type?  [ext2]?
Start? 1G
End? 2G
(parted) print
Model: Xen Virtual Block Device (xvd)
Disk /dev/xvdc: 10.7GB
Sector size (logical/physical): 512B/512B
Partition Table: msdos
Disk Flags:

Number  Start   End     Size    Type     File system  Flags
 1      1049kB  1075MB  1074MB  primary               lvm
 2      2000MB  3000MB  1000MB  primary  ext2         lba

(parted) quit
Information: You may need to update /etc/fstab.
[root@tstrhel8 ~]# lsblk
NAME    MAJ:MIN RM  SIZE RO TYPE MOUNTPOINT
xvda    202:0    0   10G  0 disk
├─xvda1 202:1    0    1M  0 part
└─xvda2 202:2    0   10G  0 part /
xvdb    202:16   0   10G  0 disk
├─xvdb1 202:17   0    1G  0 part /mount/files
├─xvdb2 202:18   0    1K  0 part
├─xvdb5 202:21   0  500M  0 part /mount/xfs
└─xvdb6 202:22   0  500M  0 part [SWAP]
xvdc    202:32   0   10G  0 disk
├─xvdc1 202:33   0    1G  0 part
└─xvdc2 202:34   0  954M  0 part
xvdd    202:48   0   10G  0 disk
Create the partition for the VDO.
[root@tstrhel8 ~]# sudo fdisk /dev/xvdc

Welcome to fdisk (util-linux 2.32.1).
Changes will remain in memory only, until you decide to write them.
Be careful before using the write command.


Command (m for help): n
Partition type
   p   primary (2 primary, 0 extended, 2 free)
   e   extended (container for logical partitions)
Select (default p):

Using default response p.
Partition number (3,4, default 3):
First sector (4196352-20971519, default 4196352):
Last sector, +sectors or +size{K,M,G,T,P} (4196352-20971519, default 20971519):

Created a new partition 3 of type 'Linux' and of size 8 GiB.

Command (m for help): w
The partition table has been altered.
Syncing disks.
Create the LVM.
[root@tstrhel8 ~]# vgcreate vgdc /dev/xvdc1
WARNING: dos signature detected on /dev/xvdc1 at offset 510. Wipe it? [y/n]: y
  Wiping dos signature on /dev/xvdc1.
  Physical volume "/dev/xvdc1" successfully created.
  Volume group "vgdc" successfully created
[root@tstrhel8 ~]# lvcreate -l 100%FREE -n lvdc vgdc
WARNING: xfs_external_log signature detected on /dev/vgdc/lvdc at offset 28672. Wipe it? [y/n]: y
  Wiping xfs_external_log signature on /dev/vgdc/lvdc.
  Logical volume "lvdc" created.
Load an XFS filesystem on the LVM.
[root@tstrhel8 ~]# mkfs.xfs /dev/vgdc/lvdc
meta-data=/dev/vgdc/lvdc         isize=512    agcount=4, agsize=65280 blks
         =                       sectsz=512   attr=2, projid32bit=1
         =                       crc=1        finobt=1, sparse=1, rmapbt=0
         =                       reflink=1
data     =                       bsize=4096   blocks=261120, imaxpct=25
         =                       sunit=0      swidth=0 blks
naming   =version 2              bsize=4096   ascii-ci=0, ftype=1
log      =internal log           bsize=4096   blocks=1566, version=2
         =                       sectsz=512   sunit=0 blks, lazy-count=1
realtime =none                   extsz=4096   blocks=0, rtextents=0
Create mountpoint /mount/lvdb and create an entry in /etc/fstab
[root@tstrhel8 ~]# mkdir -p /mount/lvdc
[root@tstrhel8 ~]# vim /etc/fstab

# EDEN: LVM-vgdc-lvdc
/dev/vgdc/lvdc                                  /mount/lvdc     xfs     defaults        0 0
Mount the LVM.
[root@tstrhel8 ~]# lsblk
NAME          MAJ:MIN RM  SIZE RO TYPE MOUNTPOINT
xvda          202:0    0   10G  0 disk
├─xvda1       202:1    0    1M  0 part
└─xvda2       202:2    0   10G  0 part /
xvdb          202:16   0   10G  0 disk
├─xvdb1       202:17   0    1G  0 part /mount/files
├─xvdb2       202:18   0    1K  0 part
├─xvdb5       202:21   0  500M  0 part /mount/xfs
└─xvdb6       202:22   0  500M  0 part [SWAP]
xvdc          202:32   0   10G  0 disk
├─xvdc1       202:33   0    1G  0 part
│ └─vgdc-lvdc 253:0    0 1020M  0 lvm
└─xvdc2       202:34   0    1G  0 part
xvdd          202:48   0   10G  0 disk
[root@tstrhel8 ~]# mount -a
[root@tstrhel8 ~]# lsblk
NAME          MAJ:MIN RM  SIZE RO TYPE MOUNTPOINT
xvda          202:0    0   10G  0 disk
├─xvda1       202:1    0    1M  0 part
└─xvda2       202:2    0   10G  0 part /
xvdb          202:16   0   10G  0 disk
├─xvdb1       202:17   0    1G  0 part /mount/files
├─xvdb2       202:18   0    1K  0 part
├─xvdb5       202:21   0  500M  0 part /mount/xfs
└─xvdb6       202:22   0  500M  0 part [SWAP]
xvdc          202:32   0   10G  0 disk
├─xvdc1       202:33   0    1G  0 part
│ └─vgdc-lvdc 253:0    0 1020M  0 lvm  /mount/lvdc
└─xvdc2       202:34   0    1G  0 part
xvdd          202:48   0   10G  0 disk
Encrpyt other volume (/dev/xvdc2).
yum install -y cryptsetup
[root@tstrhel8 ~]# cryptsetup luksFormat /dev/xvdc2

WARNING!
========
This will overwrite data on /dev/xvdc2 irrevocably.

Are you sure? (Type 'yes' in capital letters): YES
Enter passphrase for /dev/xvdc2:
Verify passphrase:
Open the volume and create a filesystem inside of it.
[root@tstrhel8 ~]# cryptsetup luksOpen /dev/xvdc2 secret
Enter passphrase for /dev/xvdc2:
[root@tstrhel8 ~]#
[root@tstrhel8 ~]# mkfs.xfs /dev/mapper/secret
meta-data=/dev/mapper/secret     isize=512    agcount=4, agsize=64512 blks
         =                       sectsz=512   attr=2, projid32bit=1
         =                       crc=1        finobt=1, sparse=1, rmapbt=0
         =                       reflink=1
data     =                       bsize=4096   blocks=258048, imaxpct=25
         =                       sunit=0      swidth=0 blks
naming   =version 2              bsize=4096   ascii-ci=0, ftype=1
log      =internal log           bsize=4096   blocks=1566, version=2
         =                       sectsz=512   sunit=0 blks, lazy-count=1
realtime =none                   extsz=4096   blocks=0, rtextents=0
Create an entry in /etc/crypttab.
[root@tstrhel8 ~]# vim /etc/crypttab

secret  /dev/xvdc2      none
Create the mountpoint /mount/secret and then create an entry in /etc/fstab.
mkdir -p /mount/secret
# EDEN: Encrypted volume
/dev/mapper/secret                              /mount/secret   xfs     defaults        0 0
Finally, let's create the 10TB thin-provisioned volume. For this one, we'll use VDO.
sudo dnf install kmod-kvdo vdo -y
sudo systemctl enable --now vdo
sudo systemctl status vdo
[eden@tst-rhcsa ~]$ sudo vdo create --name=vdo1 --device=/dev/xvdc3 --vdoLogicalSize=10T

Creating VDO vdo1
      The VDO volume can address 4 GB in 2 data slabs, each 2 GB.
      It can grow to address at most 16 TB of physical storage in 8192 slabs.
      If a larger maximum size might be needed, use bigger slabs.
Starting VDO vdo1
Starting compression on VDO vdo1
VDO instance 0 volume is ready at /dev/mapper/vdo1
Create the filesystem for VDO and use udevadm to process device creation.
[eden@tst-rhcsa ~]$ sudo mkfs.xfs -K /dev/mapper/vdo1
meta-data=/dev/mapper/vdo1       isize=512    agcount=10, agsize=268435455 blks
         =                       sectsz=4096  attr=2, projid32bit=1
         =                       crc=1        finobt=1, sparse=1, rmapbt=0
         =                       reflink=1
data     =                       bsize=4096   blocks=2684354550, imaxpct=5
         =                       sunit=0      swidth=0 blks
naming   =version 2              bsize=4096   ascii-ci=0, ftype=1
log      =internal log           bsize=4096   blocks=521728, version=2
         =                       sectsz=4096  sunit=1 blks, lazy-count=1
realtime =none                   extsz=4096   blocks=0, rtextents=0
[eden@tst-rhcsa ~]$ sudo udevadm settle
Create the mountpoint /mount/vdo and add an entry in /etc/fstab.
[root@tst-rhcsa ~]# mkdir -p /mount/vdo1
[root@tst-rhcsa ~]# vim /etc/fstab

# EDEN: VDO
/dev/mapper/vdo1        /mount/vdo1     xfs     x-systemd.requires=vdo.service  0 0
Mount the VDO partition.
[root@tst-rhcsa ~]# lsblk
NAME          MAJ:MIN RM  SIZE RO TYPE MOUNTPOINT
xvda          202:0    0   10G  0 disk
├─xvda1       202:1    0    1M  0 part
└─xvda2       202:2    0   10G  0 part /
xvdb          202:16   0   10G  0 disk
├─xvdb1       202:17   0    1G  0 part /mount/files
├─xvdb2       202:18   0    1K  0 part
├─xvdb5       202:21   0  500M  0 part /mount/xfs
└─xvdb6       202:22   0  500M  0 part [SWAP]
xvdc          202:32   0   10G  0 disk
├─xvdc1       202:33   0    1G  0 part
│ └─vgdc-lvdc 253:0    0 1020M  0 lvm  /mount/lvdc
└─xvdc2       202:34   0    1G  0 part
└─xvdc3       202:35   0    8G  0 part
  └─vdo1      253:1    0   10T  0 vdo
xvdd          202:48   0   10G  0 disk
[root@tst-rhcsa ~]# mount -a
[root@tst-rhcsa ~]# lsblk
NAME          MAJ:MIN RM  SIZE RO TYPE MOUNTPOINT
xvda          202:0    0   10G  0 disk
├─xvda1       202:1    0    1M  0 part
└─xvda2       202:2    0   10G  0 part /
xvdb          202:16   0   10G  0 disk
├─xvdb1       202:17   0    1G  0 part /mount/files
├─xvdb2       202:18   0    1K  0 part
├─xvdb5       202:21   0  500M  0 part /mount/xfs
└─xvdb6       202:22   0  500M  0 part [SWAP]
xvdc          202:32   0   10G  0 disk
├─xvdc1       202:33   0    1G  0 part
│ └─vgdc-lvdc 253:0    0 1020M  0 lvm  /mount/lvdc
└─xvdc2       202:34   0    1G  0 part
└─xvdc3       202:35   0    8G  0 part
  └─vdo1      253:1    0   10T  0 vdo  /mount/vdo1
xvdd          202:48   0   10G  0 disk
Finally, reboot the machine and check if the changes persist.
reboot
[root@tst-rhcsa ~]# lsblk
NAME          MAJ:MIN RM  SIZE RO TYPE MOUNTPOINT
xvda          202:0    0   10G  0 disk
├─xvda1       202:1    0    1M  0 part
└─xvda2       202:2    0   10G  0 part /
xvdb          202:16   0   10G  0 disk
├─xvdb1       202:17   0    1G  0 part /mount/files
├─xvdb2       202:18   0    1K  0 part
├─xvdb5       202:21   0  500M  0 part /mount/xfs
└─xvdb6       202:22   0  500M  0 part [SWAP]
xvdc          202:32   0   10G  0 disk
├─xvdc1       202:33   0    1G  0 part
│ └─vgdc-lvdc 253:0    0 1020M  0 lvm  /mount/lvdc
└─xvdc2       202:34   0    1G  0 part
└─xvdc3       202:35   0    8G  0 part
  └─vdo1      253:1    0   10T  0 vdo  /mount/vdo1
xvdd          202:48   0   10G  0 disk
Lab 10 - SELinux
Tasks:
- Ensure SELinux is booted in the appropriate way.
Solution
Check if SELinux is set to enforcing
[root@tst-rhcsa ~]# vim /etc/sysconfig/selinux

# This file controls the state of SELinux on the system.
# SELINUX= can take one of these three values:
#     enforcing - SELinux security policy is enforced.
#     permissive - SELinux prints warnings instead of enforcing.
#     disabled - No SELinux policy is loaded.
SELINUX=enforcing
# SELINUXTYPE= can take one of these three values:
#     targeted - Targeted processes are protected,
#     minimum - Modification of targeted policy. Only selected processes are protected.
#     mls - Multi Level Security protection.
SELINUXTYPE=targeted
You can also run,
[root@tst-rhcsa ~]# getenforce
Enforcing
If the /etc directory is not labelled correctly, you may run the command below which will restore the config. If there are no changes, it will not return an output.
[root@tst-rhcsa ~]# restorecon -Rv /etc/

Relabeled /etc/sysconfig/rh-cloud-firstboot from system_u:object_r:etc_runtime_t:s0 to system_u:object_r:etc_t:s0
Relabeled /etc/insights-client/machine-id from unconfined_u:object_r:machineid_t:s0 to unconfined_u:object_r:etc_t:s0