Search as you type
Using match_phrase_prefix
The match_phrase_prefix query helps to match phrases at the prefix level, which allows partial matching in multi-word phrases. It is similar to match_phrase but works on the phrase level to handle prefix matching.
Consider an index of films. We can use match_phrase_prefix to match partial phrases in the title.
Store the Elasticsearch endpoint and credentials in variables:
ELASTIC_ENDPOINT="https://your-elasticsearch-endpoint"
ELASTIC_USER="your-username"
ELASTIC_PW="your-password"
curl -s -u $ELASTIC_USER:$ELASTIC_PW \
-H 'Content-Type: application/json' \
-XGET "$ELASTIC_ENDPOINT:9200/movies/_search?pretty" -d '
{
  "query": {
    "match_phrase_prefix": {
      "title": {
        "query": "the terminator",
        "slop": 10
      }
    }
  }
}' | jq
Search-as-you-type
Search-as-you-type enables real-time, incremental searches as users type. It is optimized for autocomplete and prefix search functionality.
- Fast, partial matching during user input.
- Optimized using special field types like
search_as_you_typein mappings.
Lab: Autocomplete
In this example, we will test the autocomplete search functionality in Elasticsearch.
-
Install
jqUtility to handle JSON output formatting.sudo apt-get install jq -
Download the
movies.jsondataset, which contains movie data that we will import into Elasticsearch. -
Create a Mapping for the
moviesIndex.curl -s -u $ELASTIC_USER:$ELASTIC_PW \
-H 'Content-Type: application/json' \
-XPUT $ELASTIC_ENDPOINT:9200/movies -
Import the Data into Elasticsearch.
curl -s -u $ELASTIC_USER:$ELASTIC_PW \
-H 'Content-Type: application/json' \
-XPUT $ELASTIC_ENDPOINT:9200/_bulk?pretty \
--data-binary @movies.json | jq -
Analyze the Text with a Custom Tokenizer
curl -s -u $ELASTIC_USER:$ELASTIC_PW \
-H 'Content-Type: application/json' \
-XPOST $ELASTIC_ENDPOINT:9200/movies/_analyze?pretty \
-d '{
  "tokenizer" : "standard",
  "filter": [{"type":"edge_ngram", "min_gram": 1, "max_gram": 5}],
  "text" : "Harry"
}' | jq
This command will analyze the text using a tokenizer and apply an "edge ngram" filter. Edge ngrams are useful for autocomplete functionality because they allow partial token matches, which enables a user to type a few characters and see suggestions as they type.
-
Create the
autocompleteindex with search-as-you-type functionality for thetitleandgenrefields.curl -s -u $ELASTIC_USER:$ELASTIC_PW \
-H 'Content-Type: application/json' \
-XPUT $ELASTIC_ENDPOINT:9200/autocomplete \
-d '{
"mappings": {
"properties": {
"title": {
"type": "search_as_you_type"
},
"genre": {
"type": "search_as_you_type"
}
}
}
}' | jqThe
search_as_you_typetype is optimized for autocomplete and provides an efficient way to index text fields that will be used for real-time search. Using this allows Elasticsearch to return search results as the user types.Output:
{
  "acknowledged": true,
  "shards_acknowledged": true,
  "index": "autocomplete"
} -
Reindex Data from
moviestoautocompletefor faster searches.curl -s -u $ELASTIC_USER:$ELASTIC_PW \
-H 'Content-Type: application/json' \
-XPOST $ELASTIC_ENDPOINT:9200/_reindex?pretty -d '
{
"source": {
"index": "movies"
},
"dest": {
"index": "autocomplete"
}
}' | grep "total\|created\|failures"Reindexing the data ensures that we are using the
autocompleteindex, which is optimized for the search-as-you-type functionality.The command should return:
"total" : 50,
"created" : 50,
"failures" : [ ] -
Check the Mappings of the
autocompleteIndex.curl -s -u $ELASTIC_USER:$ELASTIC_PW \
-H 'Content-Type: application/json' \
-XGET "$ELASTIC_ENDPOINT:9200/autocomplete/_mapping?pretty=true" | jqWe can see the mappings confirm the fields
titleandgenreare set tosearch_as_you_type, ensuring that Elasticsearch is optimized for autocomplete.{
"autocomplete": {
"mappings": {
"properties": {
"genre": {
"type": "search_as_you_type",
"doc_values": false,
"max_shingle_size": 3
},
"id": {
"type": "text",
"fields": {
"keyword": {
"type": "keyword",
"ignore_above": 256
}
}
},
"title": {
"type": "search_as_you_type",
"doc_values": false,
"max_shingle_size": 3
},
"year": {
"type": "long"
}
}
}
}
} -
Perform a Search Using the
multi_matchQuerycurl -s -u $ELASTIC_USER:$ELASTIC_PW \
-H 'Content-Type: application/json' \
-XGET $ELASTIC_ENDPOINT:9200/autocomplete/_search?pretty -d'
{
"size": 5,
"query": {
"multi_match": {
"query": "Harry",
"type": "bool_prefix",
"fields": [
"title",
"title._2gram",
"title._3gram",
"title._4gram",
"title._5gram"
]
}
}
}'This will search for titles starting with "Harry" using a
bool_prefixquery. Thebool_prefixquery works well for autocomplete, as it allows partial matches and returns results that begin with the typed string. -
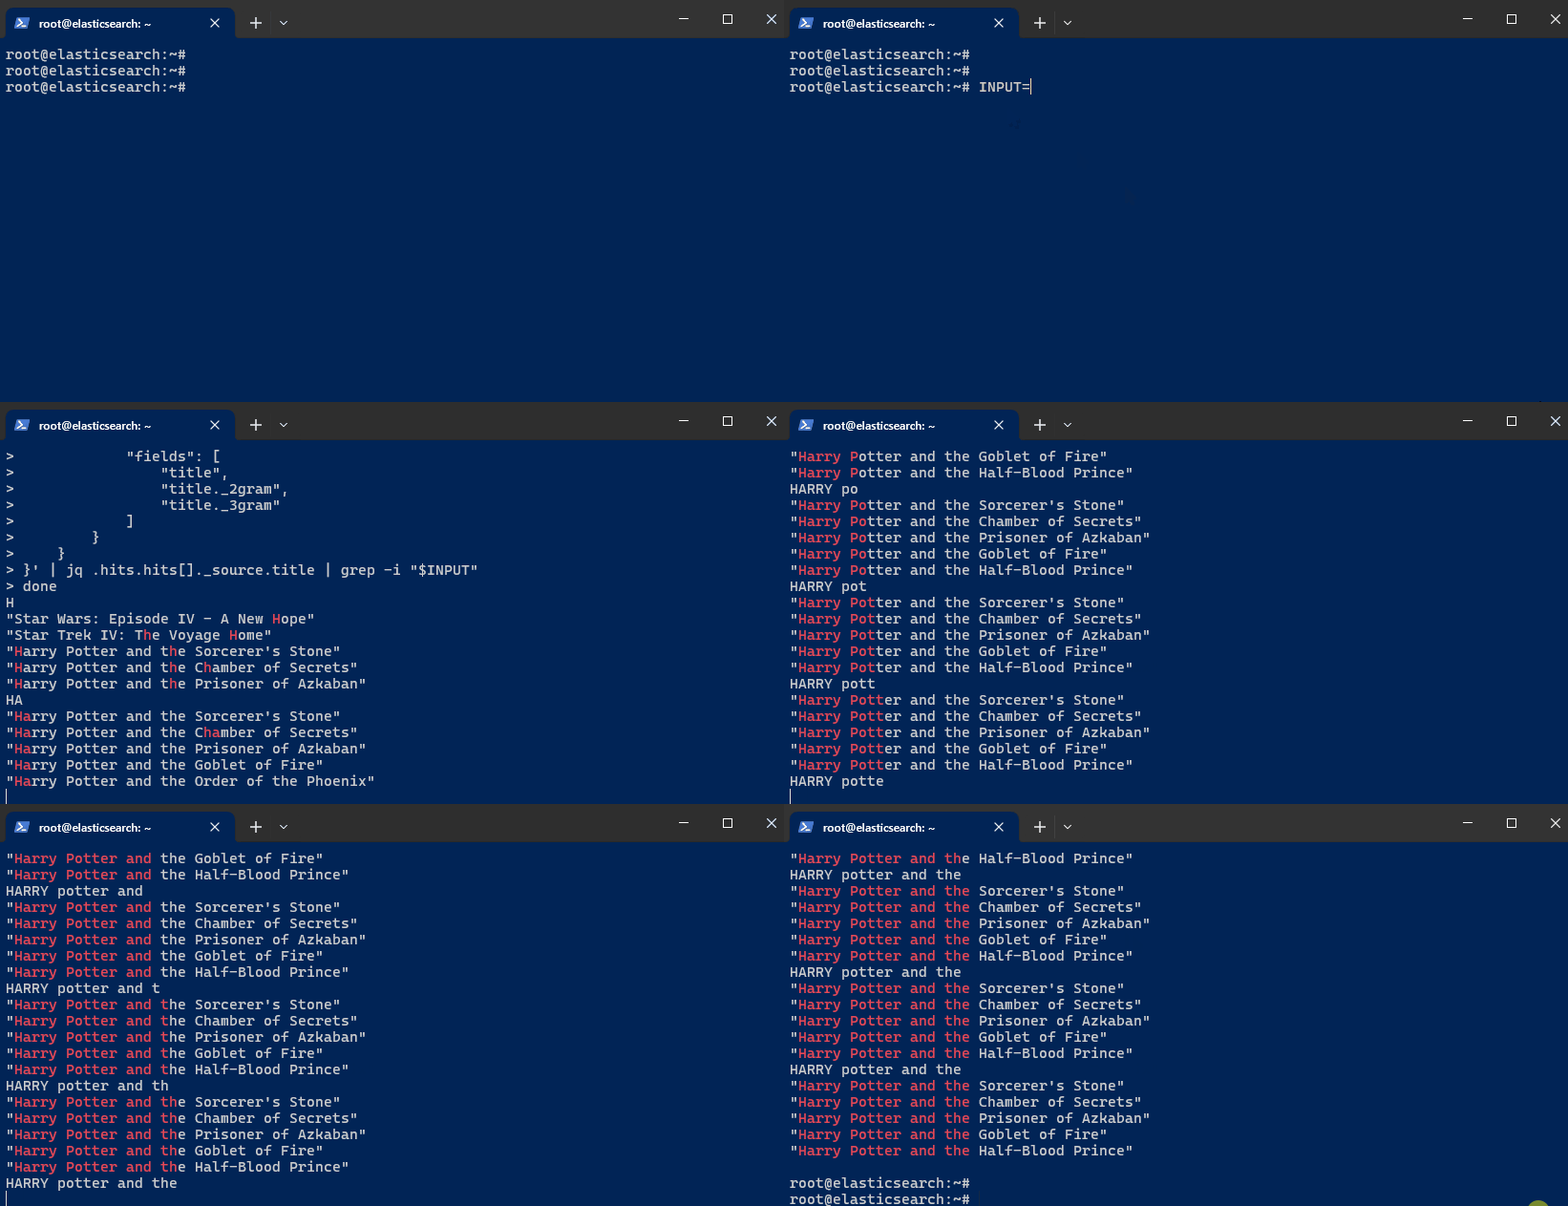
Set Up an Interactive Autocomplete Search. Initialize the
INPUTvariable to hold user input:INPUT='' -
Next, set up an infinite loop to simulate real-time autocomplete searches as you type:
while true
do
IFS= read -rsn1 char
INPUT=$INPUT$char
echo $INPUT
curl -s -u $ELASTIC_USER:$ELASTIC_PW \
-H 'Content-Type: application/json' \
-XGET $ELASTIC_ENDPOINT:9200/autocomplete/_search \
-d '{
    "size": 5,
    "query": {
        "multi_match": {
            "query": "'"$INPUT"'",
            "type": "bool_prefix",
            "fields": [
                "title",
                "title._2gram",
                "title._3gram"
            ]
        }
    }
}' | jq .hits.hits[]._source.title | grep -i "$INPUT"
done
This loop captures each character typed by the user, appends it to the
INPUTvariable, and sends a search query to Elasticsearch. The results are updated in real-time based on the input. -
Begin typing the film title. Keep in mind that the previous steps are set to display only "Harry Potter" films in the autocomplete. To test for other films, modify steps 5 and 9.
