Azure Blob Storage
This is not an exhaustive documentation of all the existing Azure Services. These are summarized notes for the Azure Certifications.
To see the complete documentation, please go to: Azure documentation
Overview
Azure Blob storage is an object storage solution designed for storing massive amounts of unstructured data, including text and binary data.
- Commonly used to host images, documents for web browsing, stream video or audio, store log files, backups, archive data, and data for analysis by on-prem or Azure-hosted processes.
- Objects in Blob storage can be accessed using HTTP or HTTPS.
- Accessible through Azure Storage REST API, Azure PowerShell, Azure CLI, or Azure storage client libraries (Java, PHP, .NET, etc.).
Blob data stands for Binary Large Object data. Blob data and can represent a wide variety of types of data you normally store on your computer including images, videos, and documents.
Key Resources
-
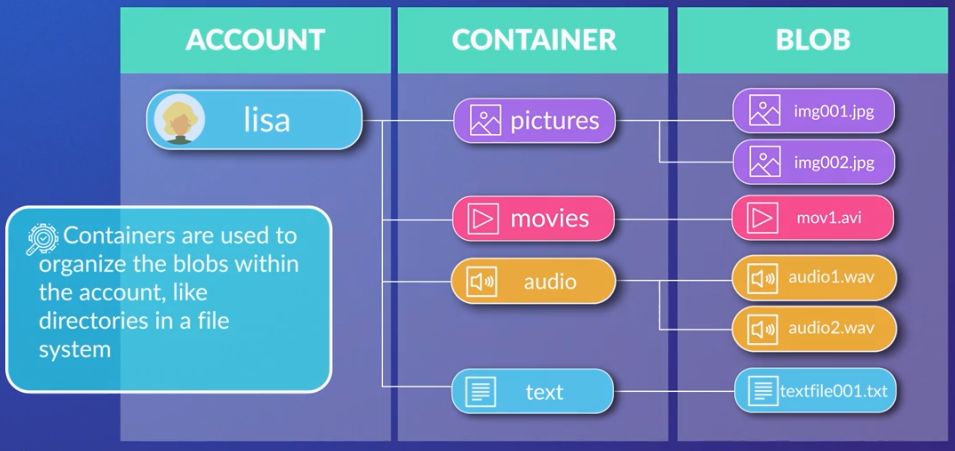
Storage Account
- Creates a unique namespace in Azure for accessing data.
- Forms the base address for objects in the storage account.
- Example URL:
http://mystorage.blob.core.windows.netfor a storage account named MyStorage.
-
Containers
- Used to organize blobs within a storage account, akin to directories in a file system.
- Unlimited containers within a storage account, each capable of storing an unlimited number of blobs.
-
Blob Types
-
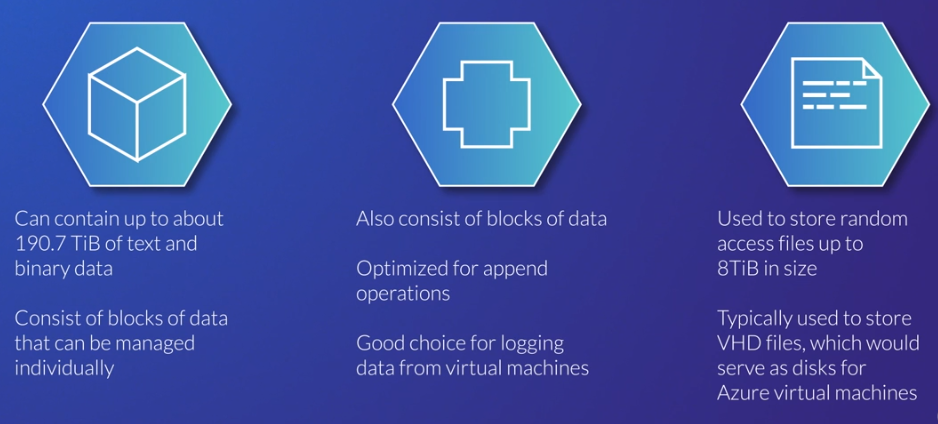
Block Blobs
- Can store up to about 190.7 TiB of text and binary data.
- Consists of manageable blocks of data, hence the name.
-
Append Blobs
- Optimized for append operations.
- Suitable for logging data from virtual machines.
-
Page Blobs
- Used for storing random access files up to 8 TiB.
- Ideal for storing VHD files, serving as disks for Azure virtual machines.
-
Resource Relationship
The storage account, containers, and blobs have a hierarchical relationship, forming a structured organization for your data.
Access Tiers
-
Hot:
- Intended for frequently accessed data.
-
Cool:
- For infrequently-accessed data.
- Optimized for data still needing immediate retrieval.
- Lower storage cost but higher cost for reads and writes.
- Data must be in cool tier for at least 30 days.
-
Archive:
- Cost-effective for rarely accessed data
- Retrieval times of up to 15 hours.
- 5x cheaper than cool tier for storage but much more expensive for reads.
- Data must be in archive tier for at least 180 days.
Blob Storage allows setting a default access tier for the entire storage account and supports individual blob tier configurations.
Azure Data Lake Storage Gen2 provides hierarchical storage on top of Blob Storage for specialized use cases.
From the UI
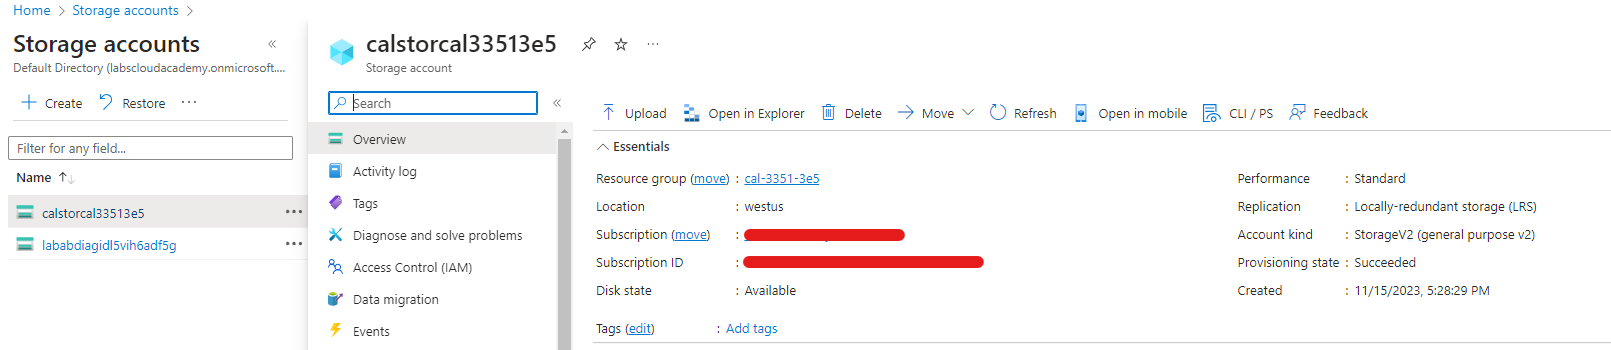
In the example below, we can see the important details in the Overview section of the Storage account.
 |
|---|
-
Disk State
- Indicates that the storage location is Available.
- In the event of an outage in Azure, you may see a different value here.
-
Location
- Determines the locations of primary and secondary storage location.
- This storage account has no secondary storage location, but you can create storage accounts with primary and secondary storage locations.
-
Performance
-
Premium Storage
- Use this when you need guaranteed latency
- Higher storage costs because they use solid-state drives (SSDs)
-
Standard storage
- Uses magnetic spinning hard disk drives (HDDs).
-
-
Replication
-
Sets the durability and availability of the storage.
-
The following options are available:
-
Locally-redundant storage (LRS)
- The cheapest option and stores the data in a single data center.
- If that data center goes offline you will not be able to access the data.
-
Zone-redundant storage (ZRS)
- Stores data across three data centers in a region.
- It can tolerate individual data center outages but not regional outages.
-
Geo-redundant storage (GRS)
- Stores data across multiple data centers in two regions, a primary region and a secondary region.
- This option is more expensive but can tolerate entire regional outages.
-
Read-access geo-redundant storage (RA-GRS)
- Allows you to read from the secondary region compared to GRS which only allows you to access the secondary in the case of a Microsoft-initiated region failover to the secondary.
-
-
-
Account kind
-
General-purpose
- Allow storage of blobs, tables, files, and queues
-
Specialized kinds
- Only allow one type such as only blob storage.
- There are different pricing models for each account kind so a specialized kind may reduce your costs.
- StorageV2 is the recommended default.
-
For more information: Azure Blob Storage Introduction.
Lifecycle Management
Effectively configuring Azure Blob Storage lifecycle management policies is crucial for optimizing costs associated with blob access and storage.
Setting Up Lifecycle Management Policies
-
Scenario
- Optimize costs for monthly reports with varying access patterns over ten years.
-
Portal Setup
- Access the Azure portal, select the storage account, and navigate to "Lifecycle management."
- Create a new rule named "LifecycleForReports."
- Apply the rule to all blobs, specifically "Block blobs."
- Define conditions to move blobs across tiers, example:
- Move to Cool tier after 30 days
- Move to Archive tier after 12 months
- Delete after 10 years
-
Additional Customizations
- Implement filters based on blob names using blob prefix.
- Enable access tracking for last access time-based conditions.
Command Line Configuration
-
JSON File Creation
- Create a JSON file containing the configured rules in the portal.
- The JSON structure includes rule actions and filters.
-
Uploading to Cloud Shell
- In Cloud Shell, upload the JSON file.
- Utilize Azure CLI commands for management policy creation.
-
Command Example
-
Use the command:
az storage account management-policy create --account-name YOUR_ACCOUNT_NAME --policy YOUR_JSON_FILE_NAME --resource-group YOUR_RESOURCE_GROUP_NAME
-
-
Applying Policies
- Execute the command to apply the lifecycle policy to the specified storage account.
- Policies take up to 24 hours to go into effect.