Setting up VirtualBox
Overview
The goal is to set up a minimal system that uses a simple virtual machine with working network access.
- Download minimal iso
- Create virtual machine
- Configure network settings
- Install and verify system
Download And Prepare Files
Get the minimal ISO before starting the VM setup.
- Download ISO image.
- Save file locally
Using the minimal ISO keeps installation fast and simple. Having the file ready locally avoids delays during VM creation and keeps the process smooth.
Reference:
UPDATE: Due to compatibility issues with CentOS Stream 9 and 10 and the many problems encountered during installation, I have switched to using AlmaLinux.
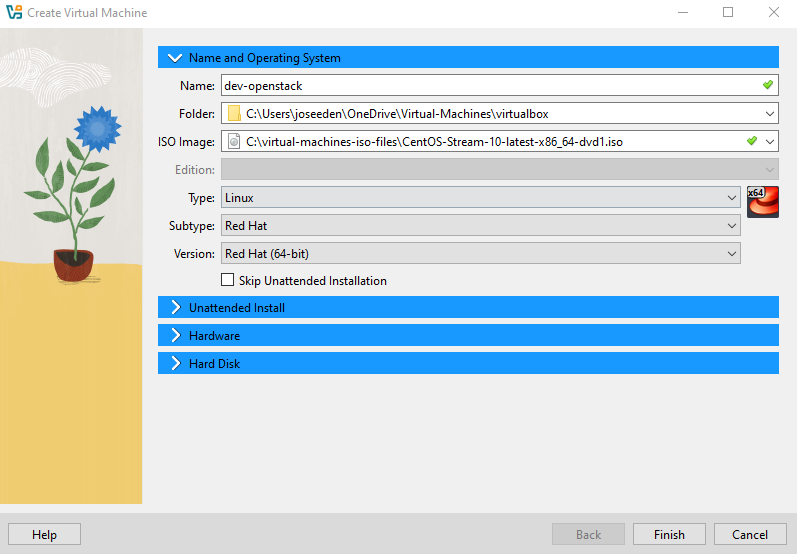
Create the Virtual Machine
Name and Operating System
- Open VirtualBox and click New
- Set the VM name, the VM folder, and the ISO image
UPDATE: Due to compatibility issues with CentOS Stream 9 and 10 and the many problems encountered during installation, I have switched to using AlmaLinux.
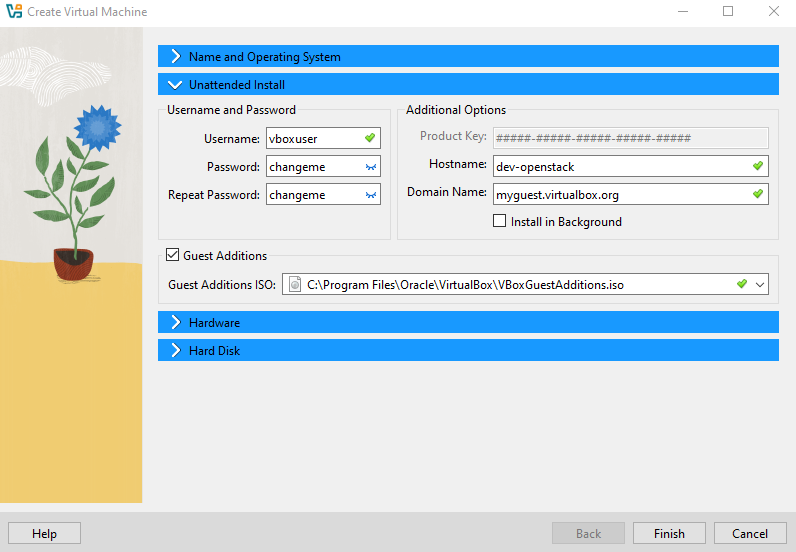
Unattended Install
- Set the username and password
- Enable the Guest Additions
- Select the VBoxGuestAdditions.iso
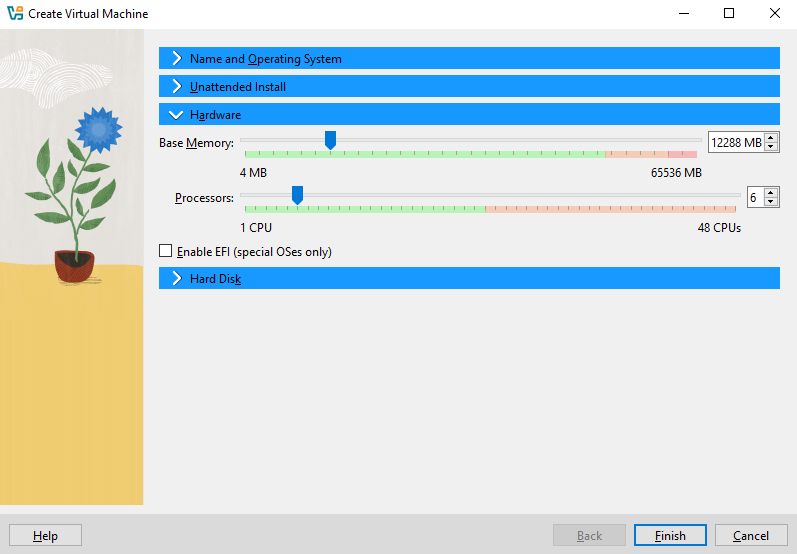
Hardware
The amount of memory you can allocate to your VM depends on how much RAM your host machine has. If your system has limited RAM, you can assign less memory to the VM, but overall performance may be affected.
Below are the recommended VM specifications for single-node OpenStack labs (Packstack) based on different host RAM sizes:
| Host RAM | Recommended VM RAM | vCPU | Disk | Swap |
|---|---|---|---|---|
| 8 GB | 4–6 GB | 2 | 20–30 GB | 2–4 GB |
| 16 GB | 6–8 GB | 2–4 | 30–40 GB | 2–4 GB |
| 32 GB | 8–12 GB | 4–6 | 40–60 GB | 4–6 GB |
| 64 GB | 12–16 GB | 6–8 | 60–80 GB | 4–8 GB |
Notes:
- Base memory in VirtualBox is in MB, e.g. 12 GB = 12288 MB.
- These are for single-node OpenStack labs (Packstack).
- More RAM → smoother install and better performance when running test instances.
- Disk sizes can be adjusted depending on how many OpenStack images/instances you plan to create.
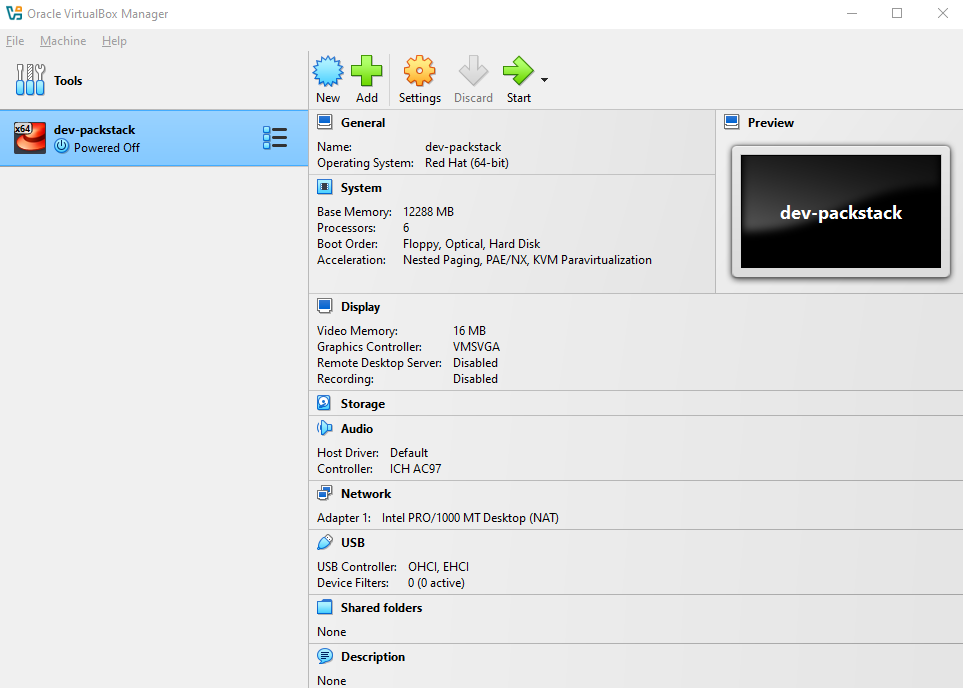
In my case, I allocated 12 GB RAM and 6 vCPU:
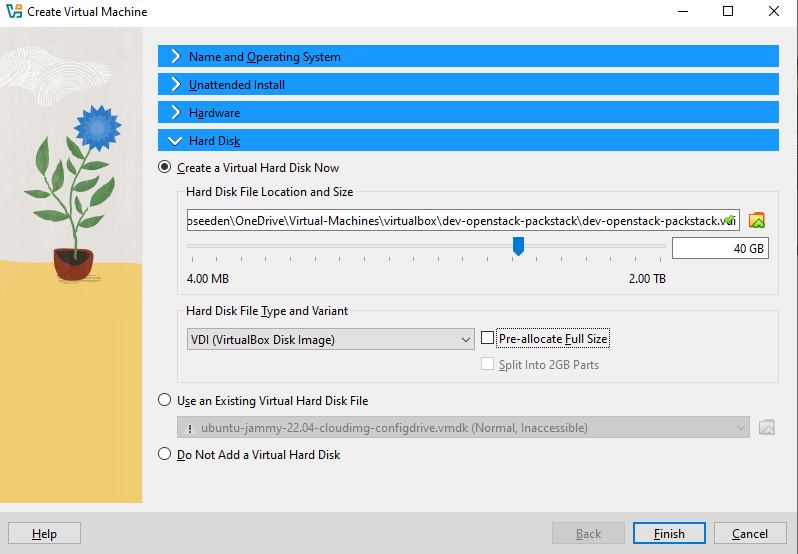
Hard Disk
For the Hard Disk, select Create a Virtual Hard Disk Now.
- The hard disk file location will be auto-selected.
- Set the disk size according to the table above.
- Enable Dynamically allocated (if there is an option)
Note that VirtualBox skips the “dynamically allocated vs fixed” option in some flows if the VM wizard detects certain defaults (sometimes depends on VirtualBox version or OS type).
Not pre-allocating lets VirtualBox grow the disk file as needed (if you wanted to change VM size later)
Once you're okay with the specs, click Finish.
You should now see the new VM created.
It means that CentOS Stream 10 (or CentOS 10) is too new for VirtualBox to recognize for unattended installation. The unattended install feature only supports certain Windows versions and a limited set of Linux distributions.
This does not affect the normal operation of the VM, it only impacts automatic Guest Additions installation.
You can safely ignore this for now and install Guest Additions manually later.
Configure the VM Hardware
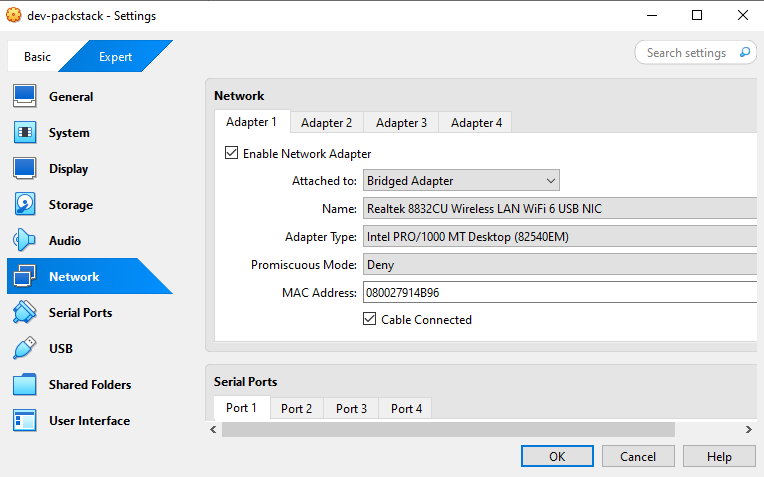
Select the VM and click Settings to configure networking before installation. We need to use two adapters to separate internet access from internal OpenStack lab traffic.
Adapter 1 — Bridged Adapter (Internet Access)
This adapter provides internet access and connects your VM directly to your host machine’s network.
| Setting | Value |
|---|---|
| Network Adapter | Enabled |
| Attached To | Bridged Adapter |
| Promiscuous Mode | Deny (default) |
This provides external connectivity for package installation and updates.
- Used for
yum/dnfinstalls - Keep default NAT settings
- DHCP enabled by default
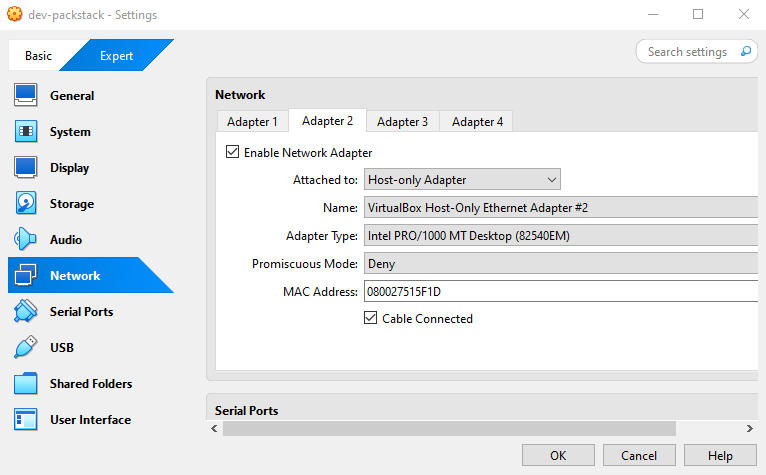
Adapter 2 — Host-Only
This adapter is dedicated to internal OpenStack networking and lab communication.
| Setting | Value |
|---|---|
| Network Adapter | Enabled |
| Attached To | Host-Only Adapter |
| Promiscuous Mode | Deny |
This setup allows the VM and host to communicate internally.
- Used for host ↔ VM communication
- Used for Packstack internal networking and testing
- No internet access required
Notes
- Promiscuous mode not needed for single-node Packstack labs
- NAT + Host-Only keeps internet separate from OpenStack traffic
- Avoid Bridged mode unless external network testing is required
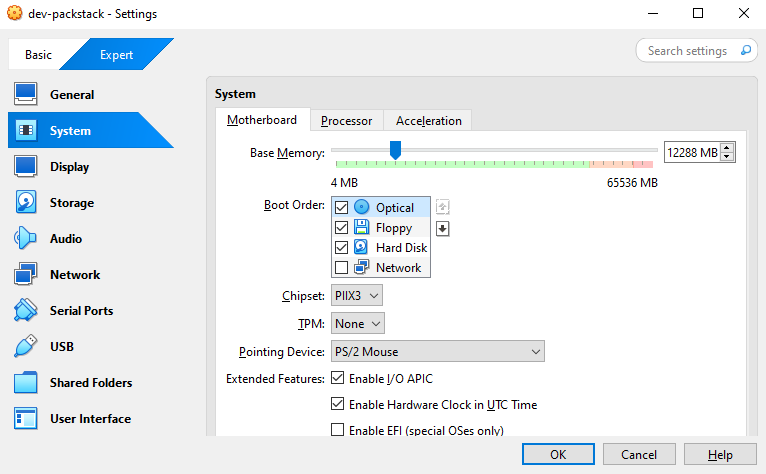
System
Go to System and ensure that Optical is set as the first boot device. You can click the arrow keys beside it to move the device.
Storage
-
In Storage, click the plus button, and choose Optical Drive:
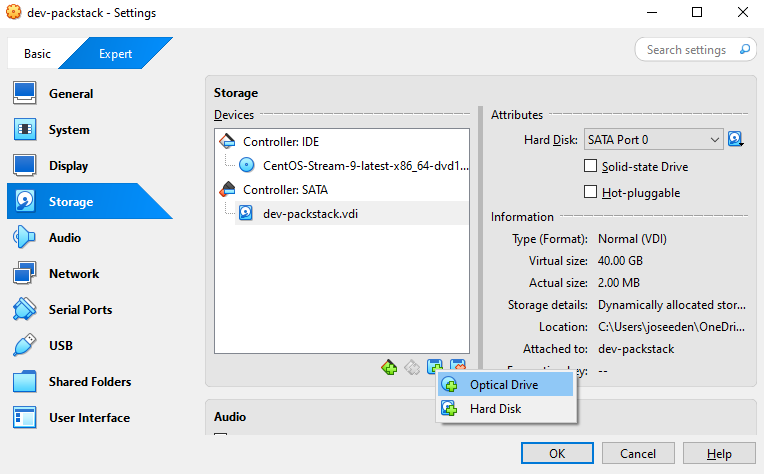
-
Select VBoxGuestAdditions.iso and click Choose.
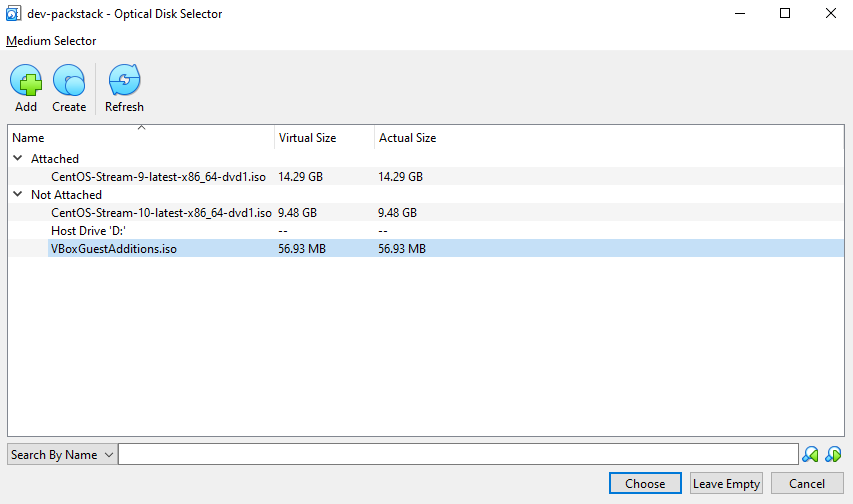
-
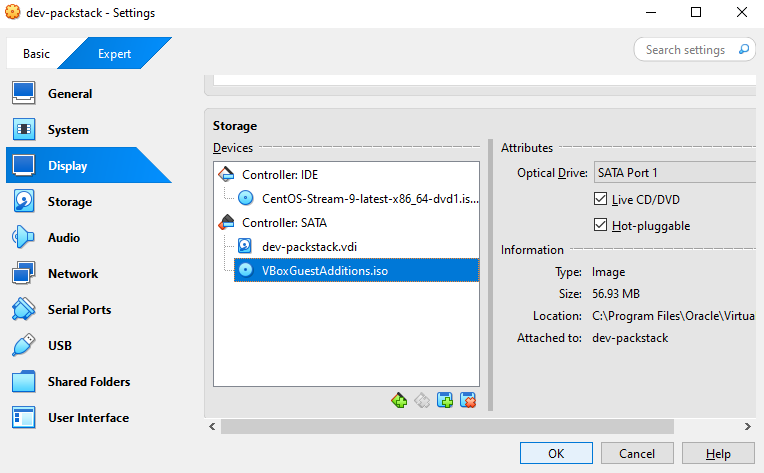
Make sure there are two devices under Controller: SATA.
Enable both options below:
✅ Hot-pluggable ✅ Live CD/DVD
Then click OK.
Launch VM and Install OS
Start the machine and complete the installation using the GUI installer.
Note: If you get a No bootable medium found error, please see Manually Load ISO.
-
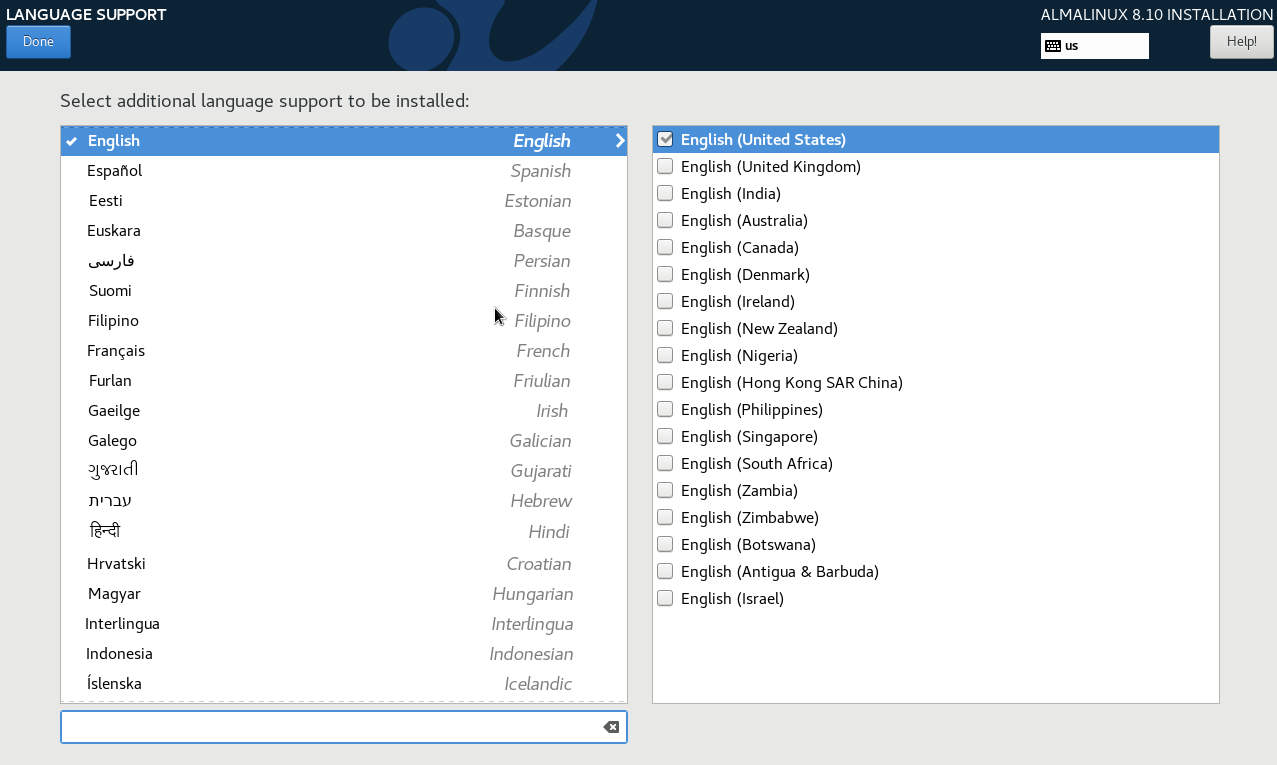
Select a language and click Done.
-
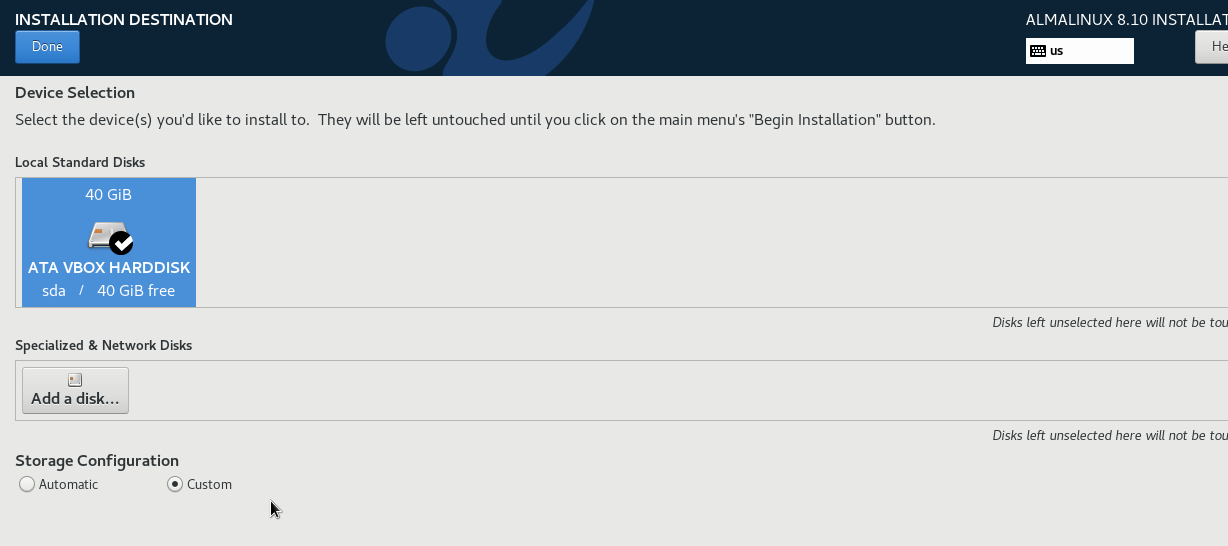
Click Installation Destination
-
Select the ATA VBOX Disk and click Custom, then Done.
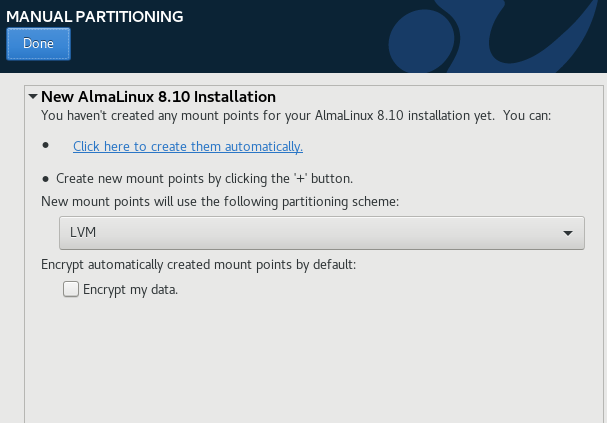
-
In Manual Partitioning -> Click here to create them automatically.
This will show the three partitions that will be created. Click Done.
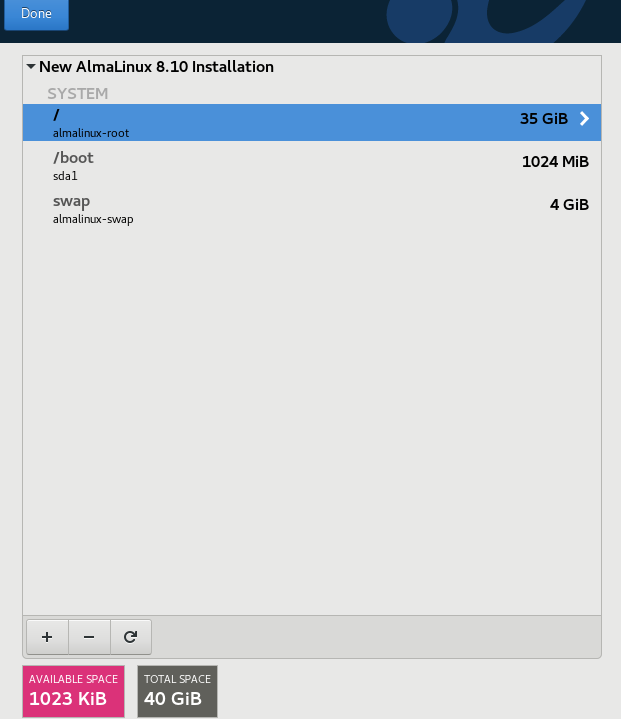
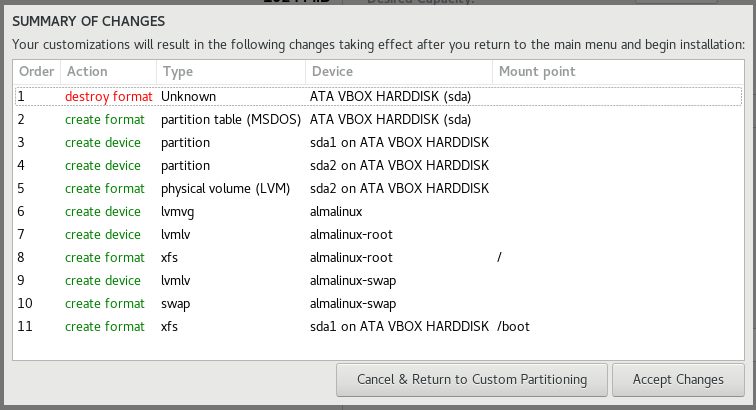
Click Accept changes.
-
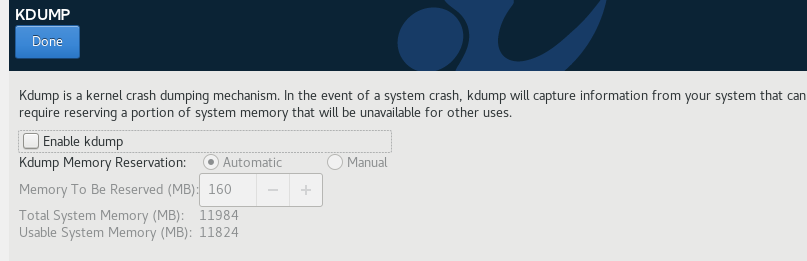
Back in the main menu, click KDUMP.
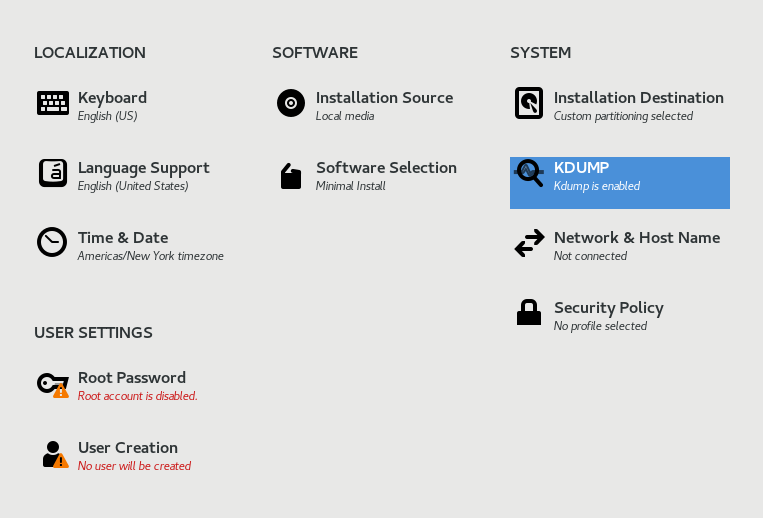
kdump is a kernel mechanism which consume some system memory, which we don't want.
Disable the kdump feature and click Done.
-
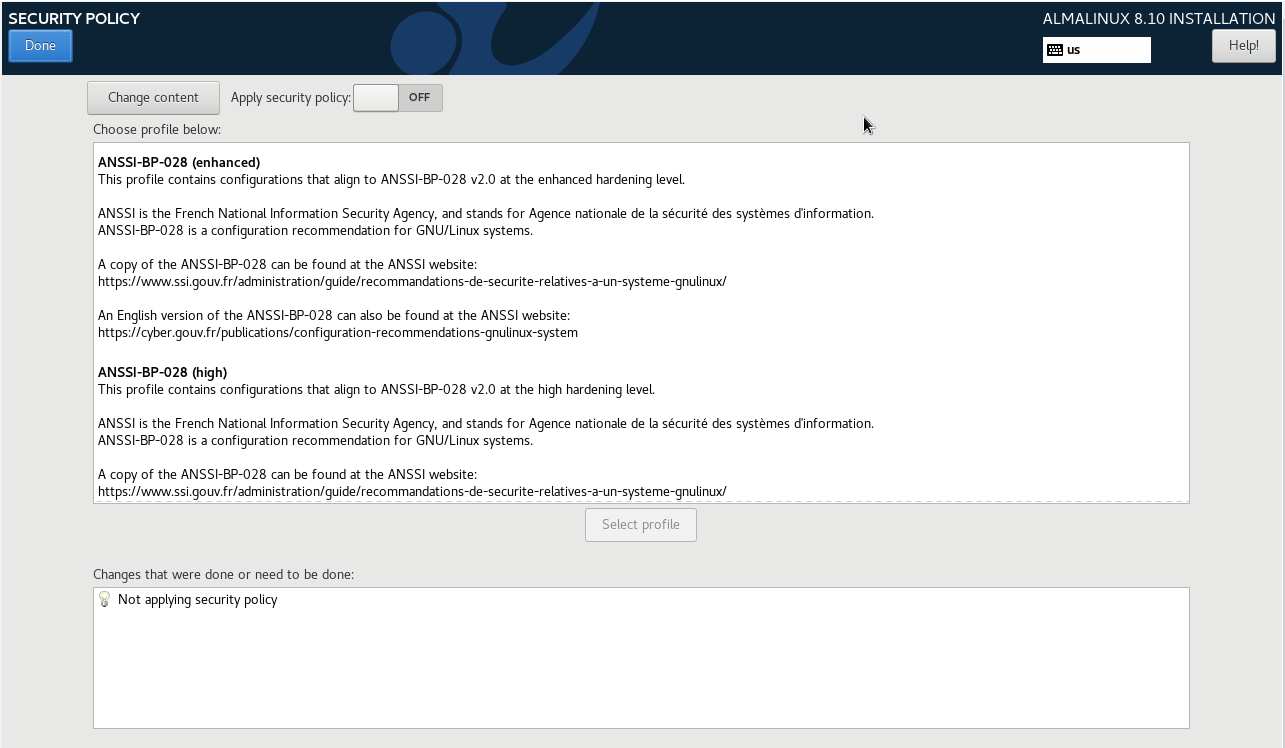
In the main menu, click Security Policy and then disable it for now.
-
Before proceeding to the next step, you need to get the IP of your host machine (not the VM).
Open command prompt and run:
ipconfigThis returns you host network info. For example:
Ethernet adapter Ethernet:

  Connection-specific DNS Suffix  . :
  IPv4 Address. . . . . . . . . . . : 192.168.1.9
  Subnet Mask . . . . . . . . . . . : 255.255.255.0
  Default Gateway . . . . . . . . . : 192.168.1.1

Wireless LAN adapter Wi-Fi:

  Connection-specific DNS Suffix  . :
  IPv4 Address. . . . . . . . . . . : 192.168.1.8
  Subnet Mask . . . . . . . . . . . : 255.255.255.0
  Default Gateway . . . . . . . . . : 192.168.1.1
Since we are using a host-only adapter mode, the VM will need to be assigned a static IP that is in the same range as your host machine.
We'll use this configuration for the VM in the next step:
IP Address: 192.168.1.130   (must be unused)
Subnet:     255.255.255.0
Gateway:    192.168.1.1
DNS: 8.8.8.8 -
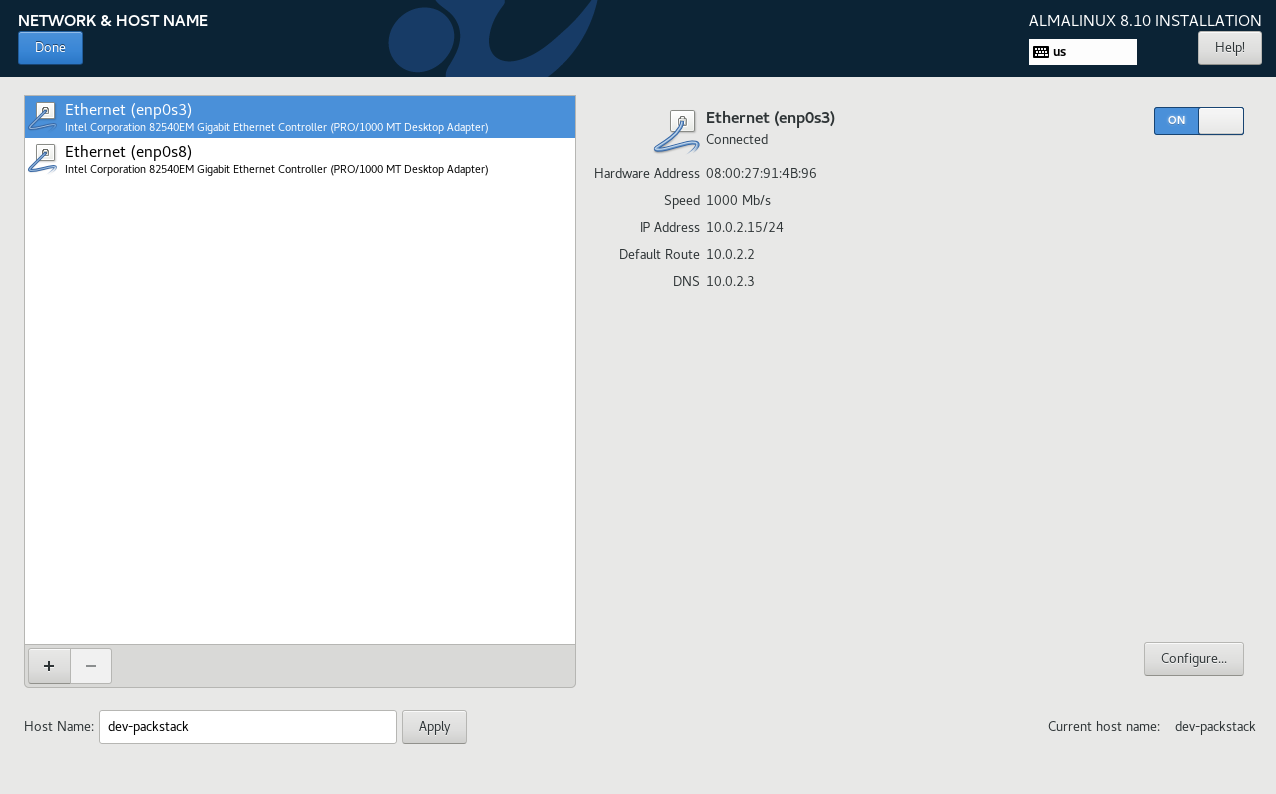
In the main menu, click Network and Hostname. There should be two interface here.
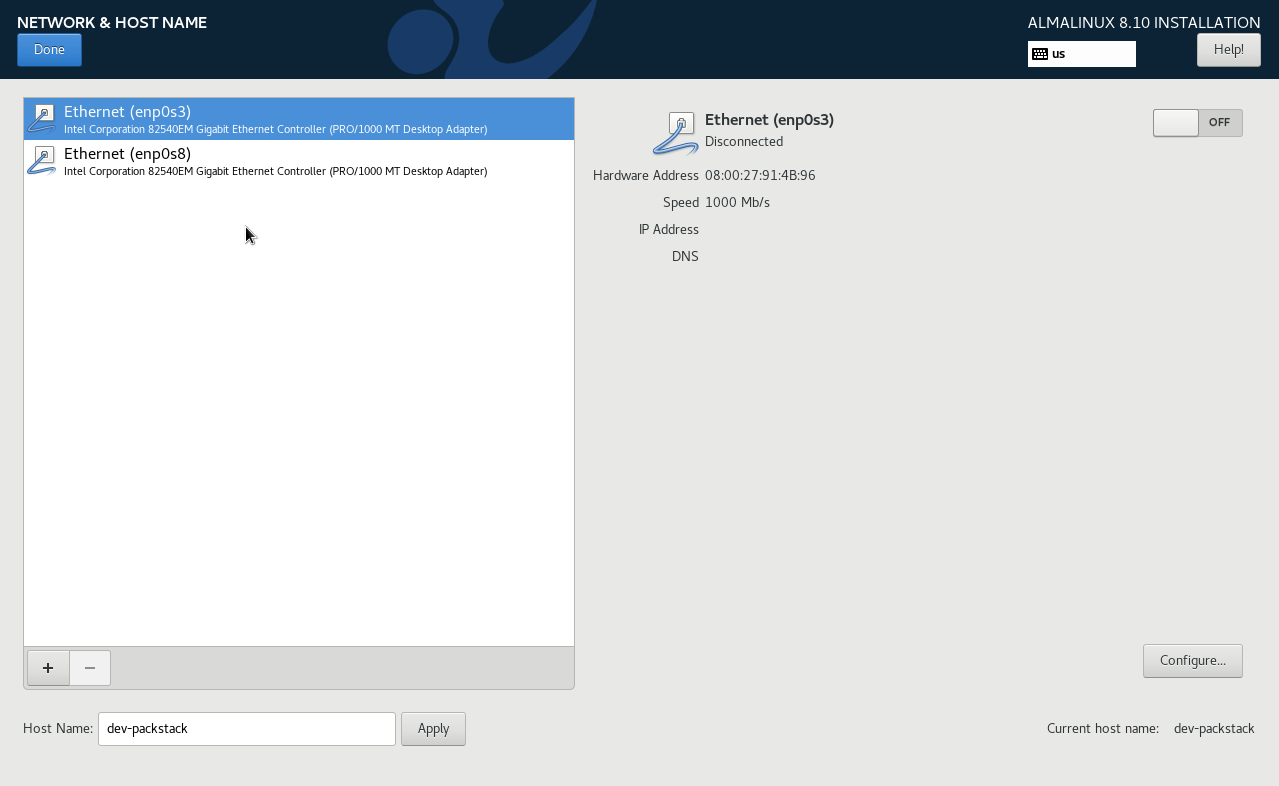
The interfaces:
enp0s3is the first adapter, usually NAT or bridged, used for the main network.enp0s8is the second adapter and can be ignored if not needed.
For a simple lab setup, you only need one active interface to connect the VM to your network. Typically, you use
enp0s3.-
Set the host name > Apply
-
Enable the Ethernet interface (enp0s3) and click Configure
-
For the configuration, we'll use this:
IP Address: 192.168.1.130   (must be unused)
Subnet:     255.255.255.0
Gateway:    192.168.1.1
DNS:         8.8.8.8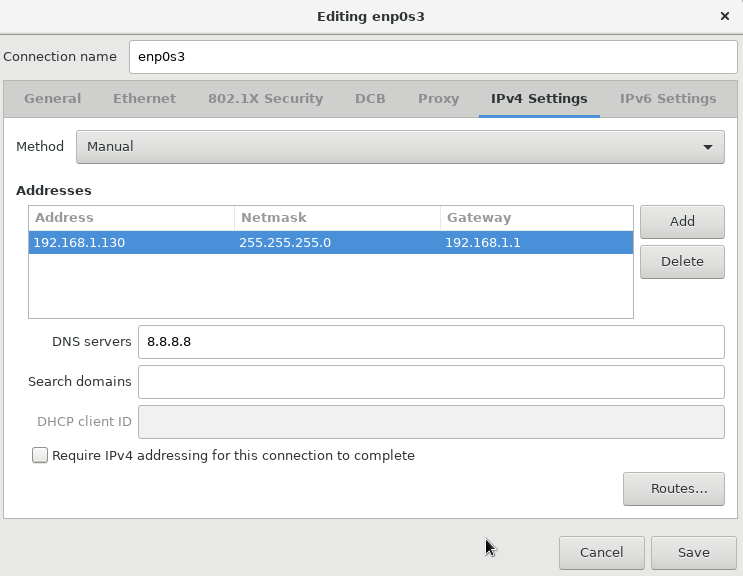
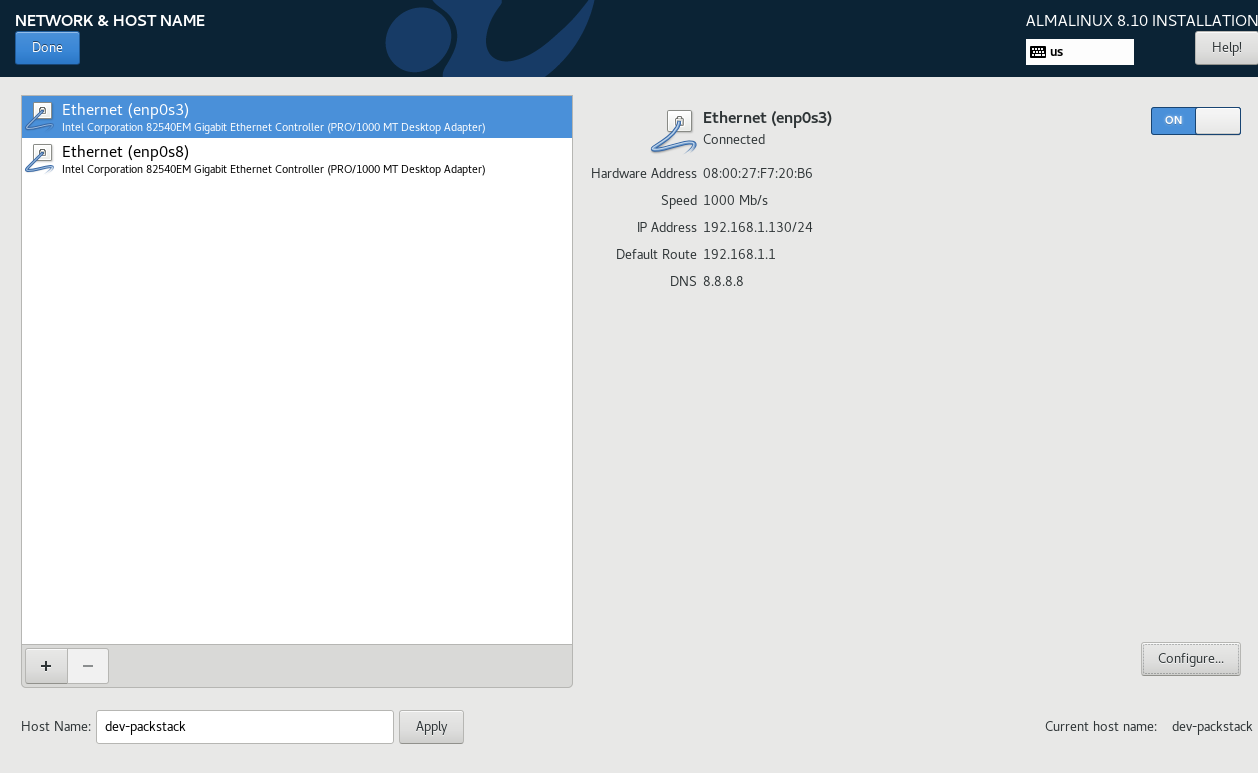
Click Save. The interface should show as Connected with its details displayed.
Click Done.
-
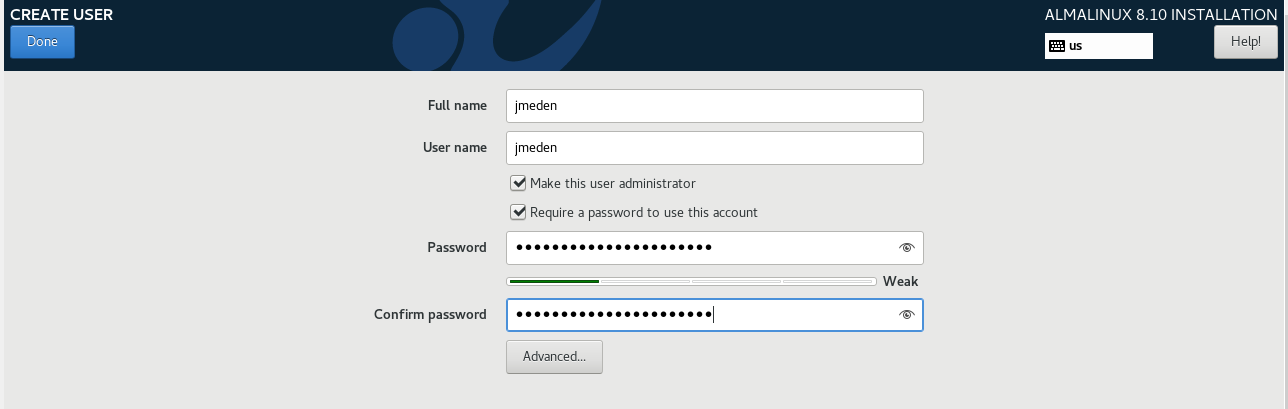
Finally, set the root password and create another user.

Provide a root password and click Done.
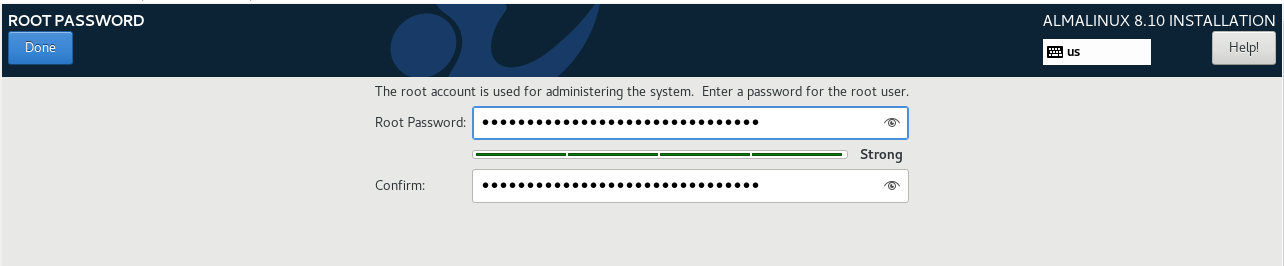
As best practice, create another admin user:
-
Back in the main menu, click Begin Installation
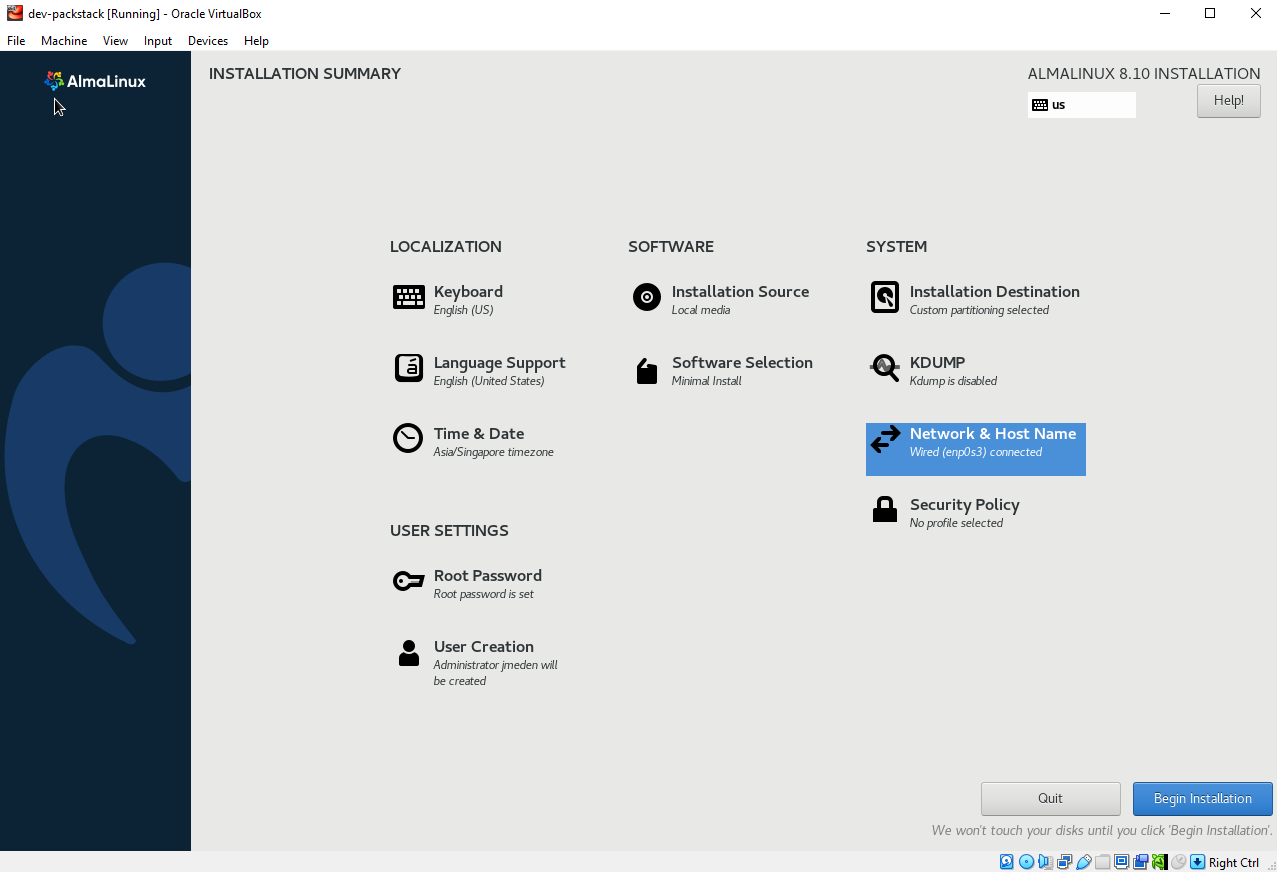
-
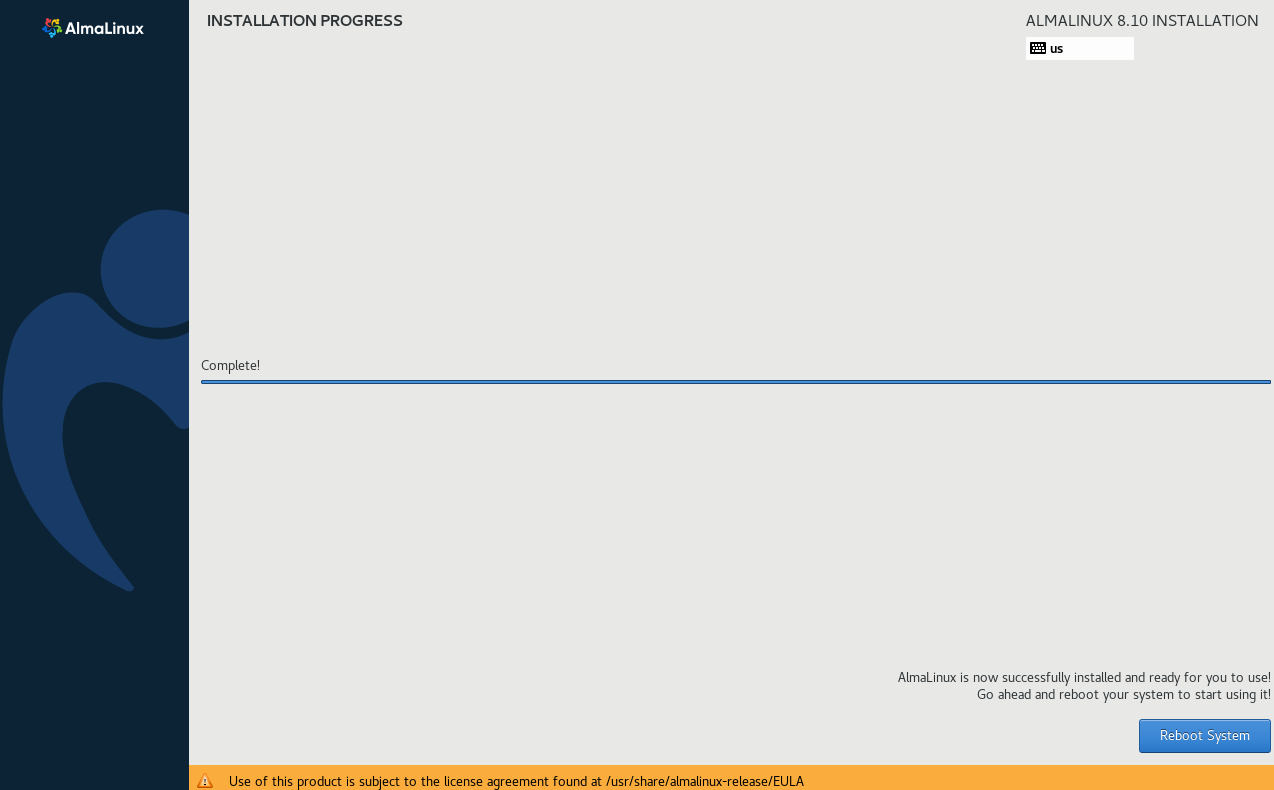
The installation will proceed and may take a few minutes. Once it’s complete, click Reboot System.
Install network-scripts
If you are using AlmaLinux, you may need to install the traditional network-scripts package for this lab. Newer versions typically uses NetworkManager and doesn't include the old network.service.
-
Check your AlmaLinux version:
cat /etc/almalinux-releaseOutput:
AlmaLinux release 8.10 (Cerulean Leopard)The fix depends on the version.
-
If you are using AlmaLinux 8, you can still install the legacy scripts:
sudo dnf install network-scripts -yThen enable:
sudo systemctl enable network
sudo systemctl start network
sudo systemctl status network -
If you are using AlmaLinux 9,
network.serviceis already deprecated.- Red Hat killed legacy network-scripts
- You are expected to use NetworkManager
- Even if you install packages, the traditional service usually won’t exist.
Verify Network Connectivity
-
Log in to the VM as root using the password you set during installation.

-
Check the status for the interface
enp0s3and confirm there's a route to the gateway:ip a show
ip route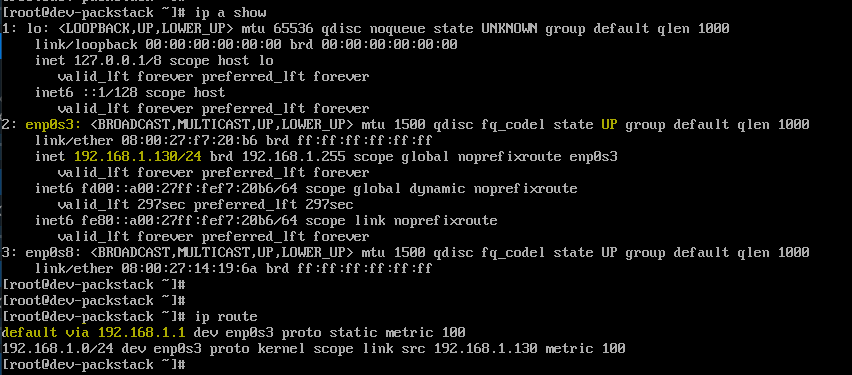
-
Test connectivity to the gateway:
ping -c 3 192.168.1.1
-
Test DNS and internet access:
ping -c 3 8.8.8.8
ping -c 3 www.google.com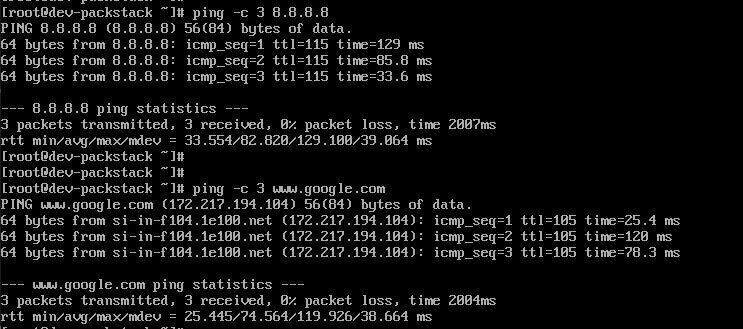
Allow Shared Clipboard
UPDATE: You can only enabled Shared Clipboard and Drag & Drop if your VM has a GUI.
For some minimal ISO installation, it only allows a terminal-based system which doesn't have a desktop environment.
As a workaround, you can connect to the VM via SSH from your host machine.
ssh user@<vm-ip>
Troubleshooting
Reconfigure Interface
If your host machine suddenly changes internet connections, the gateway may change. This can affect the VM if it was previously configured with static network settings or tied to the old adapter.
To fix this, you will need to update the gateway and network configuration.
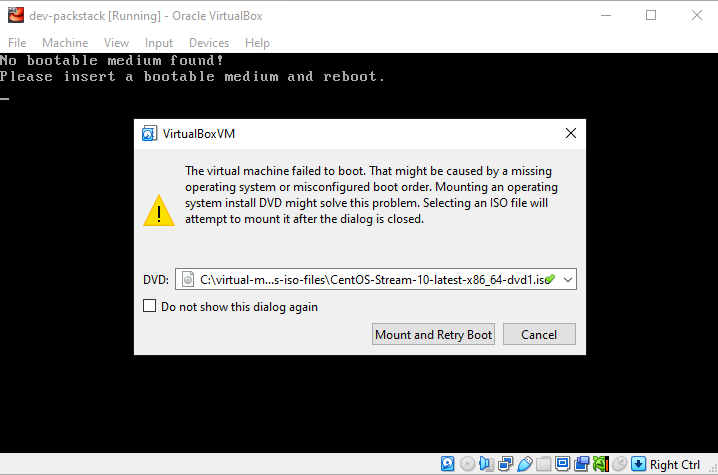
Manually Load ISO
If you get this error when you start the VM for the first time:
The virtual machine failed to boot. That might be caused by a missing operating system or misconfigured boot order. Mounting an operating system install DVD might solve this problem. Selecting an ISO file will attempt to mount it after the dialog is closed.
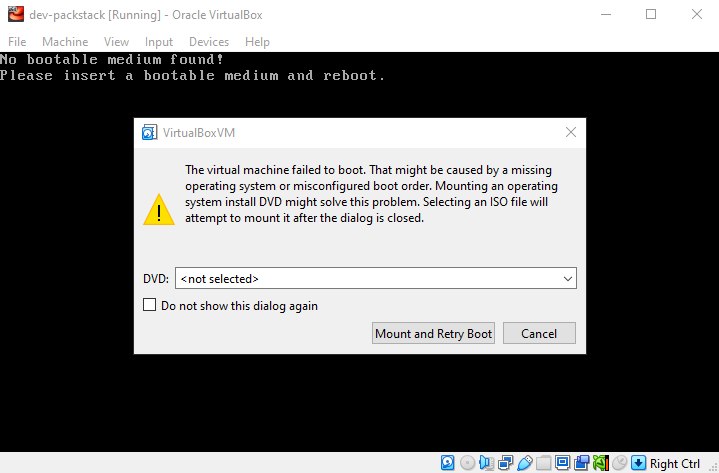
You can try to select the ISO file from the dropdown meny and click Mount and Retry Boot
Choose Install CentOS Stream 10 and click Enter.
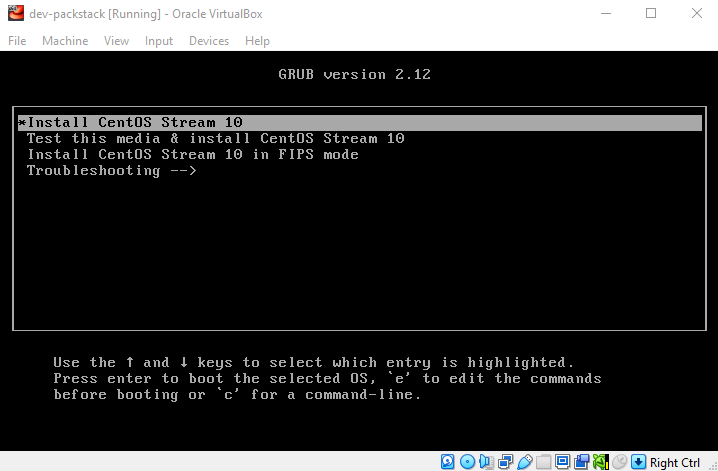
It should go through the bootup process now.
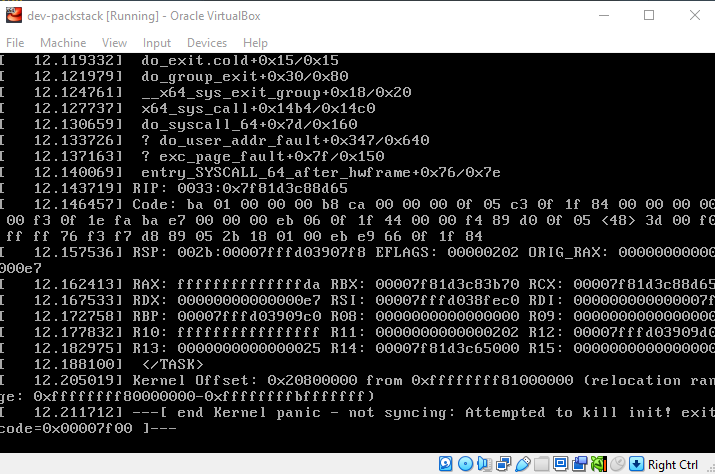
If it shows this error, it means its hitting a kernel panic.
See next section.
[ end Kernel panic - not syncing: Attempted to kill init! exit code=0x00007f00 ] --
Kernel Panic
If you get this error when booting up the VM for the first time, you are hitting a kernel panic.
This usually means the VM tried to boot the kernel from the ISO but something went wrong at the very early stage of the OS startup
[ end Kernel panic - not syncing: Attempted to kill init! exit code=0x00007f00 ] --
Troubleshooting:
-
Make sure the ISO matches the VM architecture: x86_64 (64-bit).
-
Go to Settings → System → Motherboard → Enable EFI (special OSes only).
- This is usually off for CentOS Stream 10.
-
Go to Settings → System → Processor → Enable PAE/NX → enable it.
-
Go to Settings → System → Acceleration → Enable the following:
- VT-x/AMD-V (if its an option)
- Nested Paging
It should boot successfully now.
Warning: deprecated hardware is detected: x86_64-v2
Enabling EFI may change how the CPU is exposed to the guest. The VM is reporting a CPU level (x86-64-v3) that the guest glibc library doesn’t understand, which causes the fatal error.
This is a common issue with Linux kernels on VirtualBox when EFI is enabled unnecessarily.
- EFI is not required for CentOS Stream 10 on VirtualBox.
- When EFI is enabled, VirtualBox exposes advanced CPU features to the guest (x86-64-v2, v3, etc.).
- Some older Linux userspace libraries (
glibc) don’t support these features
To fix this:
-
Disable EFI in VM settings:
Settings → System → Motherboard → Uncheck “Enable EFI (special OSes only)” -
Ensure PAE/NX is enabled:
Settings → System → Processor → Enable PAE/NX -
Boot the VM again from your ISO.
Note that if disable EFI, you may hit the kernel panic issue (again). At this point, the better option would be to use a different ISO. Here are some alternatives:
- CentOS Stream 9
- AlmaLinux 10
- AlmaLinux 8