Troubleshooting
VirtualBox Conflicts with WSL
Reference: How to get VirtualBox 6.0 and WSL working at the same time [closed]
To run off hypervisor:
-
Go to Control Panel > Programs and Features
-
Click Turn Windows features on or off
-
Uncheck the following features:
- Containers
- Hyper-V
-
Check the following features:
- Virtual Machine Platform
- Windows Hypervisor Platform
- Windows Sandbox
-
Open Powershell with elevated privileges (Run as Administrator) then run:
bcdedit /set hypervisorlaunchtype off -
Restart the Computer.
To enable WSL again and disable virtualbox:
-
Run in Powershell:
bcdedit /set hypervisorlaunchtype auto -
Restart the Computer.
Reconfigure Interface
If your host machine suddenly changes internet connections, the gateway may change. This can affect the VM if it was previously configured with static network settings or tied to the old adapter.
To fix this:
-
From your host machine's terminal, check the new gateway and interface being used.
-
Linux / macOS
ip route | grep defaultroute -n -
Windows (PowerShell / CMD)
ipconfiginfoDo not check the host machine's configuration from WSL since WSL uses a virtual network interface that may not reflect the actual host network configuration.
Better to check from Powershell or Command Prompt.
Take note of:
- active network adapter
- default gateway
- subnet
-
-
Verify VirtualBox Network Adapter
VirtualBox Manager ➔ VM ➔ Settings ➔ NetworkCheck:
- Adapter type (NAT / Bridged / Host-only)
- If Bridged ➔ confirm it’s mapped to the current active host adapter
- Example: WiFi changed from Ethernet
If unsure:
- Temporarily switch to NAT
- Start VM and test connectivity
-
Check VM Network Interface
Inside AlmaLinux VM:
ip aVerify interface name:
- Usually
enp0s3,enp0s8, or similar
Check routes:
ip route - Usually
-
Update Gateway (if static IP configured)
Edit connection:
nmcli connection showModify gateway:
sudo nmcli connection modify <connection-name> ipv4.gateway <new-gateway>sudo nmcli connection up <connection-name>Or if using config file:
sudo vi /etc/sysconfig/network-scripts/ifcfg-<interface>Update:
GATEWAY=<new-gateway>Restart network:
sudo systemctl restart NetworkManager -
Test Connectivity
ping -c 3 8.8.8.8ping -c 3 google.com
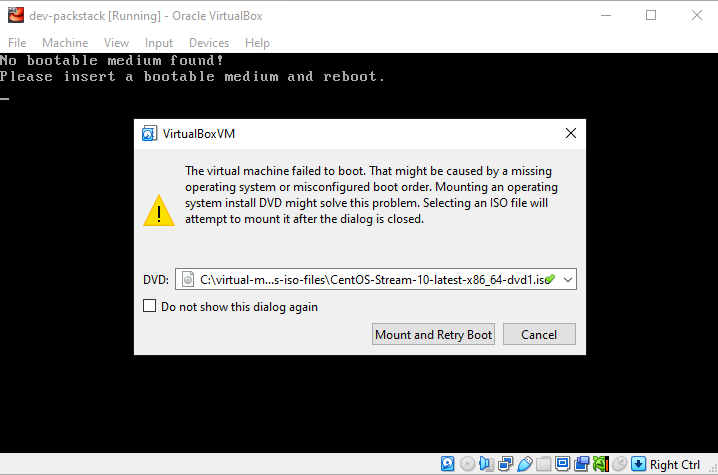
Manually Load ISO
If you get this error when you start the VM for the first time:
The virtual machine failed to boot. That might be caused by a missing operating system or misconfigured boot order. Mounting an operating system install DVD might solve this problem. Selecting an ISO file will attempt to mount it after the dialog is closed.
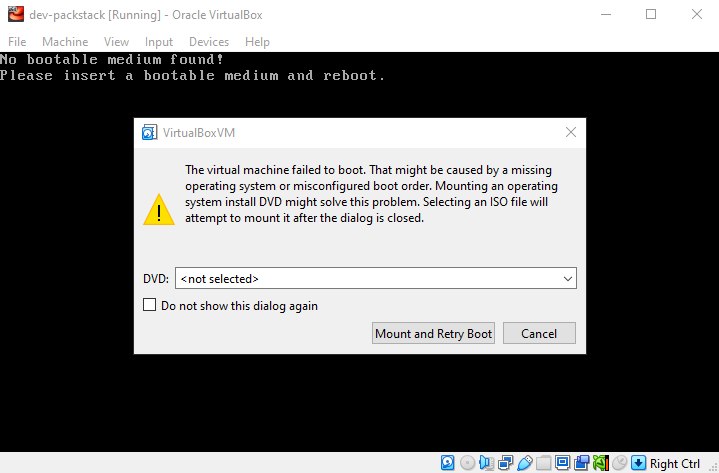
You can try to select the ISO file from the dropdown meny and click Mount and Retry Boot
Choose Install CentOS Stream 10 and click Enter.
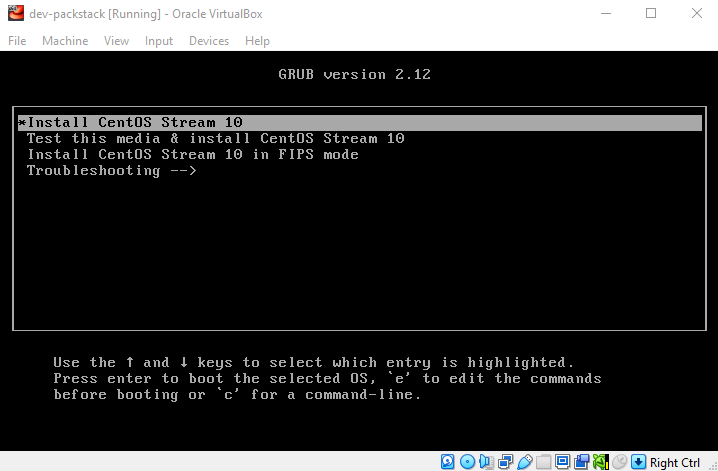
It should go through the bootup process now.
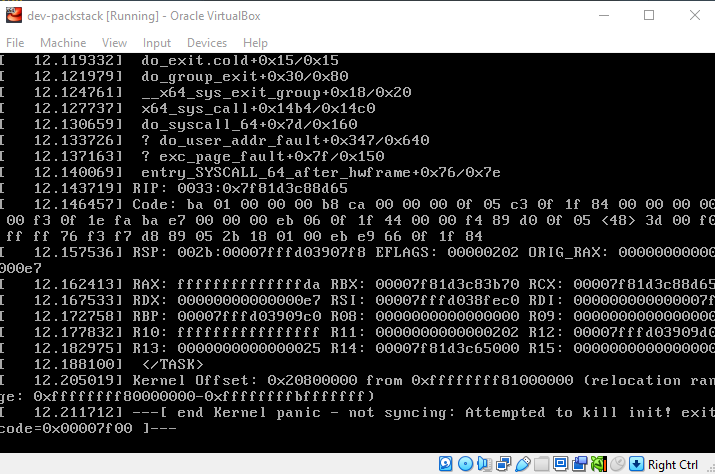
If it shows this error, it means its hitting a kernel panic.
See next section.
[ end Kernel panic - not syncing: Attempted to kill init! exit code=0x00007f00 ] --
Kernel Panic
If you get this error when booting up the VM for the first time, you are hitting a kernel panic.
This usually means the VM tried to boot the kernel from the ISO but something went wrong at the very early stage of the OS startup
[ end Kernel panic - not syncing: Attempted to kill init! exit code=0x00007f00 ] --
Troubleshooting:
-
Make sure the ISO matches the VM architecture: x86_64 (64-bit).
-
Go to Settings ➔ System ➔ Motherboard ➔ Enable EFI (special OSes only).
- This is usually off for CentOS Stream 10.
-
Go to Settings ➔ System ➔ Processor ➔ Enable PAE/NX ➔ enable it.
-
Go to Settings ➔ System ➔ Acceleration ➔ Enable the following:
- VT-x/AMD-V (if its an option)
- Nested Paging
It should boot successfully now.
Warning: deprecated hardware is detected: x86_64-v2
Enabling EFI may change how the CPU is exposed to the guest. The VM is reporting a CPU level (x86-64-v3) that the guest glibc library doesn’t understand, which causes the fatal error.
This is a common issue with Linux kernels on VirtualBox when EFI is enabled unnecessarily.
- EFI is not required for CentOS Stream 10 on VirtualBox.
- When EFI is enabled, VirtualBox exposes advanced CPU features to the guest (x86-64-v2, v3, etc.).
- Some older Linux userspace libraries (
glibc) don’t support these features
To fix this:
-
Disable EFI in VM settings:
Settings ➔ System ➔ Motherboard ➔ Uncheck “Enable EFI (special OSes only)” -
Ensure PAE/NX is enabled:
Settings ➔ System ➔ Processor ➔ Enable PAE/NX -
Boot the VM again from your ISO.
Note that if disable EFI, you may hit the kernel panic issue (again). At this point, the better option would be to use a different ISO.
If you are using CentOS Stream 10, you can use some alternatives:
- CentOS Stream 9
- AlmaLinux 10
- AlmaLinux 8