DNS Challenge
Using Let's Encrypt - DNS Challenge
In this lab, we’ll set up Traefik with Let’s Encrypt DNS challenge, which allows automatic creation of wildcard certificates, meaning you can secure all subdomains (like app.yourdomain.com, api.yourdomain.com) with a single certificate.
- Wildcard certs cover many subdomains
- DNS challenge updates DNS records automatically
- Works without exposing HTTP port (uses DNS + HTTPS only)
This method is fully automated and gives you more flexibility with subdomains.
Pre-requisites
Setup a Public Cloud VM
It is recommended to perform this lab on a a VM with a public IP because you need to open port 80 to the internet.
- Your DNS records must point to the VM’s public IP.
- Let’s Encrypt can verify your site via HTTP without problems.
If you do this lab in your local Windows machine, it is likely that your machine has a private LAN IP like 192.168.x.x behind NAT.
You can definitely tweak your Windows machine’s firewall to allow inbound connections on port 80 (and 443), but this alone won’t fix the main problem if your router or network blocks/doesn’t forward that traffic.
To create a public cloud VM, you can use:
Make sure your EC2 security group allows inbound TCP traffic on:
- Port 80 (HTTP)
- Port 443 (HTTPS)
- Port 8080 (Traefik dashboard)
After launching your VM, install the necessary tools. For example, on my EC2 instance, I run:
# Install Git
sudo yum update -y && sudo yum install -y git

# Install Docker
sudo amazon-linux-extras enable docker
sudo yum install -y docker

# Start Docker service
sudo systemctl enable --now docker
sudo systemctl status docker

# Configure DOcker
sudo usermod -aG docker ec2-user && newgrp docker

# Install Docker compsoe
sudo curl -L "https://github.com/docker/compose/releases/download/v2.20.2/docker-compose-$(uname -s)-$(uname -m)" -o /usr/local/bin/docker-compose

# Configure permission
sudo chmod +x /usr/local/bin/docker-compose
docker-compose --version

# Initialize Docker Swarm (needed for docker stack deploy):
docker swarm init
Prepare your Domain
Before using HTTPS with Traefik, make sure you have:
- A domain name for testing
- DNS records pointing to your DNS provider
- A DNS provider supported by TraefikA DNS provider supported by Traefik
heck the supported providers list here: Traefik DNS Provider Integrations**
For example, my setup uses:
- Domain from Namecheap
- DNS hosted on DigitalOcean
After getting a domain, update its registrar settings so it points to your chosen DNS provider. If you're also using DigitalOcean, you can follow the steps here: Adding a Domain in DigitalOcean
NOTE: Make sure your domain is fully set up and pointing to your server before proceeding with the labs. Propagation can take up to 24–48 hours, sometimes longer depending on the registrar and TLD.
To verify, you can run:
dig NS yourdomain.com
dig A yourdomain.com
If you are using DigitalOcean name servers, you should see:
;; ANSWER SECTION:
yourdomain.com.     1800    IN      NS      ns1.digitalocean.com.
yourdomain.com.     1800    IN      NS      ns2.digitalocean.com.
yourdomain.com.     1800    IN      NS      ns3.digitalocean.com.

;; ANSWER SECTION:
yourdomain.com.     300     IN      A       192.0.2.123
Set Up DNS Records
Once you've changed your domain’s nameservers to your DNS provider, the next step is to add your DNS records there.
Here are the DNS records I used. You can copy them but make sure to replace with your own domain details.
| Type | Hostname | Value | TTL (seconds) |
|---|---|---|---|
| A | *.joeden.site | points to 34.201.50.100 | 30 |
| A | www.joeden.site | points to 34.201.50.100 | 30 |
| A | dashboard.joeden.site | points to 34.201.50.100 | 30 |
| A | joeden.site | points to 34.201.50.100 | 30 |
The IP 34.201.50.100 is my test machine's public IP. Point the DNS records to your machine's public IP.
The dashboard.joeden.site is used to access the Traefik dashboard.
You can also use shorthand names since they mean the same:
| Type | Hostname | Value | TTL (seconds) |
|---|---|---|---|
| A | *.joeden.site | points to 34.201.50.100 | 30 |
| A | www | points to 34.201.50.100 | 30 |
| A | dashboard | points to 34.201.50.100 | 30 |
| A | @ | points to 34.201.50.100 | 30 |
If you set this up in DigitalOcean, your DNS records should look like this:
| Type | Hostname | Value | TTL (seconds) |
|---|---|---|---|
| NS | joeden.site | points to ns1.digitalocean.com | 30 |
| NS | joeden.site | points to ns2.digitalocean.com | 30 |
| NS | joeden.site | points to ns3.digitalocean.com | 30 |
| A | *.joeden.site | points to 34.201.50.100 | 30 |
| A | www.joeden.site | points to 34.201.50.100 | 30 |
| A | dashboard.joeden.site | points to 34.201.50.100 | 30 |
| A | joeden.site | points to 34.201.50.100 | 30 |
Clone the Repository
Github repo: joseeden/labs-traefik
Login to the public cloud VM and clone the project repository from GitHub.
git clone https://github.com/joseeden/labs-traefik.git
cd labs-traefik/04-https-tls
Project structure:
04-https-tls
├── challenge-dns
│   ├── .env
│   ├── .gitignore
│   ├── docker-compose.dns.yml
│   └── traefik.dns.yml
├── challenge-http
│   ├── docker-compose.http.yml
│   └── traefik.http.yml
├── challenge-tls
│   ├── docker-compose.tls.yml
│   └── traefik.tls.yml
└── letsencrypt
Note: Make sure the letsencrypt folder is next to the challenge folders, not inside any of them. The Docker compose files expect it there. If you move the letsencrypt folder, remember to update the Docker compose files accordingly.
Prepare Your DNS Provider
If you followed the Lab pre-requisites section, you should already have wildcard DNS records added which are pointing to your server.
- A
*.yourdomain.comrecord - An
@(root) record
This allows Traefik to request certificates for any subdomain you choose later; no need to manually add DNS entries every time.
For more information, please see Setup your DNS Records.
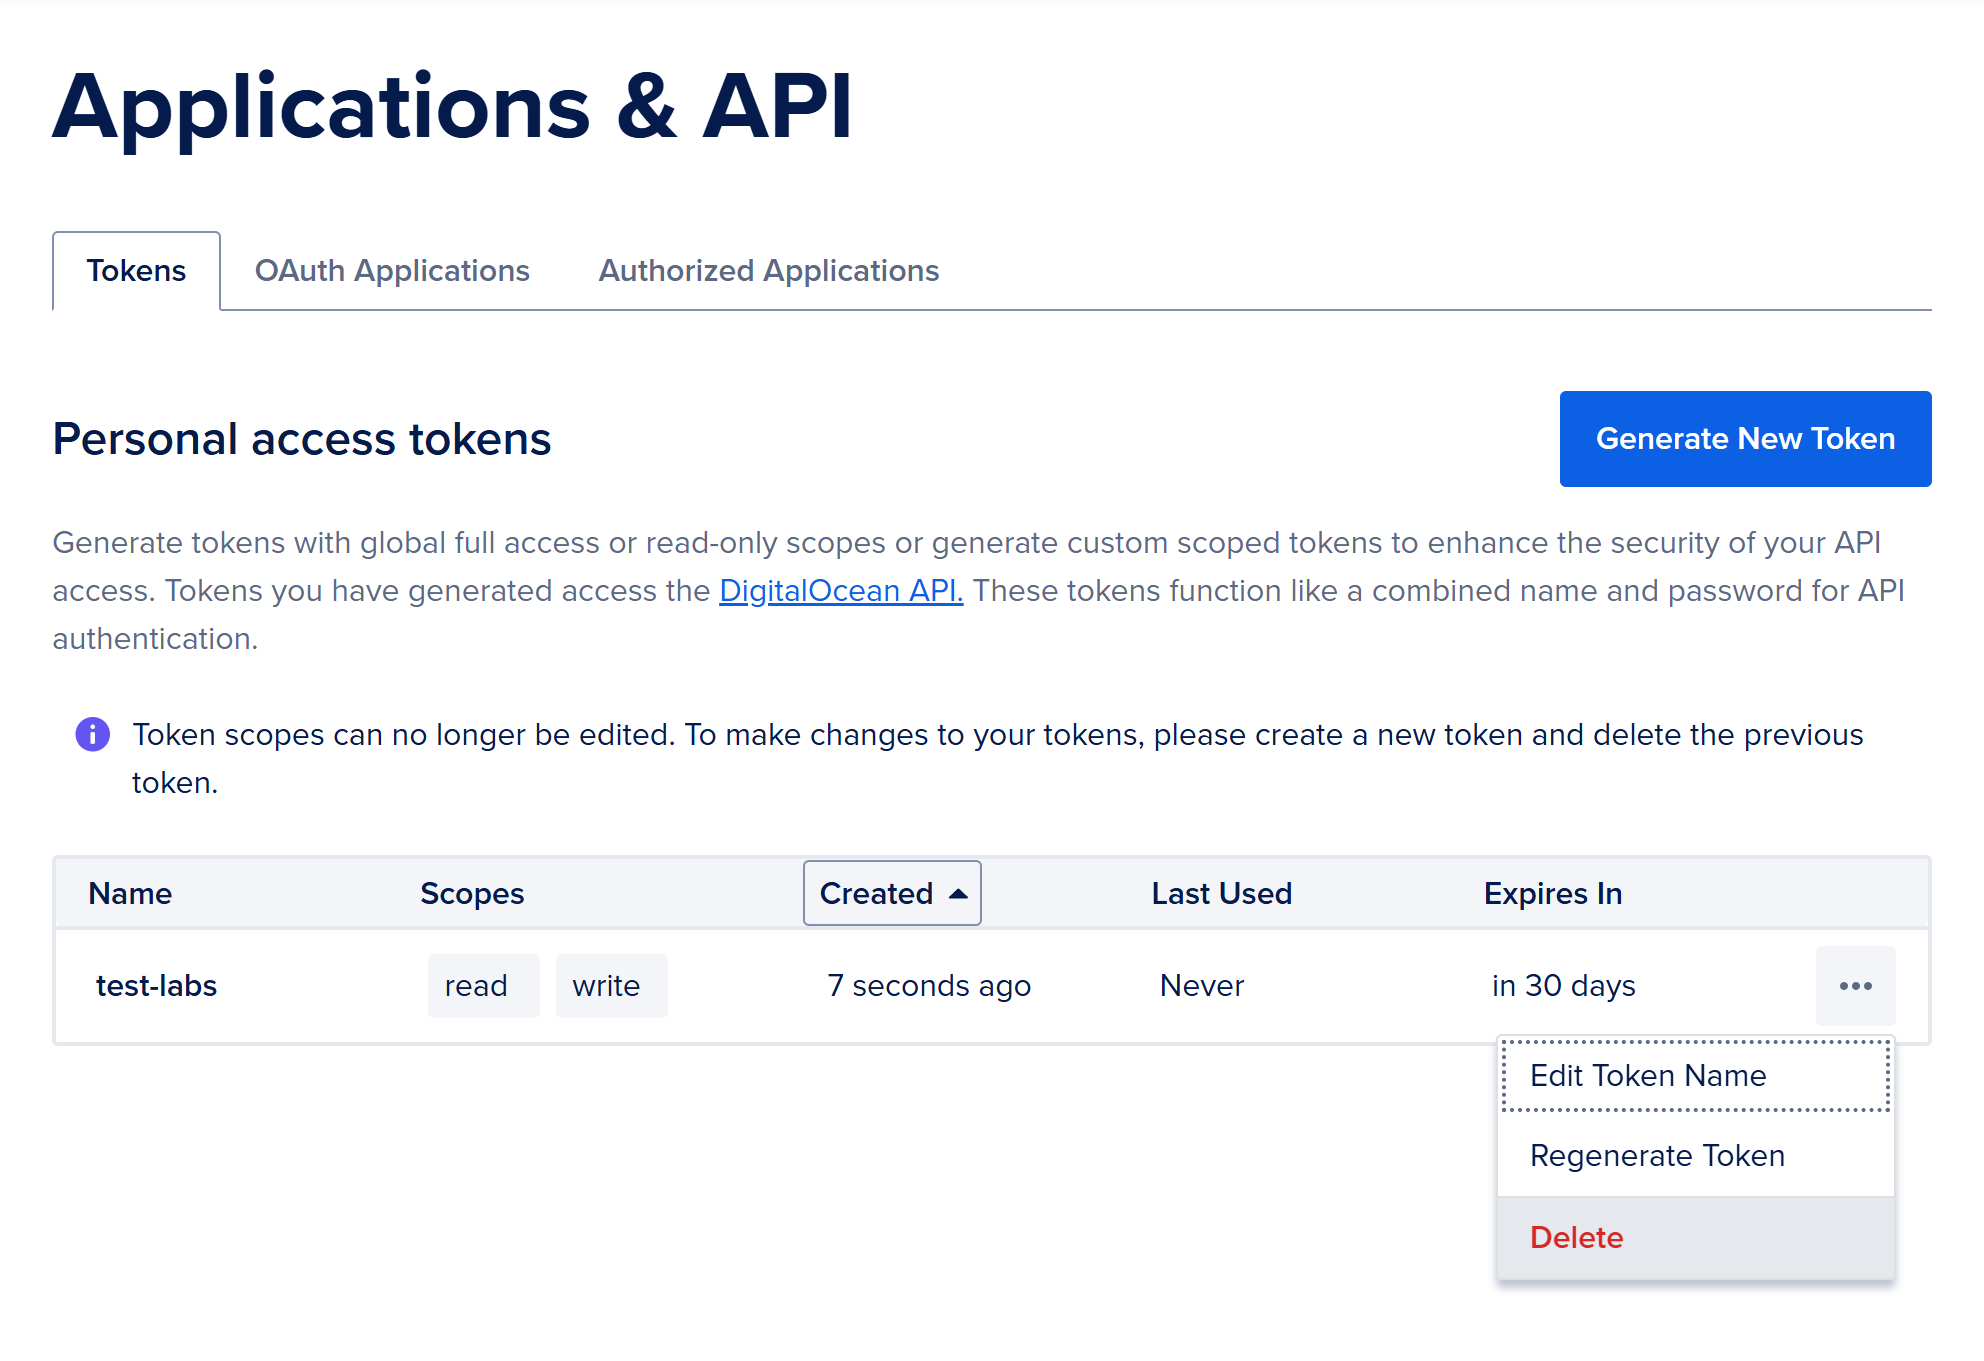
Create an API Token (DigitalOcean)
To allow Traefik to update DNS records automatically, you’ll need a token from your DNS provider.
- Go to your DNS provider’s dashboard (e.g., DigitalOcean)
- Generate a new API token with DNS access
- Copy the token. This will be added to the Docker compose
This token is used by Traefik to prove domain ownership via the DNS challenge.
To generate the token in DigitalOcean please see Generate an API Token.
Add API Token in Docker Compose
Now configure the Docker Compose file with the token and labels.
To do this securely, create a .env file not tracked by Git (make sure to add .env to .gitignore)):
DO_AUTH_TOKEN=your_real_token_here
Then update the docker-compose.dns.yml:
# docker-compose.dns.yml
version: "3"

services:
  traefik:
    image: traefik:v2.3
    ports:
      - "80:80"
      - "443:443"
      - "8080:8080"
    volumes:
      - /var/run/docker.sock:/var/run/docker.sock
      - ../letsencrypt:/letsencrypt
      - ./traefik.dns.yml:/etc/traefik/traefik.yml
    environment:
      - DO_AUTH_TOKEN=${DO_AUTH_TOKEN}
    env_file:
      - .env

  catapp:
    image: mikesir87/cats:1.0
    labels:
      - "traefik.enable=true"
      - "traefik.http.routers.catapp.rule=Host(`anything.yourdomain.com`)"  ## you can set this to anysubdomain
      - "traefik.http.routers.catapp.service=catapp"
      - "traefik.http.services.catapp.loadbalancer.server.port=5000"
      - "traefik.http.routers.catapp.entrypoints=websecure"
      - "traefik.http.routers.catapp.tls.certresolver=myresolver"
As a recap, the DNS records that we have are:
| Type | Hostname | Value | TTL(seconds) |
|---|---|---|---|
| A | *.yourdomain.com | directs to (add ip) | 30 |
| A | www.yourdomain.com | directs to (add ip) | 30 |
| A | dashboard.yourdomain.com | directs to (add ip) | 30 |
| A | yourdomain.com | directs to (add ip) | 30 |
In the Docker Compose file, the rule *.yourdomain.com matches anything.yourdomain.com. So, Traefik will get a wildcard certificate for *.yourdomain.com using the DNS challenge. This lets Traefik secure all subdomains automatically with one certificate.
Set Up Static Traefik Config (DNS Challenge)
The traefik.dns.yml sets the static config for the DNS challenge and the right provider.
# traefik.dns.yml
api:
  dashboard: true
  insecure: true

providers:
  docker:
    exposedByDefault: false

log:
  level: INFO

entryPoints:
  web:
    address: ":80"
  websecure:
    address: ":443"
  traefik:
    address: ":8080"

# Challenge DNS
certificatesResolvers:
  myresolver:
    acme:
      email: your_email@example.com
      storage: /letsencrypt/acme.json
      dnsChallenge:
        provider: digitalocean
        delayBeforeCheck: 0

# Dashboard router
http:
  routers:
    traefik:
      rule: Host(`dashboard.yourdomain.com`)  # or use your domain + a subdomain
      entryPoints:
        - traefik
      service: api@internal
      # middlewares:                       # DO NOT DO IN PRODUCTION
      #   - auth                           # Disables the authentication
Note:
- Replace
email:with your real address - Set
provider:to match your DNS provider name (e.g.,digitalocean) - The
myresolvername must match the Docker Compose labels later
This config tells Traefik to request certificates using DNS, with your provider’s API.
Testing certificate renew..." providerName=myresolver.acme
Deploy the New Stack
Make sure no other stack is running before deployment:
docker stack rm traefik
Manually load the .env first:
set -a
source ./challenge-dns/.env
set +a
Now deploy your updated setup:
docker stack deploy -c ./challenge-dns/docker-compose.dns.yml traefik
Check the logs to verify that the certificate was issued:
docker service logs traefik_traefik
You should see messages about the DNS challenge and a successful certificate request.
Test in Browser
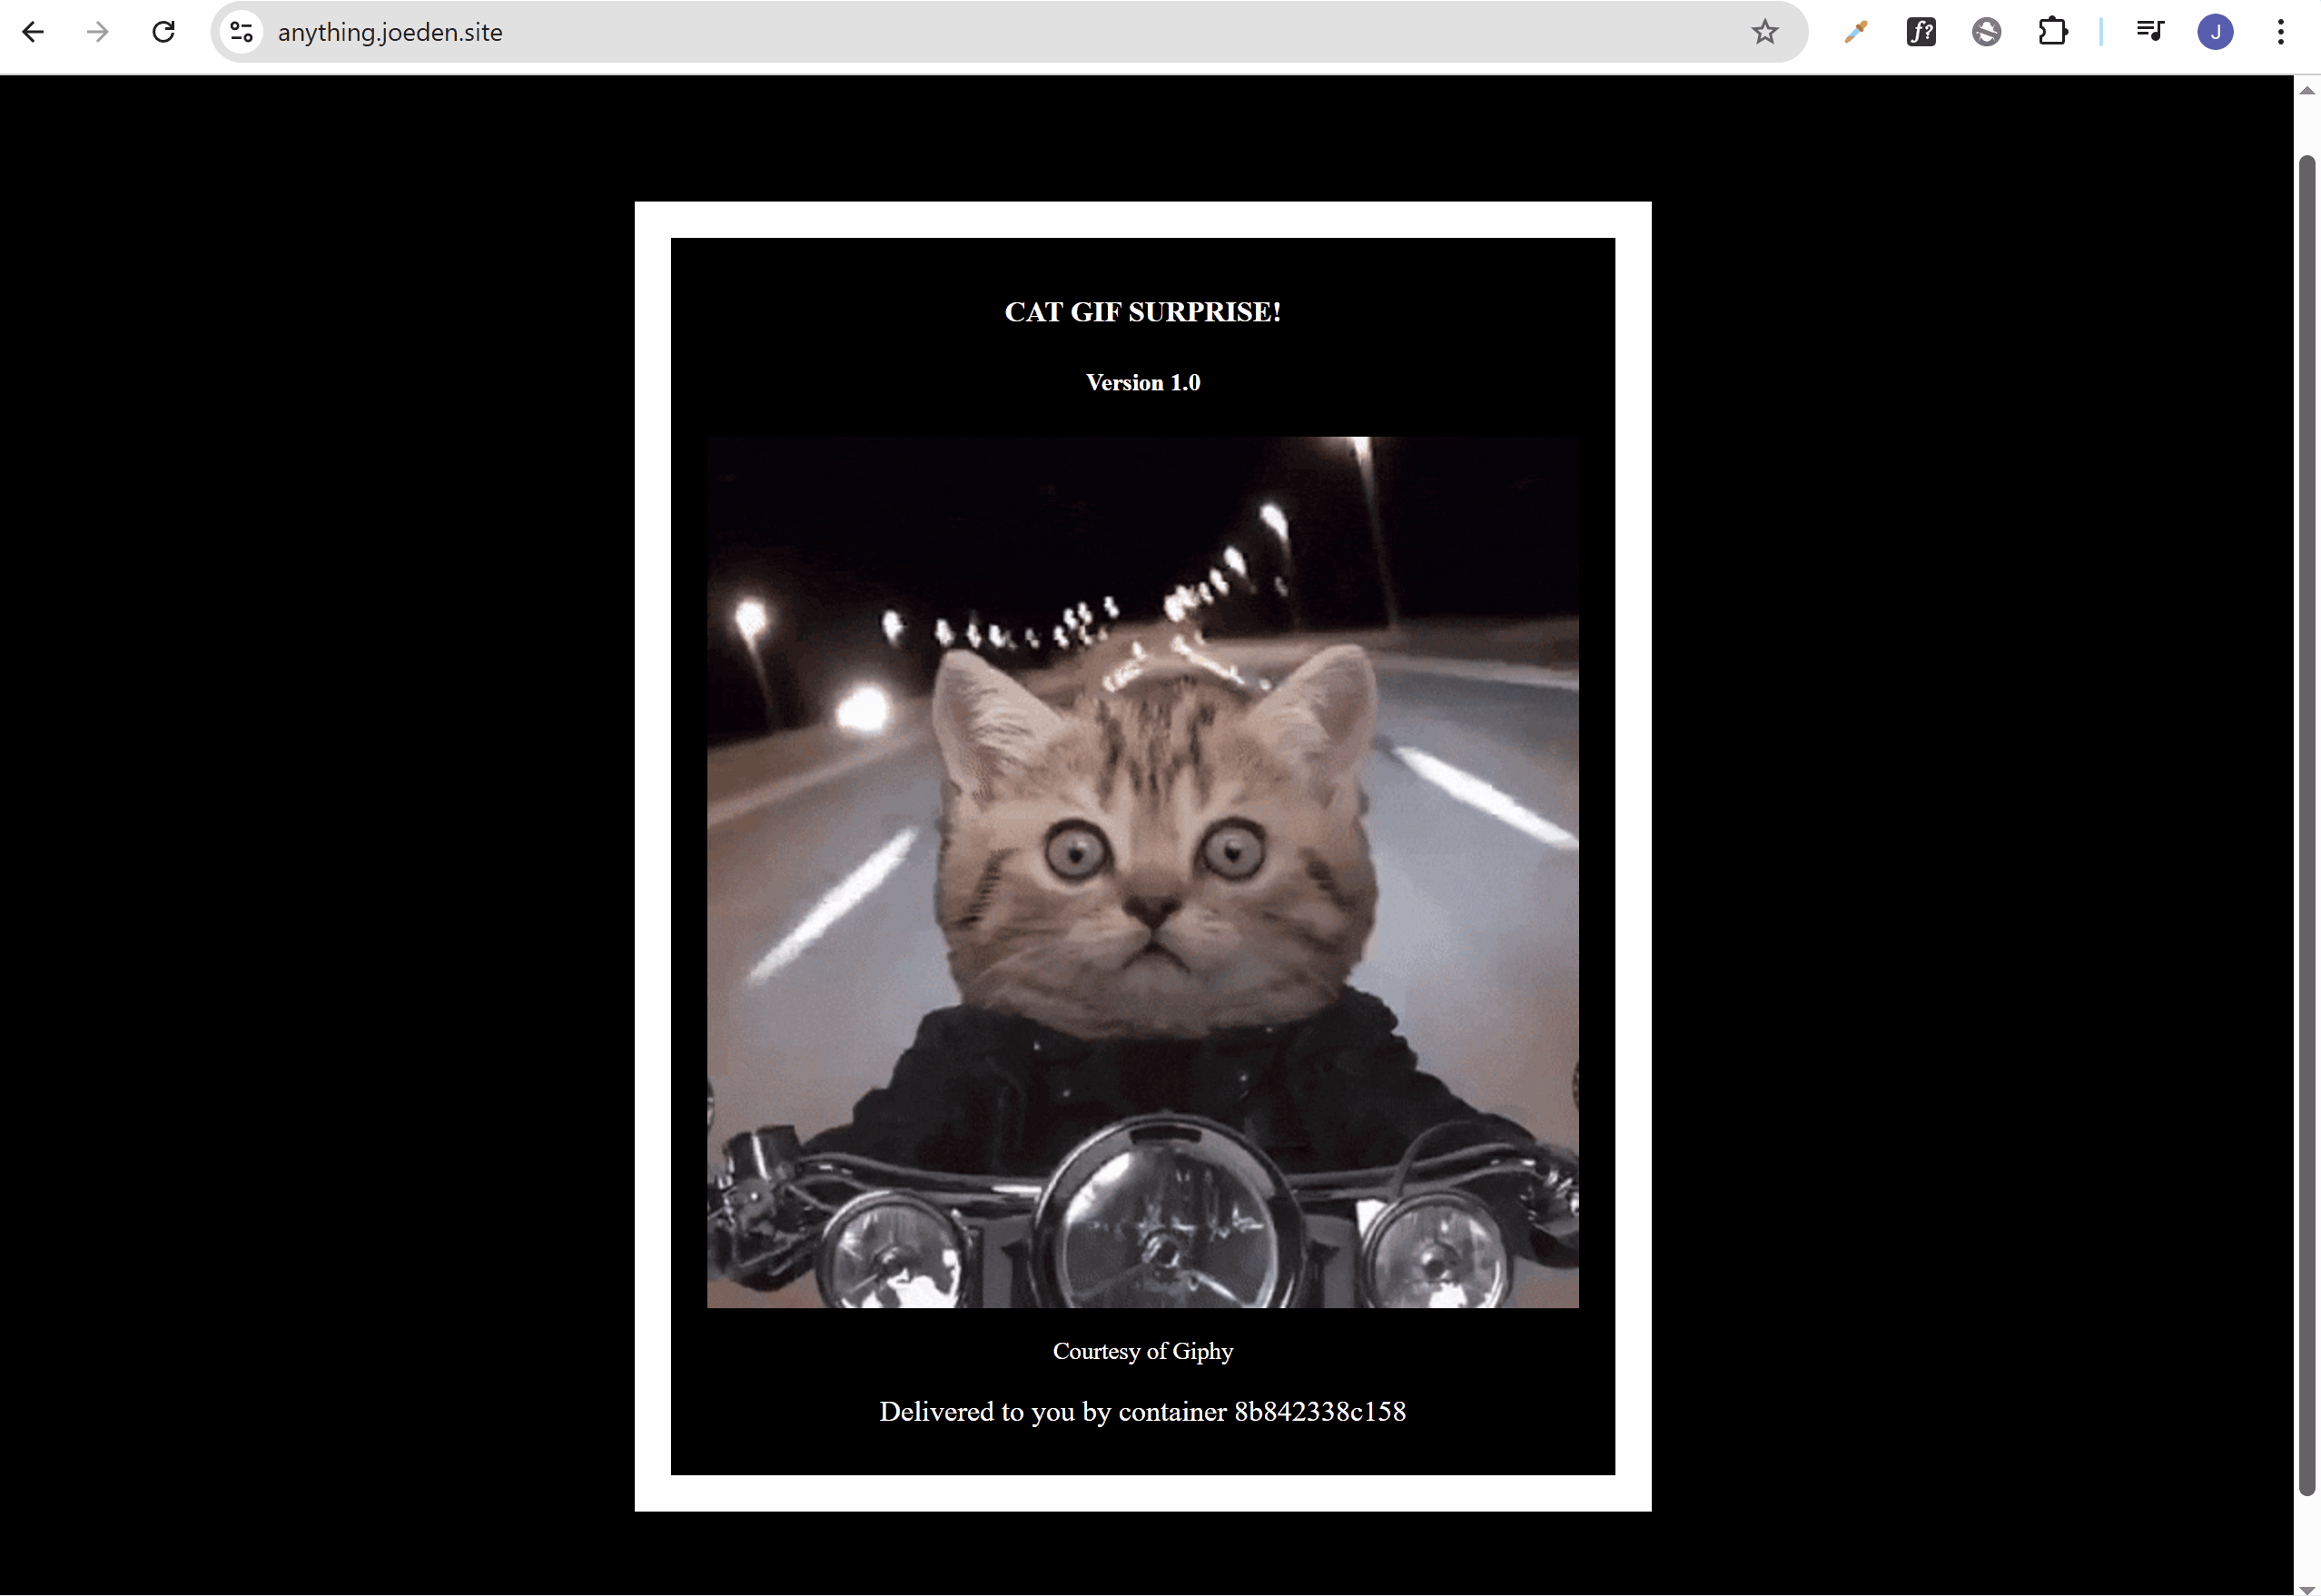
Open your browser and visit:
https://anything.yourdomain.com
You should see the app running with a valid HTTPS certificate. No DNS config was needed manually.
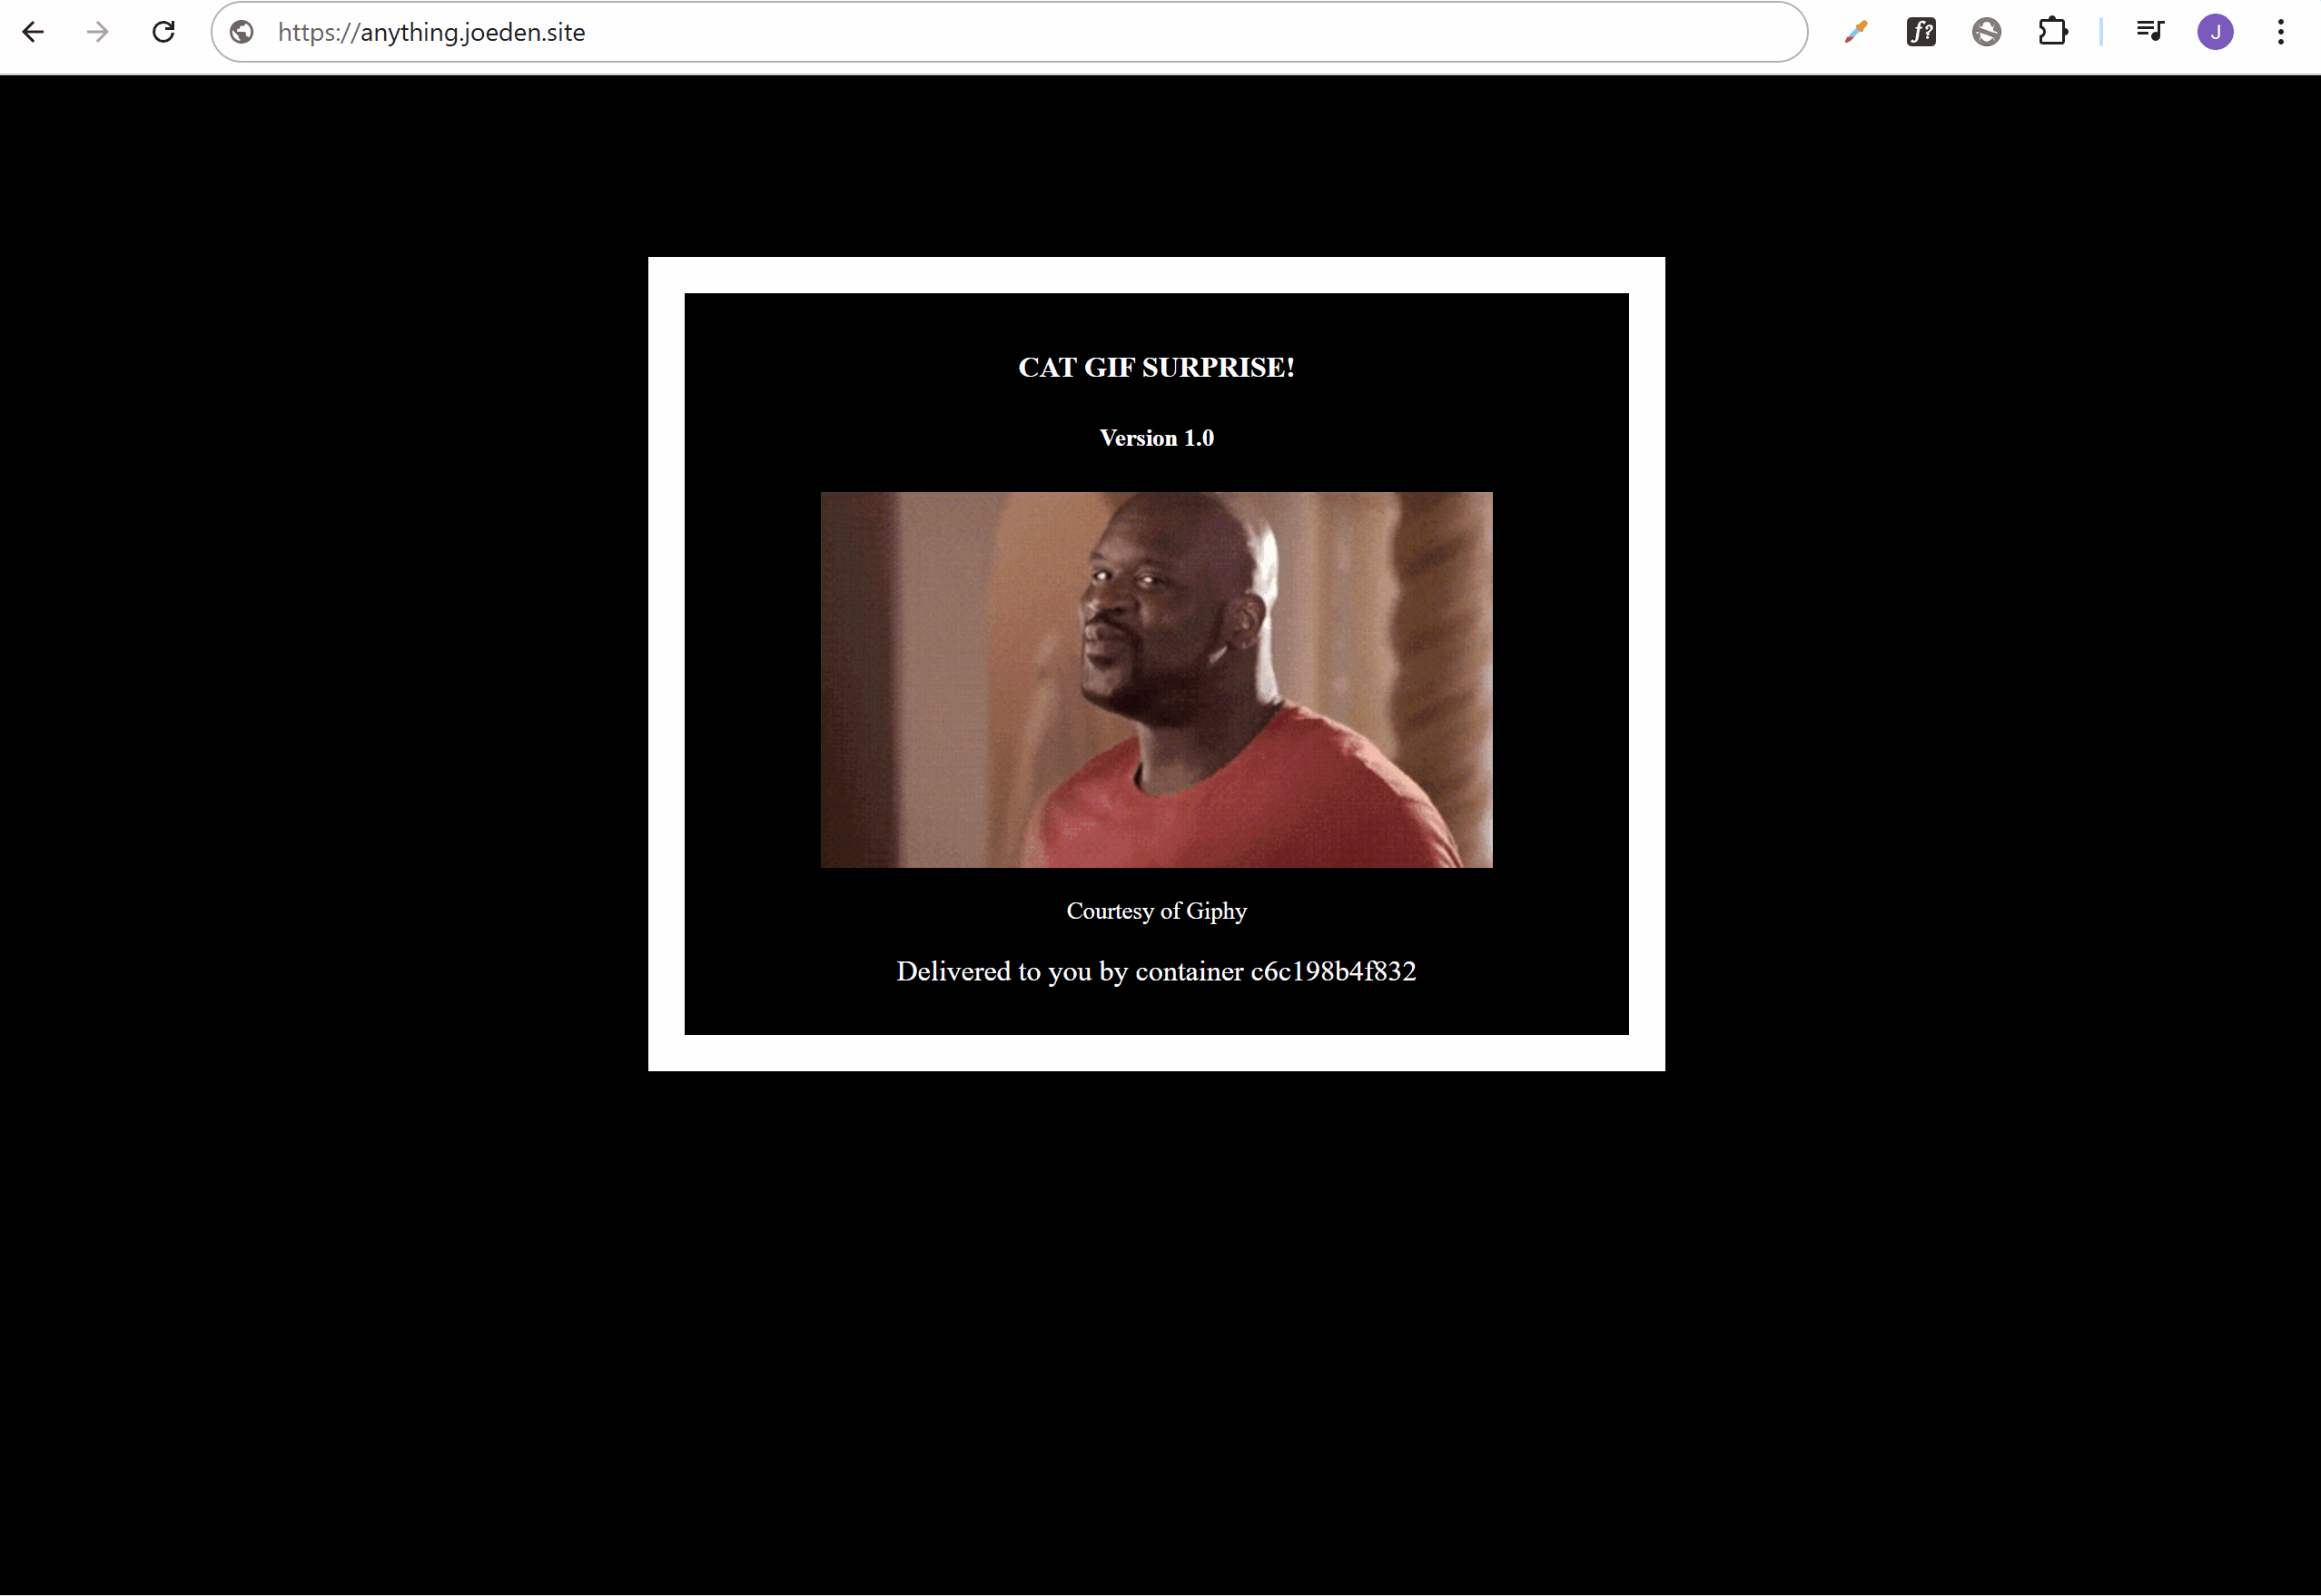
To test further, update the Compose file to use a new subdomain:
- "traefik.http.routers.catapp.rule=Host(`michaelscarn.yourdomain.com`)"
Re-deploy the stack and Traefik will request a new certificate using the same wildcard.
docker stack deploy -c ./challenge-dns/docker-compose.dns.yml traefik
Now visit:
https://michaelscarn.yourdomain.com
It should load securely, using the wildcard certificate.
Store Certificates Safely
To avoid rate limits and protect your certs:
- Always mount the
/letsencryptdirectory outside the container - Backup your
acme.jsonfile which stores certs - Avoid deleting containers without saving this file
# Store and check certificate file
ls ./letsencrypt/acme.json
If the cert file is lost and you request too many new ones, Let’s Encrypt may block further requests temporarily.
Use Secrets for Tokens (Best Practice)
Instead of writing your DNS API token directly in the file:
- Use Docker secrets to keep it hidden
- Avoid exposing sensitive tokens in version control
This helps keep your system secure while still allowing full automation.
-
Create the secret:
echo -n "your_digitalocean_api_token" | docker secret create do_auth_token - -
Update your
docker-compose.dns.yml:version: "3.8"services:traefik:image: traefik:v2.3ports:- "80:80"- "443:443"- "8080:8080"volumes:- /var/run/docker.sock:/var/run/docker.sock- ../letsencrypt:/letsencrypt- ./traefik.dns.yml:/etc/traefik/traefik.ymlsecrets:- do_auth_tokenenvironment:- DO_AUTH_TOKEN_FILE=/run/secrets/do_auth_tokensecrets:do_auth_token:external: true -
Deploy:
docker stack deploy -c ./challenge-dns/docker-compose.dns.yml traefikTraefik will then read the token from
/run/secrets/do_auth_token.
Cleanup
Delete the deployed stack:
docker stack rm traefik
You can also delete the .env:
rm -f .env
Go to your DNS provider and delete the API token.
Finally, make sure to delete your public cloud VM.