IPtables and getting locked out
Problem
Locked myself out via my own iptables policy. Other possible ways to connect are laid out but the one that worked is explained in the* What really solved it section.
Setup
My current setup:
- EC2 t2.xlarge instance with Elastic IP
- I haven't installed any AWS-related agents before the incident
- Security groups are set to allow only connections from either my IP or the security group itself
- I didn't modify the default parameters set in the iptables-config file
I was playing around with DROP and REJECT on iptables and I'm using the --protocol as criteria to apply policy on. Since I've used udp and icmp already, I tried to drop tcp connections - bad idea.
$ sudo iptables -A INPUT --protocol tcp --in-intersection
After some searching, I learned that I'm basically screwed. From a Stackoverflow discussion How to fix iptables if i have blocked all incoming and outgoing connections?
From comments, we've established this is on an Amazon AWS EC2 instance, and that you've locked yourself out from SSH access remotely. By using Amazon EC2, you're going to have a bit of a headache here. There's no real serial/console mode for access, nor anyone who can just 'fix' it, and by disabling all connections as you did, you've locked yourself out completely.
You don't really have much of a solution here but to destroy the EC2 instance and start over.
While this was helpful, note that this answer was posted in the Stackoverflow site last 2017 and there have been other ways created to connect to the instance. To see the options on how to connect to your EC2 instance, select your instance and click Connect.

Possible solutions
SSH Client
I've already used up SSH client when I blocked myself through iptables, so that leaves me with 3 more options.
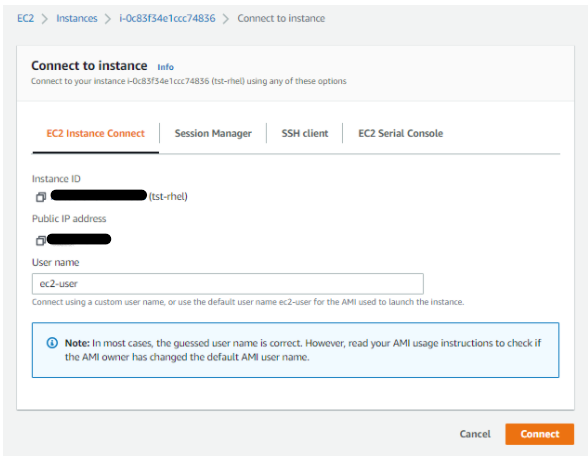
EC2 Instance Connect
This didn't worked out as well since I needed to have EC2 Instance Connect installed on the machine before anything else. I tried to go the link provided in the error message Task 1: Configure network access to an instance. but it tackled more about security groups which isn't the one that's restricting me.

Session Manager
This would have been really useful because this uses SSH to connect to the instance. However, like EC2 Instance Connect, the Session Manager needs to be installed on the machine before anything else.
NOTE: Have this installed upon launching your instance or better yet define it in the startup script. Steps on how to install Session Manager in Linux can be read here.

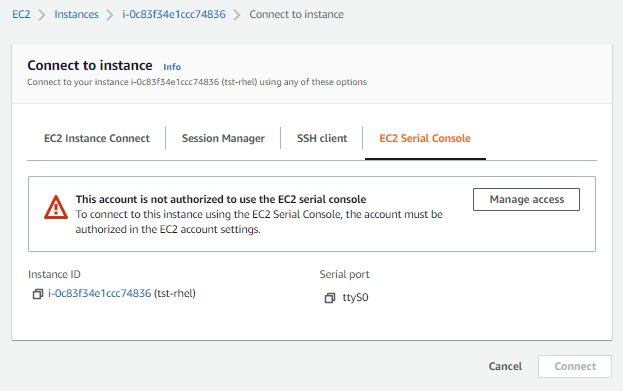
EC2 Serial Console
This was a new one which I haven't seen last year during my review for the Associates certification exam. It required me to allow the account to use the EC2 Serial Console so I simply clicked Managed access and then ticked the Allow box and Update on the next page.

Going back to the previous EC2 instances landing page, selected my instance and hit Connect to see the EC2 Serial Console tab again. This time it showed another message - "This instance type is not supported for the EC2 serial console."
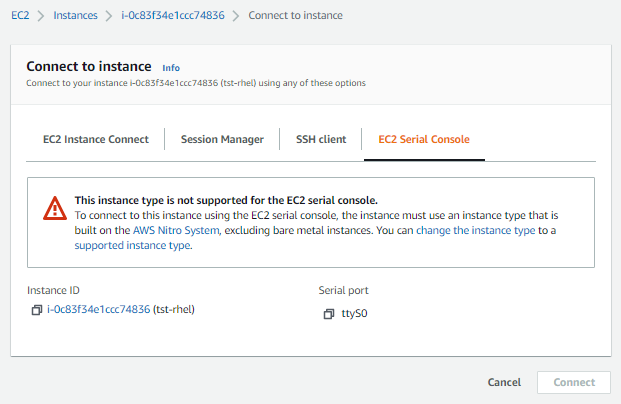
I went over the provided links and breezed through them. After allowing EC2 serial console access to the account, the instance type I'm using should also one of the supported instance type - Nitro. These are references you may check out:
Detaching the root volume and attaching to a second instance
This is actually an interesting method though I decided not to opt for this because I already found a solution - a really simple one actually! Also, I might create a separate page about this method.
EC2 Support
When all else fail, reach out to support. My free tier account has already expired years ago and I'm currently using AWS free credits I've obtained by joining the AWS Community Builders program. I am pretty sure that I'll have someone from their end answered some of my inquiries in the next 6 hours but I decided to not take the rouble of raising any support requests to them.
Since my focus at the moment is doing labs for the RHCSA topics and not on AWS, going through the linked documentations would be a rabbithole and would tend to be more complicated that just by simply deleting this instance and spinning up a fresh one.
Having said, I am considering to destroy it and start over. But this time, I'm having SSM Session Manager installed!
What really solved it!
I was almost on the verge of completely deleting the instance but then I remembered that iptables has a default config file called iptables-config, which contains two important parameters:
# Save current firewall rules on stop.
#   Value: yes|no,  default: no
# Saves all firewall rules to /etc/sysconfig/iptables if firewall gets stopped
# (e.g. on system shutdown).
IPTABLES_SAVE_ON_STOP="no"

# Save current firewall rules on restart.
#   Value: yes|no,  default: no
# Saves all firewall rules to /etc/sysconfig/iptables if firewall gets
# restarted.
IPTABLES_SAVE_ON_RESTART="no"
Basically what this two parameters meant is, if these two are set to "no", then rules will not persists when the machine is stopped or restarted. This means rules will be flushed out - yes!
So, after some restarting, I was able to log in again! All rules are also flushed out!
Didn't thought that a simple restart would save the day once again. Whew!
$ sudo  iptables -L -v
Chain INPUT (policy ACCEPT 379 packets, 47895 bytes)
 pkts bytes target     prot opt in     out     source               destination

Chain FORWARD (policy ACCEPT 0 packets, 0 bytes)
 pkts bytes target     prot opt in     out     source               destination

Chain OUTPUT (policy ACCEPT 486 packets, 50206 bytes)
 pkts bytes target     prot opt in     out     source               destination
Replicating the issue
To ensure the solution found really solves the issue, we'll want to forced the system to lock us out again. Note that before we forced the system to lock me out, we need firewalld installed and enabled.
$ sudo yum update -y
$ sudo yum install -y firewalld
Also, iptables don't persist across reboot in RHEL unless you issue iptables-save. In our case, we'll append it to the "forced lockout" command so it is immediately applied.
Change /etc/sysconfig/iptables-config file and set the two parameters below to "yes". By doing this, I'm telling the server to persist the rules even after the machine is stopped or restarted.
# Save current firewall rules on stop.
#   Value: yes|no,  default: no
# Saves all firewall rules to /etc/sysconfig/iptables if firewall gets stopped
# (e.g. on system shutdown).
IPTABLES_SAVE_ON_STOP="yes"

# Save current firewall rules on restart.
#   Value: yes|no,  default: no
# Saves all firewall rules to /etc/sysconfig/iptables if firewall gets
# restarted.
IPTABLES_SAVE_ON_RESTART="yes"
Now, time to lock myself out by blocking all tcp connections to the port.
$ sudo iptables -L -v
Chain INPUT (policy ACCEPT 0 packets, 0 bytes)
pkts bytes target prot opt in out source destination
Chain FORWARD (policy ACCEPT 0 packets, 0 bytes)
pkts bytes target prot opt in out source destination
Chain OUTPUT (policy ACCEPT 0 packets, 0 bytes)
pkts bytes target prot opt in out source destination
$ ifconfig
eth0: flags=4163<UP,BROADCAST,RUNNING,MULTICAST> mtu 9001
lo: flags=73<UP,LOOPBACK,RUNNING> mtu 65536
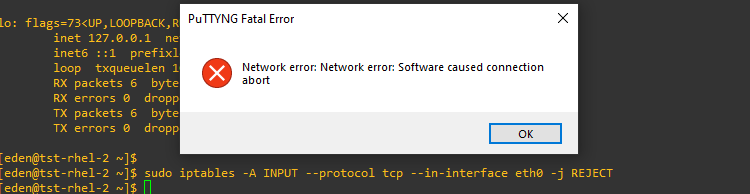
$ sudo iptables -A INPUT --protocol tcp --in-interface eth0 -j REJECT && sudo iptables-save
We see the terminal crashing.
Lesson Learned
Going back to the original Stackoverflow discussion I've read earlier, it provided some important pointers which I thoguht to include here. I'm putting the original thread in the references section at the bottom.
-
Use the EC2 security group firewall instead. This is a little easier to configure, and it's already there without any additional configuration - it's part of the EC2 infrastructure where you have to permit ports to actually get to the EC2 instance. You also aren't going to lock yourself out as easily (though you can get locked out, it's trivial to fix it then because you just allow port 22 again in the rule set from the Amazon EC2 settings panel, provided you don't mess with iptables as well).
-
Use a decent iptables ruleset and don't log out from PuTTY on your EC2 until you are absolutely sure the rules you've put in place don't completely torpedo your access to the system.
-
It is not recommended to mess with the default policies on a server, because it has some... evils... if not done correctly, and I usually only filter ingress traffic and FORWARD traffic, and permit Outgoing traffic because of time sync servers,
Decent iptables - A Working Rule Set for iptables per your requirements
You don't need to type lines that have a # at the beginning, those're just my comments explaining what each command does. Also, replace YOUR.IP.ADDRESS.HERE with your actual IP address, where it shows up below.
Inbound filtering
# Permit localhost to communicate with itself.
iptables -A INPUT -i lo -j ACCEPT
# Permit already established connection traffic and related traffic
iptables -A INPUT -m conntrack --ctstate RELATED,ESTABLISHED -j ACCEPT
# Permit new SSH connections into the system from trusted IP address
iptables -A INPUT -p tcp --dport 22 -s YOUR.IP.ADDRESS.HERE -m conntrack --ctstate NEW -j ACCEPT
# Permit all other traffic from trusted IP Address
iptables -A INPUT -s YOUR.IP.ADDRESS.HERE -j ACCEPT
# Drop all other traffic
iptables -A INPUT -j DROP
Outbound filtering
Warning: This will block access to the update servers, time sync servers, etc. so ONLY filter on Outbound if you absolutely need to, otherwise don't do this section at all.
# Allow Localhost to itself
iptables -A OUTPUT -i lo -j ACCEPT
# Allow RELATED,ESTABLISHED state traffic (related to Inbound for example)
iptables -A OUTPUT -m conntrack --ctstate RELATED,ESTABLISHED -j ACCEPT
# Allow all other traffic to trusted IP address
iptables -A OUTPUT -d YOUR.IP.ADDRESS.HERE -j ACCEPT
# Drop all other unpermitted outbound traffic.
iptables -A OUTPUT -j DROP
Forward filtering
NOTE Unless you really need to restrict things like forwarding traffic to the Internet via a tunnel or VPN to your server as a 'proxy' to the 'net, you really don't need to mess with the FORWARD rulesets, so I would suggest not doing this because nothing else is really going to use this function or ever land in this rule set table.
# Drop FORWARD target traffic, we don't need it
iptables -A FORWARD -j DROP
Firewall rules doesn't persist
After some hours of searching, I've also learned that my problem was really easy and it would always be solved by simply restarting the system. This is a bit difficult if you;re on an enterprise setup, more so for production, but since I own my own test EC2 instances, I can simply restart them anytime.
As said, this is not enabled by default but there is an option to enable it.
sudo iptables-save
Of course, if you locked yourself out before you're able to run the command above then it means any rules that locked you out will not persist and will be flushed out when you restart the system. I was thinking of doing a forced lockout on myself and I've read different articles online. I decided to not go deep into this for now (or maybe I will) but I'll attach the helpful articles in the references section below.
References
- How to fix iptables if i have blocked all incoming and outgoing connections?
- Should you use iptables with EC2 instances?
- CentOS / RHEL : How to make iptable rules persist across reboots
- Why do iptables rules disappear when restarting my Debian system?
- Saving Iptables Firewall Rules Permanently
- Saving iptables firewall rules permanently on Linux
- How to save iptables firewall rules permanently on Linux
- How to make iptables rules persistent after reboot on Linux