SSL/TLS Configuration
Checking SSL
To check if SSL/TLS is enabled, check /etc/elasticsearch/elasticsearch.yml:
# Enable security features
xpack.security.enabled: true

xpack.security.enrollment.enabled: true

# Enable encryption for HTTP API client connections, such as Kibana, Logstash, and Agents
xpack.security.http.ssl:
  enabled: true
  keystore.path: certs/http.p12

# Enable encryption and mutual authentication between cluster nodes
xpack.security.transport.ssl:
  enabled: true
  verification_mode: certificate
  keystore.path: certs/transport.p12
  truststore.path: certs/transport.p12
I revisited this page and chose to use my own CA and self-signed certificates.
You can skip the next sections and go directly to the Using Self-signed Certificates section.
Following Elastic Documentation
Built-in Certificates
These certificates are typically self-signed by Elasticsearch during the initial setup if no custom certificates are provided.
-
Server Certificate (
http.p12):This is the server certificate used for HTTP communications (HTTPS) between Elasticsearch and external clients (e.g., Kibana, Logstash, and Agents).
- Contains the public certificate and the private key.
- Verifies clients are connecting to the correct server.
- Ensures clients can securely communicate using HTTPS.
-
Transport SSL Certificate (
transport.p12):This is used for node-to-node encryption. It ensures that communications between different Elasticsearch nodes within the cluster are encrypted and secure.
- Contains certificates and keys for mutual TLS authentication.
- Used between Elasticsearch nodes in the cluster.
Custom Certificates
You can replace the auto-generated server certificates with your own custom certificates by modifying the configuration file.
- If using an untrusted certificate, distribute it to all systems that need to trust it.
- For internal use, you can use a self-signed certificate or one from an internal CA.
- Set up internal trust stores to recognize the certificate.
- Ensure the
.p12format is supported by your systems (e.g., Elasticsearch, Kibana). - Store the private key and certificate securely.
For node-to-node encryption in Elasticsearch:
- Create your own self-signed certificate or one from an internal CA for mutual TLS (mTLS).
- Configure both the private key and certificate on each node.
- Ensure all nodes trust the certificate.
- Add the root CA certificate to each node's trust store if needed.
- Update
elasticsearch.ymlon each node with the correct certificate and key paths. - Secure the private key to prevent unauthorized access.
Trust the CA Certificate
When configuring SSL/TLS for secure communication between Elasticsearch and clients, it is important to trust the Certificate Authority (CA) certificate to ensure the authenticity of the server.
-
Add the self-signed CA certificate to the trusted certificates directory:
cp /etc/elasticsearch/certs/http_ca.crt /usr/share/ca-certificates/elastic-ca.crtThis certificate is the Certificate Authority (CA) certificate generated by Elasticsearch during its security auto-configuration process. It is a self-signed certificate used to secure HTTP communication between Elasticsearch clients and the server by enabling SSL/TLS encryption.
If you are using your own certificate, specify it instead:
cp /etc/elasticsearch/certs/myown_ca.crt /usr/share/ca-certificates/myown-ca.crtinfoThis is generally used for system-wide trust on the machine/s where you're copying the certificate. If you're adding the CA certificate to your machine's list of trusted certificates (for example, for system-level applications like browsers or other services), this method is appropriate.
-
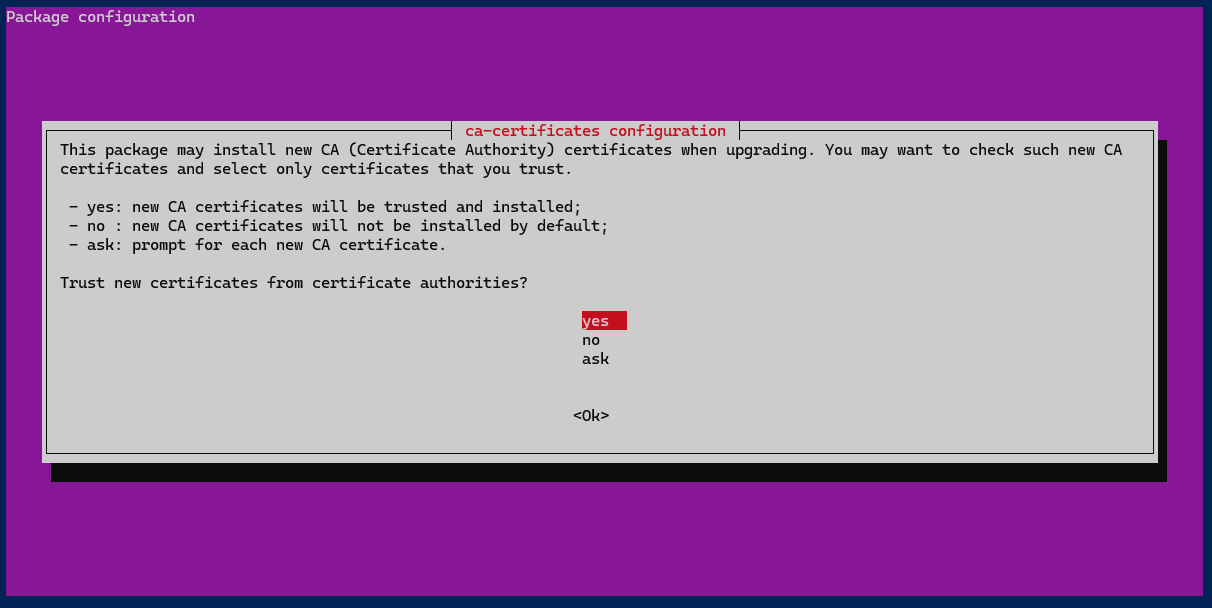
If you're using Ubuntu or Debian-based system, run the command below.
dpkg-reconfigure ca-certificates -
When prompted, click Yes.
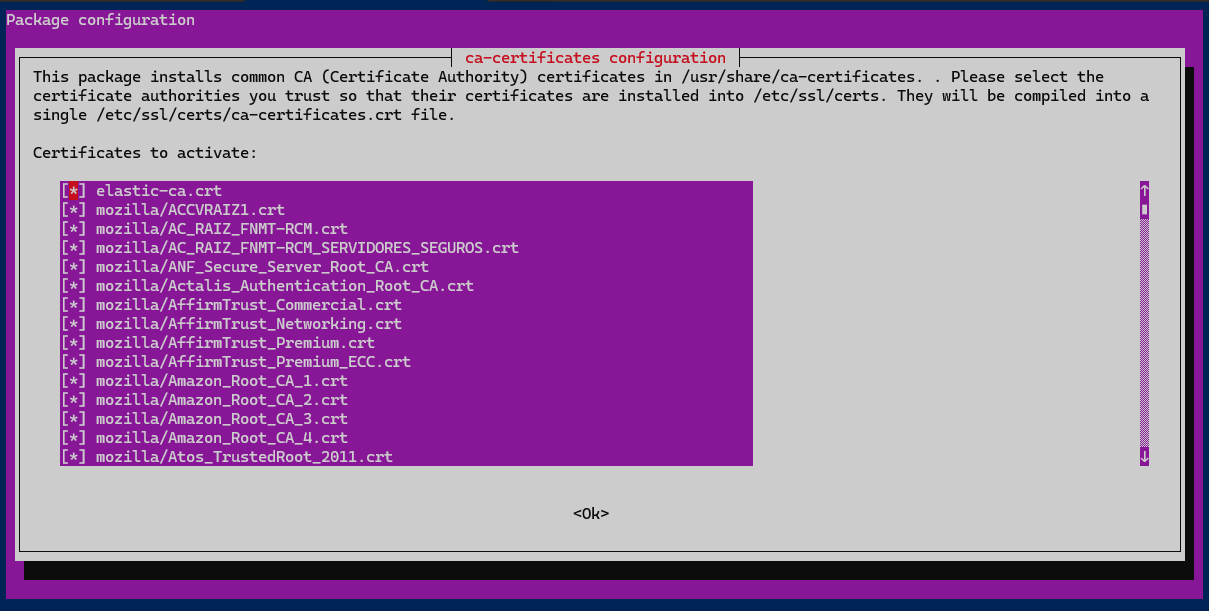
-
Select the copied certificate by pressing spacebar > Enter
-
Verify that the SSL certificate works.
infoStore the Elasticsearch endpoint and credentials in variables
ELASTIC_ENDPOINT="https://your-elasticsearch-endpoint"ELASTIC_USER="your-username"ELASTIC_PW="your-password"curl -u $ELASTIC_USER:$ELASTIC_PW $ELASTIC_ENDPOINT:9200Output:
{"name" : "elasticsearch","cluster_name" : "elasticsearch","cluster_uuid" : "Lmfoq9mbRBqis3GvrLVTZw","version" : {"number" : "8.17.0","build_flavor" : "default","build_type" : "deb","build_hash" : "2b6a7fed44faa321997703718f07ee0420804b41","build_date" : "2024-12-11T12:08:05.663969764Z","build_snapshot" : false,"lucene_version" : "9.12.0","minimum_wire_compatibility_version" : "7.17.0","minimum_index_compatibility_version" : "7.0.0"},"tagline" : "You Know, for Search"}
Share the CA Certificate to Other VMs (Optional)
To enable secure communication between Elasticsearch and other VMs, you need to share and configure the Elasticsearch SSL certificate on those VMs.
To use the Elasticsearch SSL certificate on other VMs, follow these steps:
-
On the Elasticsearch VM, generate the SSH key.
ssh-keygen -t ecdsa -b 521 -f ~/.ssh/id_ecdsa -
Get the public key.
cat ~/.ssh/id_ecdsa.pub -
On the other VM, add the Elasticsearch VM's public key to the
authorized_keysfile.cat >> ~/.ssh/authorized_keysPaste the copied public key and hit
Ctrl + D. -
From the Elasticsearch VM, share the certificate to the other VM using
scp. Make sure to change the IP address of the other VM.scp /etc/elasticsearch/certs/http_ca.crt root@192.168.56.103:/tmp -
Go back to the other VM and move the shared certificate.
sudo sumv /tmp/http_ca.crt /usr/share/ca-certificates/elastic-ca.crt -
Similar to the Elasticsearch node, reconfigure the CA certificates on the other VM to trust the new cert.
~~dpkg-reconfigure ca-certificates~~ -
When prompted, click Yes.
-
Select the copied certificate by pressing spacebar > Enter
-
From the other VM, test the connection:
$ curl -s -k -u $ELASTIC_USER:$ELASTIC_PW $ELASTIC_ENDPOINT:9200 | jq{"name": "node1","cluster_name": "elasticsearch","cluster_uuid": "QyCE0sgfQci-KgVx7mc5bA","version": {"number": "8.17.0","build_flavor": "default","build_type": "deb","build_hash": "2b6a7fed44faa321997703718f07ee0420804b41","build_date": "2024-12-11T12:08:05.663969764Z","build_snapshot": false,"lucene_version": "9.12.0","minimum_wire_compatibility_version": "7.17.0","minimum_index_compatibility_version": "7.0.0"},"tagline": "You Know, for Search"}Elasticsearch node has the IP: 192.168.56.101
Creating a Truststore
In Logstash, you may need to configure a truststore if you're using SSL/TLS communication with Elasticsearch, especially when working with self-signed certificates. A truststore ensures that Logstash can trust the server certificate from Elasticsearch for secure communication.
If you have a self-signed certificate, you'll need to convert your server’s certificate into a valid .jks (Java KeyStore) file.
-
Download the server's certificate (the one your Elasticsearch instance is using) if you don’t already have it.
openssl s_client -showcerts -connect MYURL:MYPORT </dev/null 2>/dev/null | openssl x509 -outform PEM > downloaded_cert.pemReplace MYURL with your server's URL and MYPORT with the port number (usually 443 for HTTPS). For example:
openssl s_client -showcerts -connect 127.0.0.1:9200 </dev/null 2>/dev/null | openssl x509 -outform PEM > downloaded_cert.pemThis will save the certificate in the
downloaded_cert.pemfile. -
Next, you need to convert the downloaded PEM certificate into a Java keystore file (.jks).
keytool -import -alias test -file downloaded_cert.pem -keystore downloaded_truststore.jksYou’ll be prompted to enter a password for the keystore. Store this password in a secure location.
This truststore will allow Logstash to securely communicate with Elasticsearch using SSL/TLS by trusting the server’s certificate.
Using Self-signed Certificates
This guide explains the process for generating and configuring SSL certificates for Elasticsearch
Generate the Root Certificate Authority (CA)
Generate the certificates ensuring the CA is properly set:
openssl req -x509 -nodes -new -sha256 -days 365 -subj "/CN=Elasticsearch-CA" \
-keyout /etc/elasticsearch/certs/ca.key \
-out /etc/elasticsearch/certs/ca.crt
Create the openssl.cnf Configuration File
-
The
openssl.cnffile is essential for configuring OpenSSL to generate certificates, keys, and CSRs.vi /etc/elasticsearch/certs/openssl.cnf -
Add the following configuration content to the file:
[ req ]default_bits = 2048default_keyfile = elasticsearch.keydistinguished_name = req_distinguished_namex509_extensions = v3_req[ req_distinguished_name ]countryName = Country Name (2 letter code)countryName_default = USstateOrProvinceName = State or Province Name (full name)stateOrProvinceName_default = CalifornialocalityName = Locality Name (eg, city)localityName_default = San FranciscoorganizationName = Organization Name (eg, company)organizationName_default = ElasticorganizationalUnitName = Organizational Unit Name (eg, section)organizationalUnitName_default = ITcommonName = Common Name (eg, fully qualified host name)commonName_default = elasticsearch.local[ v3_req ]subjectAltName = @alt_names[ alt_names ]DNS.1 = elasticsearch.localIP.1 = 127.0.0.1 -
Set Permissions for
openssl.cnfchown root:elasticsearch /etc/elasticsearch/certs/openssl.cnfchmod 644 /etc/elasticsearch/certs/openssl.cnf -
Verify the configuration file.
openssl req -config /etc/elasticsearch/certs/openssl.cnf \-new -keyout /etc/elasticsearch/certs/test.key \-out /etc/elasticsearch/certs/test.csrProvide PEM pass phrase when prompted.
If successful, this will generate a test private key and CSR without errors. Delete test files.
rm -rf test*
Generate the Certificate Signing Request (CSR)
-
Generate the private key and certificate for Elasticsearch. Provide PEM pass phrase when prompted.
openssl req -new -x509 -days 365 \-keyout /etc/elasticsearch/certs/elasticsearch.key \-config /etc/elasticsearch/certs/openssl.cnf \-out /etc/elasticsearch/certs/elasticsearch.crt -
Next, generate the signing request.
openssl req -new -nodes -newkey rsa:2048 -days 365 \-keyout /etc/elasticsearch/certs/elasticsearch.key \-config /etc/elasticsearch/certs/openssl.cnf \-out /etc/elasticsearch/certs/elasticsearch.csr -
Use the root CA's private key and certificate to sign the Elasticsearch CSR:
openssl x509 -req \-in /etc/elasticsearch/certs/elasticsearch.csr \-CA /etc/elasticsearch/certs/ca.crt \-CAkey /etc/elasticsearch/certs/ca.key \-CAcreateserial -days 365 \-extensions v3_req -extfile /etc/elasticsearch/certs/openssl.cnf \-out /etc/elasticsearch/certs/elasticsearch.crtThis will sign the CSR and generate the
elasticsearch.crtcertificate.Expected output:
Certificate request self-signature oksubject=C = US, ST = California, L = San Francisco, O = Elastic, OU = IT, CN = elasticsearch.local
Verify the Generated Files
-
At this point, we now have the following files.
$ ls -la-rw-r--r-- 1 root root 1269 Jan 30 14:28 ca.crt-rw------- 1 root root 1874 Jan 30 14:27 ca.key-rw-r--r-- 1 root root 1180 Jan 30 14:33 elasticsearch.crt-rw-r--r-- 1 root root 985 Jan 30 14:29 elasticsearch.csr-rw------- 1 root root 1874 Jan 30 14:28 elasticsearch.key-rw-r--r-- 1 root elasticsearch 272 Jan 30 14:26 openssl.cnf -
Verify the Root Certificate.
openssl x509 -noout -text -in /etc/elasticsearch/certs/ca.crt -
Verify the signed Elasticsearch Certificate.
openssl x509 -noout -text -in /etc/elasticsearch/certs/elasticsearch.crtLook for the X509v3 Subject Alternative Name field. If it's missing, you need to regenerate the certificate with the correct SAN entries.
X509v3 extensions:X509v3 Subject Alternative Name:DNS:elasticsearch.local, IP Address:127.0.0.1 -
Verify the CSR.
openssl req -noout -text -in /etc/elasticsearch/certs/elasticsearch.csr -
Check if the certificate details match the Elasticsearch certificate:
openssl s_client -connect 127.0.0.1:9200 -CAfile /etc/elasticsearch/certs/ca.crt -
Another way to verify is to check if key and certificate match:
openssl x509 -noout -modulus -in /etc/elasticsearch/certs/elasticsearch.crt | openssl md5openssl rsa -noout -modulus -in /etc/elasticsearch/certs/elasticsearc h.key | openssl md5The outputs should be identical. If they differ, the private key does not match the certificate.
Convert the Private Key to PKCS#8 Format (Optional)
If the key is in an incompatible format, convert it to PKCS#8:
openssl pkcs8 -topk8 -nocrypt \
-in /etc/elasticsearch/certs/elasticsearch.key \
-out /etc/elasticsearch/certs/elasticsearch.key.pkcs8
mv /etc/elasticsearch/certs/elasticsearch.key.pkcs8 /etc/elasticsearch/certs/elasticsearch.key
chmod 600 /etc/elasticsearch/certs/elasticsearch.key
Create the PKCS#12 File (Optional)
If needed, create a PKCS#12 file that combines the Elasticsearch certificate and its private key.
openssl pkcs12 -export \
-inkey /etc/elasticsearch/certs/elasticsearch.key \
-in /etc/elasticsearch/certs/elasticsearch.crt \
-certfile /etc/elasticsearch/certs/ca.crt \
-out /etc/elasticsearch/certs/elasticsearch.p12
You will be prompted for a password for the .p12 file.
Set Appropriate Permissions and Ownership
Ensure that the certificate files are properly secured by setting the correct permissions:
chown root:elasticsearch /etc/elasticsearch/certs/*.crt
chown root:elasticsearch /etc/elasticsearch/certs/*.key
chown root:elasticsearch /etc/elasticsearch/certs/*.p12
chmod 644 /etc/elasticsearch/certs/*.key
chmod 644 /etc/elasticsearch/certs/*.crt
chmod 644 /etc/elasticsearch/certs/*.p12
This ensures the certificates and private keys are readable only by root and the elasticsearch group.
Manually Trust the CA Certificate
To ensure the root certificate is trusted by systems or browsers, you should add it to the trusted certificate store.
To add the CA certificate to the system’s trust store (for Ubuntu):
cp /etc/elasticsearch/certs/ca.crt /usr/share/ca-certificates/elastic-ca.crt
dpkg-reconfigure ca-certificates
update-ca-certificates
This will install the CA certificate into the system’s trusted store.
Configure Elasticsearch
Edit the Elasticsearch configuration file to enable security features.
vi /etc/elasticsearch/elasticsearch.yml
Add these settings:
# Enable security features
xpack.security.enabled: true
#xpack.security.enabled: false
xpack.security.enrollment.enabled: true
#xpack.security.enrollment.enabled: false
# Enable encryption for HTTP API client connections, such as Kibana, Logstash, and Agents
xpack.security.http.ssl:
enabled: true
#enabled: false
certificate_authorities: [ "/etc/elasticsearch/certs/ca.crt" ]
keystore.path: /etc/elasticsearch/certs/elasticsearch.p12
keystore.password: elastic
#keystore.path: certs/http.p12
#truststore.path: /etc/elasticsearch/certs/truststore.p12
#truststore.password: elastic
# Enable encryption and mutual authentication between cluster nodes
xpack.security.transport.ssl:
enabled: true
verification_mode: certificate
certificate: "/etc/elasticsearch/certs/elasticsearch.crt"
key: "/etc/elasticsearch/certs/elasticsearch.key"
certificate_authorities: [ "/etc/elasticsearch/certs/ca.crt" ]
#keystore.path: certs/transport.p12
#truststore.path: certs/transport.p12
#verification_mode: certificate
#keystore.path: /etc/elasticsearch/certs/elasticsearch.p12
#truststore.path: /etc/elasticsearch/certs/truststore.p12
#keystore.password: elastic
#truststore.password: elastic
# Create a new cluster with the current node only
# Additional nodes can still join the cluster later
cluster.initial_master_nodes: ["node1"]
# Allow HTTP API connections from anywhere
# Connections are encrypted and require user authentication
http.host: 0.0.0.0
Restart and Verify
Restart Elasticsearch and check its status:
systemctl restart elasticsearch
systemctl status elasticsearch
Verify the connection. First, define environment variables for authentication:
ELASTIC_ENDPOINT="https://your-elasticsearch-endpoint"
ELASTIC_USER="your-username"
ELASTIC_PW="your-password"
Use curl with -k to bypass certificate validation:
curl -k -u $ELASTIC_USER:$ELASTIC_PW -XGET $ELASTIC_ENDPOINT:9200
Output:
{
  "name" : "node1",
  "cluster_name" : "elasticsearch",
  "cluster_uuid" : "UYlLyPlmRkGGSHGZQxUIhw",
  "version" : {
    "number" : "8.17.0",
    "build_flavor" : "default",
    "build_type" : "deb",
    "build_hash" : "2b6a7fed44faa321997703718f07ee0420804b41",
    "build_date" : "2024-12-11T12:08:05.663969764Z",
    "build_snapshot" : false,
    "lucene_version" : "9.12.0",
    "minimum_wire_compatibility_version" : "7.17.0",
    "minimum_index_compatibility_version" : "7.0.0"
},
Now remove -k to validate the certificate. The output should remain the same:
curl -u $ELASTIC_USER:$ELASTIC_PW -XGET $ELASTIC_ENDPOINT:9200
Output:
{
  "name" : "node1",
  "cluster_name" : "elasticsearch",
  "cluster_uuid" : "UYlLyPlmRkGGSHGZQxUIhw",
  "version" : {
    "number" : "8.17.0",
    "build_flavor" : "default",
    "build_type" : "deb",
    "build_hash" : "2b6a7fed44faa321997703718f07ee0420804b41",
    "build_date" : "2024-12-11T12:08:05.663969764Z",
    "build_snapshot" : false,
    "lucene_version" : "9.12.0",
    "minimum_wire_compatibility_version" : "7.17.0",
    "minimum_index_compatibility_version" : "7.0.0"
},