Offline Install
Overview
This lab covers the offline installation of Elasticsearch. This is suited for private networks where nodes doesn't have internet access. The nodes are still created as virtual machines in VirtualBox using Vagrant, but the installation process will use a package manager.
Pre-requisites
- Install VirtualBox
- Install Vagrant on Windows
- Setup fileshare on the Virtual Machine
- Install jq on Elasticsearch node
Setup the Virtual Machines
If you are using cloud compute instances, you can skip this section.
-
Download the Vagrant files here: Project Files
-
Unzip the Files. Open Powershell and proceed to Elastic directory.
cd elastic -
Run the command below. This will create four virtual machines in VirtualBox
vagrant upIf you encounter any error, you can add the
--debugparameter:vagrant up --debugSince having multiple Virtual machines can be resource-intensive, you can modify the
Vagrantfileand comment out theconfigblocks for the other VMs. -
Run the
vagrantcommand below to list the VMs:vagrant ssh-config -
Open VirtualBox. You should see all VMs running.
-
To login to the node, run:
vagrant ssh node1
Download the Packages
-
On a computer with internet access, download the Debian package for Elasticsearch v8.17.0.
wget https://artifacts.elastic.co/downloads/elasticsearch/elasticsearch-8.17.0-amd64.debwget https://artifacts.elastic.co/downloads/elasticsearch/elasticsearch-8.17.0-amd64.deb.sha512shasum -a 512 -c elasticsearch-8.17.0-amd64.deb.sha512sudo dpkg -i elasticsearch-8.17.0-amd64.deb -
Copy the files to the virtual machine. You can map local folder to a fileshare in you VM.
Install Elasticsearch 8.17
-
Login to the Elasticsearch node, switch to root, and move the files from fileshare to
/tmp.cp -r /mnt/fileshare/elastic* /tmpcd /tmp/elastic* -
Install the packages.
sudo dpkg -i elasticsearch-8.17.0-amd64.deb -
Configure Elasticsearch configuration file.
sudo vi /etc/elasticsearch/elasticsearch.ymlSpecify the following:
node.name: node-1network.host: 0.0.0.0discovery.seed_hosts: ["127.0.0.1"]cluster.initial_master_nodes: ["node-1"]infoThe
cluster.initial_master_nodesmay already be set at the end of the file. Confirm first to avoid duplicate fields. -
Enable and start the service.
sudo systemctl daemon-reloadsudo systemctl enable --now elasticsearch.servicesudo systemctl status elasticsearch.service -
Reset the password for the
elasticuser./usr/share/elasticsearch/bin/elasticsearch-reset-password -i -u elasticPress
ywhen prompted and then provide your new password.Please confirm that you would like to continue [y/N]yEnter password for [elastic]:Re-enter password for [elastic]:Password for the [elastic] user successfully reset.If you encounter the error below, you may need to adjust the heap size.
ERROR: Failed to determine the health of the cluster. Unexpected http status [503], with exit code 65 -
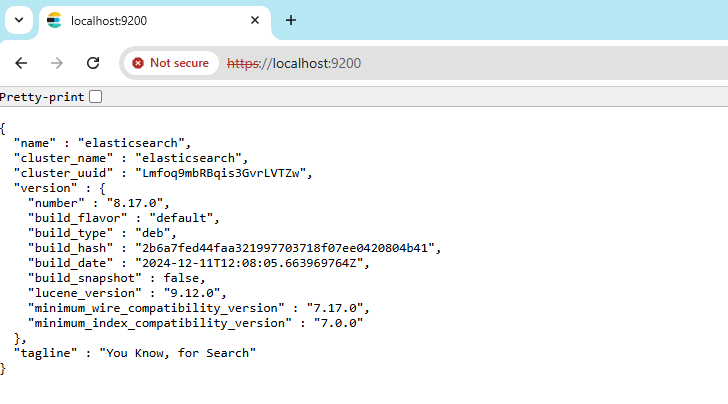
Verify the access:
curl -k -u elastic:<add-password> $ELASTIC_ENDPOINT:9200Output:
{"name" : "elasticsearch","cluster_name" : "elasticsearch","cluster_uuid" : "Lmfoq9mbRBqis3GvrLVTZw","version" : {"number" : "8.17.0","build_flavor" : "default","build_type" : "deb","build_hash" : "2b6a7fed44faa321997703718f07ee0420804b41","build_date" : "2024-12-11T12:08:05.663969764Z","build_snapshot" : false,"lucene_version" : "9.12.0","minimum_wire_compatibility_version" : "7.17.0","minimum_index_compatibility_version" : "7.0.0"},"tagline" : "You Know, for Search"} -
Another way to verify access: Open a web browser in your computer (host) and navigate to:
$ELASTIC_ENDPOINT:9200/It will prompt you to enter the username and password. If successful, you should see the same output.
Configure SSL on Elasticsearch
When configuring SSL/TLS for secure communication between Elasticsearch and clients, it is important to trust the Certificate Authority (CA) certificate to ensure the authenticity of the server.
For more information, please see SSL Configuration.
Share the Certificate to Other VMs (Optional)
If you want other VMs to trust the Elasticsearch SSL certificate, you need to share the CA certificate. This allows them to securely connect to Elasticsearch using the same certificate.
For more information, please see Sharing the Certificate.