Features/Tools
Overview
This page covers common features you can enable or configure after the VM is created, to improve usability and integration with the host.
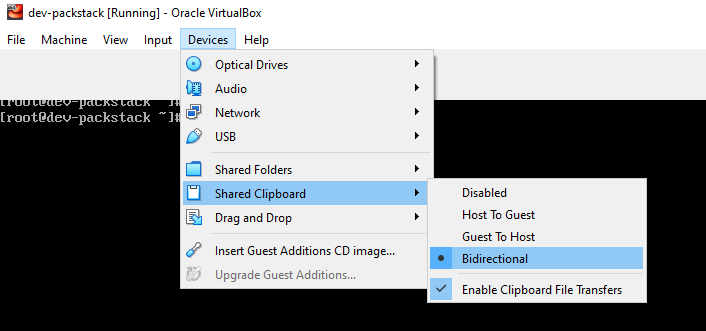
Allow Shared Clipboard
You can only enable Shared Clipboard and Drag & Drop if your VM has a GUI.
For most minimal ISO setup, they only install a terminal-based system which doesn't have a desktop environment.
As a workaround, you can connect to the VM via SSH from your host machine.
You can enable the shared clipboard in VirtualBox to copy text between your host machine and your VM.
-
Go to Devices ➔ Shared Clipboard ➔ Bidirectional
-
Check the VBox Service.
Inside the VM:
lsmod | grep vboxguestIf you see nothing, clipboard won’t work.
Also check:
systemctl status vboxserviceShould be active (running).
-
If NOT installed, install Guest Additions properly.
sudo dnf install -y gcc make perl kernel-devel kernel-headers elfutils-libelf-develWhen you install VirtualBox Guest Additions on Linux, it often needs to compile kernel modules (like
vboxguest) for your currently running kernel.Check the running kernel version:
uname -rCheck the installed headers:
rpm -q kernel-devel kernel-headersYou want something like:
uname -r: 5.15.0-1127.el8.x86_64kernel-devel-5.15.0-1127.el8.x86_64kernel-headers-5.15.0-1127.el8.x86_64If the numbers don’t match, you need to update your kernel and headers:
sudo dnf update -yreboot -
Mount Guest Additions ISO.
From VirtualBox menu:
Devices > Insert Guest Additions CD ImageThen inside VM:
sudo mkdir /mnt/cdromsudo mount /dev/cdrom /mnt/cdromcd /mnt/cdromsudo ./VBoxLinuxAdditions.runReboot after.
-
Restart clipboard services.
After reboot try:
VBoxClient --clipboardAlso verify:
ps aux | grep VBoxClientYou should see clipboard process running.
-
If you are using AlmaLinux, there are some very common gotchas.
-
VirtualBox clipboard is flaky with Wayland.
Check:
echo $XDG_SESSION_TYPEIf
wayland➔ switch to Xorg at login screen. -
Minimal install / no GUI session - Clipboard only works with GUI sessions.
-
-
Quick sanity test.
Inside VM:
VBoxClient-allThen try copy again.
Mounting a Fileshare to VMs
Share a folder from your host machine with your VM to easily transfer files.
-
Open VirtualBox and select the VM in the VirtualBox Manager.
-
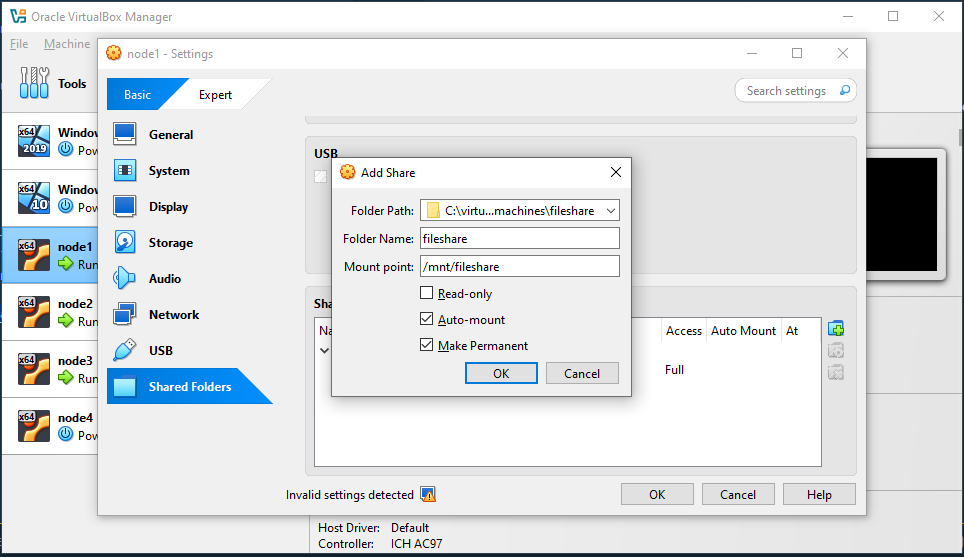
Go to Settings > Shared Folders > Click the `+' to add a folder.
-
Specify the folder path, foldername, and mount point.
-
Click OK > OK
-
Check if you can find it listed using this command:
sudo VBoxControl sharedfolder listOutput:
Oracle VM VirtualBox Guest Additions Command Line Management Interface Version 5.2.42_Ubuntu(C) 2008-2020 Oracle CorporationAll rights reserved.Shared Folder mappings (2):01 - vagrant02 - fileshare -
If so, create directory and mount.
mkdir /mnt/filesharemount -t vboxsf fileshare /mnt/fileshare -
If step 4 did not returned the shared folders, you can install
virtualbox-guest-dkms.sudo apt-get install -y virtualbox-guest-dkmssudo usermod -aG vboxsf $(whoami)sudo VBoxControl guestproperty \set /VirtualBox/GuestAdd/SharedFolders/MountDir /add/your/fileshare/here -
Restart VM then check if you have any vb folders mounted.
mount | grep vboxsfOutput:
/vagrant on /vagrant type vboxsf (rw,nodev,relatime,_netdev)fileshare on /mnt/fileshare type vboxsf (rw,nodev,relatime)fileshare on /mnt/fileshare type vboxsf (rw,nodev,relatime)fileshare on /mnt/fileshare type vboxsf (rw,nodev,relatime) -
If so, change ownership of
/add/your/fileshare/hereto yourself.sudo chown $(whoami):$(whoami) /add/your/fileshare/here
Drag and Drop between Host and VM
Allows copying files directly by dragging them between host and VM windows.
-
Enable in VirtualBox menu:
Devices ➔ Drag and Drop ➔ Bidirectional -
Requires Guest Additions on the VM.
-
Works for both files and text (depending on OS support).
Snapshot Management
Take snapshots to save the current state of a VM for quick rollback.
-
From VirtualBox menu:
Machine ➔ Take Snapshot -
Useful before updates, configuration changes, or testing software.
-
Restore a snapshot anytime to revert the VM to the saved state.
Seamless Mode / Fullscreen Integration
Integrate the VM display with the host desktop for better workflow.
-
Fullscreen Mode:
View ➔ Fullscreen Mode -
Seamless Mode: merges guest windows with host desktop:
View ➔ Seamless Mode
Notes: Requires Guest Additions.
USB Device Passthrough
Allows the VM to directly access USB devices from the host.
-
Connect USB devices in VirtualBox menu:
Devices ➔ USB ➔ <Device Name> -
May require adding your user to
vboxusersgroup on Linux:sudo usermod -aG vboxusers $USER -
Useful for USB drives, dongles, or hardware testing in the VM.