Apache Hadoop
Overview
When handling petabytes of data, Hadoop enables efficient processing by utilizing multiple computers to process data in parallel.
- Expand storage capacity as data grows
- Each computer added enhances the Hadoop Distributed Filesystem (HDFS)
- Built to continue operations even if some computers fail
- Distributes data across separate hardware
This lab demonstrates how to integrate Elasticsearch with Apache Hadoop to process large datasets.
- Use an Apache access log as an example of big data.
- Write a simple MapReduce job to ingest the file with Hadoop
- Index the ingested data into Elasticsearch
Lab Environment
| Node | Hostname | IP Address |
|---|---|---|
| Node 1 | elasticsearch | 192.168.56.101 |
| Node 2 | logstash | 192.168.56.102 |
| Node 3 | kibana | 192.168.56.103 |
| Node 4 | hadoop | 192.168.56.104 |
Setup details:
- The nodes are created in VirtualBox using Vagrant.
- An SSH key is generated on the Elasticsearch node
Pre-requisites
- Create the nodes in VirtualBox
- Install Elasticsearch on node 1
- Install Logstash on node 2
- Configure SSL on Elasticsearch
- Install jq on the nodes
Choosing the Right Tool
Hadoop, Elasticsearch, and Logstash each have unique strengths for data management and analysis.
-
Hadoop
- Handles large-scale data ingestion from billions of sources
- Processes data in parallel across clusters
- Suitable for initial collection and raw data processing
-
Elasticsearch
- Stores and indexes data for fast retrieval
- Optimized for full-text searches and complex queries
- Ideal for quick data access and user-friendly search results
-
Logstash
- Collects and processes real-time data
- Converts raw data into structured formats
- Acts as a bridge between data sources and Elasticsearch
Working together, Hadoop collects and processes vast amounts of data, Logstash organizes and forwards it, and Elasticsearch stores and retrieves it quickly for user searches.
How MapReduce Works
MapReduce processes data through three stages: map, shuffle, and reduce. It allows fine-tuned customization and optimization for efficient data processing.
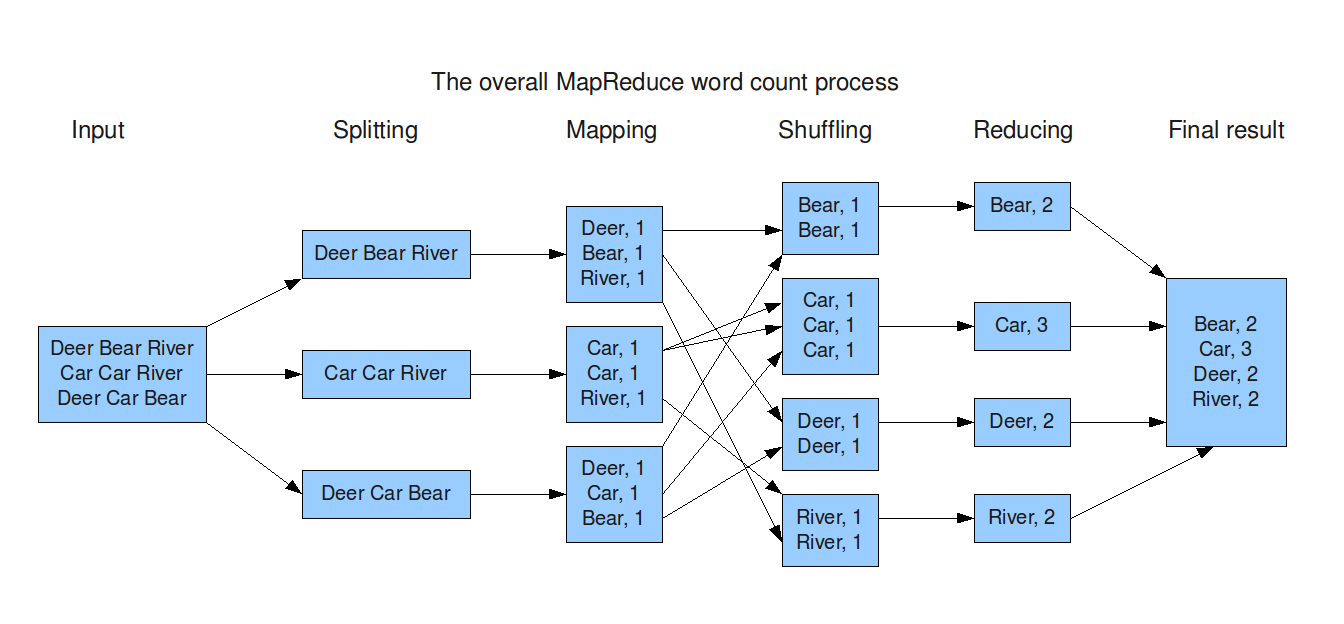
Initially, the data is split into smaller chunks that are distributed across different computing nodes.
- Nodes map the data into key-value pairs.
- Values with the same keys are grouped together during the shuffle stage.
- Shuffled data is simplified for processing in the reduce stage.
- The output is the final aggregated result.
Offline Installation
In a production enterprise setup, Hadoop nodes are typically placed in a private network to enhance security and control access. Offline installation is generally recommended for such setups.
-
On a computer with internet access, download the latest Hadoop version.
wget https://dlcdn.apache.org/hadoop/common/hadoop-3.4.1/hadoop-3.4.1.tar.gzFor more information, please see Hadoop downloads.
-
Copy the files to the virtual machine. If you are using VirtualBox in your computer, you can map local folder to a fileshare in you VM.
-
Login to your VM and create the
hadoopuser and add it to the sudoers group.sudo useradd hadoopsudo passwd hadoopsudo usermod -aG sudo hadoop -
Proceed to the directory where the Hadoop package is stored and unzip the file.
cd /mnt/fileshare/hadoopcp hadoop* /tmptar -xvzf hadoop-3.4.1.tar.gz -C /usr/localmv /usr/local/hadoop-3.4.1 /usr/local/hadoop -
Change the ownership of the Hadoop directory.
sudo chown -R hadoop:hadoop /usr/local/hadoop -
Before anything else, verify the required packages on the VM.
-
Check if Java is installed.
java -versiondpkg -l | grep openjdkIf Java is installed, you'll see output similar to:
openjdk version "11.0.25" 2024-10-15OpenJDK Runtime Environment (build 11.0.25+9-post-Ubuntu-1ubuntu122.04)OpenJDK 64-Bit Server VM (build 11.0.25+9-post-Ubuntu-1ubuntu122.04, mixed mode, sharing)If Java is not installed, you can install it:
sudo apt install -y openjdk-11-jdksudo apt install -y openjdk-8-jdk # (Optional) Install Java 8 if neededYou can choose between installed Java versions if multiple are available.
sudo update-alternatives --config javaOutput:
There is only one alternative in link group java (providing /usr/bin/java): /usr/lib/jvm/java-11-openjdk-amd64/bin/javaNothing to configure. -
Check if
libsnappyis installed:dpkg -l | gxrep libsnappyIf not installed, you can install it:
sudo apt install -y libsnappy-dev -
Check if
zlibis installed:dpkg -l | grep zlibIf not installed, you can install it:
sudo apt install zlib1g-dev -
Verify Python installation.
python3 --versionYou can install Python 3 on Ubuntu using:
sudo apt updatesudo apt install python3
-
-
After installing the pre-requisites, proceed with the installation.
-
Add the following to
~/.bashrcor/etc/profile:cat >> ~/.bashrcEnter the following:
export HADOOP_HOME=/usr/local/hadoopexport HADOOP_INSTALL=$HADOOP_HOMEexport HADOOP_MAPRED_HOME=$HADOOP_HOMEexport HADOOP_COMMON_HOME=$HADOOP_HOMEexport HADOOP_HDFS_HOME=$HADOOP_HOMEexport YARN_HOME=$HADOOP_HOMEexport HADOOP_COMMON_LIB_BNTIVE_DIR=$HADOOP_HOME/lib/nativeexport PATH=$PATH:$HADOOP_HOME/bin:$HADOOP_HOME/sbinexport HADOOP_OPTS="-Djava.library.path=$HADOOP_HOME/lib/native"export JAVA_HOME=/usr/lib/jvm/java-11-openjdk-amd64 -
Reload the shell.
source ~/.bashrc -
Verify Installation:
hadoop versionOutput:
Hadoop 3.4.1Source code repository https://github.com/apache/hadoop.git -r 4d7825309348956336b8f06a08322b78422849b1Compiled by mthakur on 2024-10-09T14:57ZCompiled on platform linux-x86_64Compiled with protoc 3.23.4From source with checksum 7292fe9dba5e2e44e3a9f763fce3e680This command was run using /usr/local/hadoop/share/hadoop/common/hadoop-common-3.4.1.jar
Download the Sample Log File
A sample log file will be used to simulate big data for this project. This file will be imported into Elasticsearch for further processing. The log file will serve as the input for the MapReduce job.
Download the file here: hadoop-apache-access.log
After you download the log file, you can transfer the file to your node. If you are using VirtualBox in your computer, you can map local folder to a fileshare in you VM.
MapReduce Project
This section covers the theory behind the MapReduce project.
To save time, you can clone the GitHub repository that contains the sample source code.
For more information, please see Clone the Project Repository.
To compile the MapReduce code into a JAR file, we'll need throws use Maven. In a real-world scenario, there are additional steps:
- Use an IDE to create the project and write the code.
- Compile the code into a JAR file with Maven on your local machine.
- Transfer the JAR file to the Hadoop instance.
Maven Setup
-
Create an empty Maven project using your IDE.
-
Skip the archetype selection since you only need an empty project.
-
After the project is created, modify the
pom.xmlfile with the following properties:<properties><maven.compiler.source>1.8</maven.compiler.source><maven.compiler.target>1.8</maven.compiler.target></properties><dependencies><dependency><groupId>org.apache.hadoop</groupId><artifactId>hadoop-client</artifactId><version>3.2.1</version></dependency><dependency><groupId>org.elasticsearch</groupId><artifactId>elasticsearch-hadoop-mr</artifactId><version>7.8.0</version></dependency><dependency><groupId>commons-httpclient</groupId><artifactId>commons-httpclient</artifactId><version>3.1</version></dependency></dependencies>Notes:
- Update the version numbers based on your setup.
- The
elasticsearch-hadoop-mrlibrary is used to write to Elasticsearch. - The
commons-httpclientlibrary allows Hadoop to make REST calls to the Elasticsearch server.
-
Define the access log mapper class and override the default map method with the logic you need:
import org.apache.hadoop.mapreduce.Mapper;import java.io.IOException;public class AccessLogIndexIngestion {public static class AccessLogMapper extends Mapper<Object, Object, Text, IntWritable> {@Overrideprotected void map(Object key, Object value, Context context) throws IOException, InterruptedException {// Implement your map logic here}}public static void main(String[] args) {// Main method logic}}
Build the JAR File
Github repository: test-maven-project
-
On a computer with internet access, clone the repository:
git clone https://github.com/joseeden/test-maven-project.git -
Install Maven:
sudo apt install -y maven -
Proceed to the project directory and build the JAR file.
mvn clean package -
If successful, you should see a build success message:
[INFO] ------------------------------------------------------------------------[INFO] BUILD SUCCESS[INFO] ------------------------------------------------------------------------[INFO] Total time: 36.095 s[INFO] Finished at: 2025-01-05T17:03:43+08:00[INFO] ------------------------------------------------------------------------ -
Copy the JAR file onto the Hadoop node. If you are using VirtualBox in your computer, you can map local folder to a fileshare in you VM.
Create the Elasticsearch Index
Login to the Elasticsearch node and run the following command to create an Elasticsearch index. Make sure to change the password and the IP address for your Elasticsearch node.
curl -s -u elastic:elastic \
-H 'Content-Type: application/json' \
-X PUT "$ELASTIC_ENDPOINT:9200/logs?pretty" -d'
{
  "mappings": {
    "properties": {
      "ip": { "type": "keyword" },
      "dateTime": { "type": "date", "format": "dd/MMM/yyyy:HH:mm:ss" },
      "httpstatus": { "type": "keyword" },
      "url": { "type": "keyword" },
      "responseCode": { "type": "keyword" },
      "size": { "type": "integer" }
    }
  }
}' | jq
The dateTime field is defined as a date, which allows us to visualize various metrics using Kibana. The date format is also specified to ensure that values passed to Elasticsearch are parsed correctly.
If the index is created correctly, you should see:
{
  "acknowledged": true,
  "shards_acknowledged": true,
  "index": "logs"
}
Another way it to check the indices:
curl -u elastic:elastic --insecure \
-X GET "$ELASTIC_ENDPOINT:9200/_cat/indices?v"
Output:
health status index uuid                   pri rep docs.count docs.deleted store.size pri.store.size dataset.size
yellow open   logs  wpxLIsW1TCOqAnpUl2SGKg   1   1          0            0       227b           227b         227b
Running the Hadoop Job
Login to the Hadoop node.
-
Switch to
hadoopuser. Ensure both the sample log file and the JAR file is copied over.su - hadoopmkdir /tmp/hadoopcp /mnt/fileshare/logs/hadoop-apache-access.log /tmp/hadoop/cp /mnt/fileshare/hadoop/test-maven-project-1.0.jar /tmp/hadoop/cd /tmp/hadoopIn this step, I created the
/tmp/hadoopdirectory and copied over both files. -
Execute the Hadoop JAR file with the log file as input.
hadoop jar test-maven-project-1.0.jar hadoop-apache-access.log
Verify the Index
Login to the Elasticsearch node and switch to root.
Verify the index is created:
curl -u elastic:elastic --insecure \
-X GET "$ELASTIC_ENDPOINT:9200/_cat/indices?v"
Output:
health status index uuid                   pri rep docs.count docs.deleted store.size pri.store.size dataset.size
yellow open   logs  wpxLIsW1TCOqAnpUl2SGKg   1   1      10000                       0        805.2kb      805.2kb
Visualize in Kibana
TODO....
Store the Elasticsearch endpoint and credentials in variables:
ELASTIC_ENDPOINT="https://your-elasticsearch-endpoint"
ELASTIC_USER="your-username"
ELASTIC_PW="your-password"
Cleanup
Use the command below to delete the indices after the lab. Make sure to replace enter-name with the index name.
curl -s -u $ELASTIC_USER:$ELASTIC_PW  \
-H 'Content-Type: application/json' \
-XDELETE "$ELASTIC_ENDPOINT:9200/enter-name" | jq