OpenStack - Manual Installation
Overview
OpenStack can be installed manually in a virtual lab. This setup is simple to prepare and lets you experiment with VM sizing and networking before moving to physical servers.
- Use three virtual machines (will be increased to 4 VMs later)
- Separate traffic using three virtual networks
- Install Linux manually on each node
- Install OpenStack services step by step
Manual installation involves many steps and configuration edits. It may include over a hundred commands.
While automation tools can simplify the process, doing it manually helps in understanding the service dependencies and see how components interact.
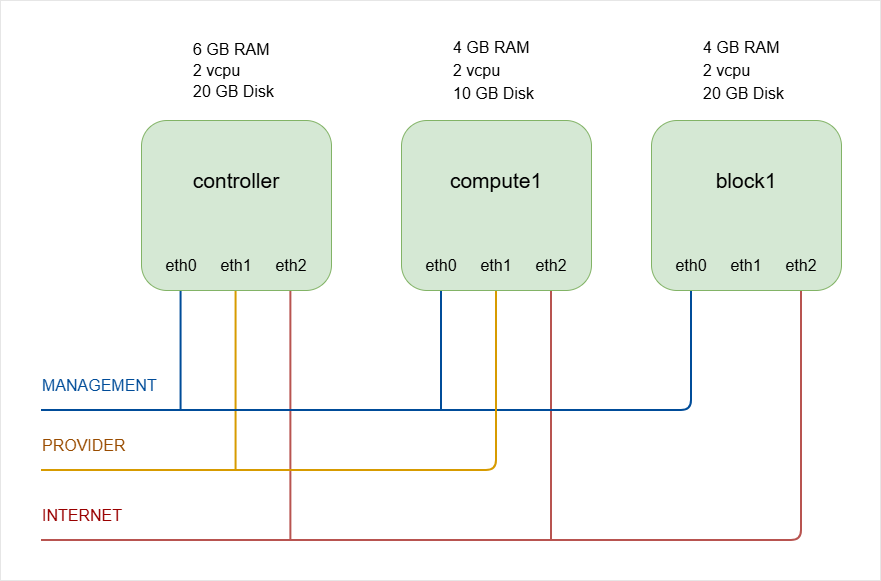
Lab Architecture
The lab uses three VMs to represent a small OpenStack environment.
| Node | Role | vCPUs | RAM | Disk |
|---|---|---|---|---|
| Controller | Runs core OpenStack services (Identity, Image, Networking, Dashboard, etc.) | 2 | 6 GB | 20 GB |
| Compute | Runs virtual machine instances (Nova compute service) | 2 | 4 GB | 10 GB |
| Storage | Provides block storage (Cinder with LVM backend) | 2 | 4 GB | 20 GB |
NOTE: The number of compute nodes will be increased to two during the Nova Compute installation step. We will use VirtualBox snapshots to clone the compute node.
To keep things simple, we will begin with only three virtual machines.
Host System Recommendation
For a smooth experience:
| Host Specification | Recommended | Minimum (Limited Performance) |
|---|---|---|
| RAM | 16 GB | 8 GB |
| CPU | 4 cores | 2 cores |
Running the lab on 8 GB RAM is possible but performance will be constrained, especially when launching multiple instances.
Tools Used
VirtualBox
VirtualBox is a free hypervisor used to create and manage virtual machines for lab and testing environments.
- Used to create and run the virtual machines
- Available on Windows, macOS, and Linux
- See: Download VirtualBox
Other hypervisors such as Hyper-V, VMware, or KVM can also be used with minor configuration adjustments.
A few notes:
- The compute node runs inside a VirtualBox VM.
- QEMU is used as the hypervisor
- KVM is not available inside this nested setup
QEMU is fine for learning and testing. It is not intended for production workloads. In real environments, compute nodes use KVM on physical servers.
Operating System
This lab uses Ubuntu Server 22.04.5 LTS, but other Linux distributions can also be used, including:
- AlmaLinux
- Rocky Linux
- OpenSUSE
The primary difference between distributions is the package manager:
| Distribution Type | Package Manager |
|---|---|
| Ubuntu / Debian | apt |
| RHEL-based (AlmaLinux, Rocky) | dnf or yum |
| openSUSE | zypper |
Most OpenStack configuration files and service concepts remain the same across distributions, although package names and file paths may differ slightly.
Resource Considerations
The values below are recommended for stable operation, but adjustments can be made depending on available hardware.
- RAM can be reduced to 2 GB for Compute/Storage nodes if system resources are limited.
- Controller node requires more RAM because it runs multiple services simultaneously.
- Thin disk allocation can be enabled so disk space is consumed only as data is written.
On the Compute node:
- Approximately 0.5 GB RAM is used by the operating system.
- Each small test instance may consume around 0.5 GB RAM.
- Less RAM means fewer instances can run concurrently.
On the Storage node:
- Reducing RAM is possible but may impact storage performance.
Virtual Networks
Three virtual networks are used to separate traffic.
The network configurations can be found here: Create the Virtual Networks.
-
Management Network
- Used for management, tunnel, and storage traffic
- Configured as Host Only network
- VMs can talk with each other and with the host machine.
-
Provider Network
- Used for instance traffic
- Configured as NAT Network
- Allows instances to reach the outside network.
-
Internet Network
-
Provides internet access to all nodes
-
Used for installing packages and updates
infoYou can experiment with bridged networking if needed, but you may have to adjust IP addressing.
-
Storage Backend
The storage node uses LVM as the backend.
- Simple to configure
- Suitable for labs and testing
Production environments often use more advanced backends such as Ceph.
For learning purposes, LVM keeps the setup simple and focused on OpenStack itself.
Neutron Networking Backend
Linux Bridge is easier to configure and suitable for a basic learning environment.
- Linux Bridge agent is used
- Open vSwitch can also be used in other setups