Install Keystone
Overview
Keystone is the identity service of OpenStack. It handles authentication and authorization for all other services. The steps include:
- Configure SQL database
- Install required packages
- Update keystone.conf
- Initialize Keystone
- Configure Apache
Each step builds the identity service, which is the core access control of OpenStack.
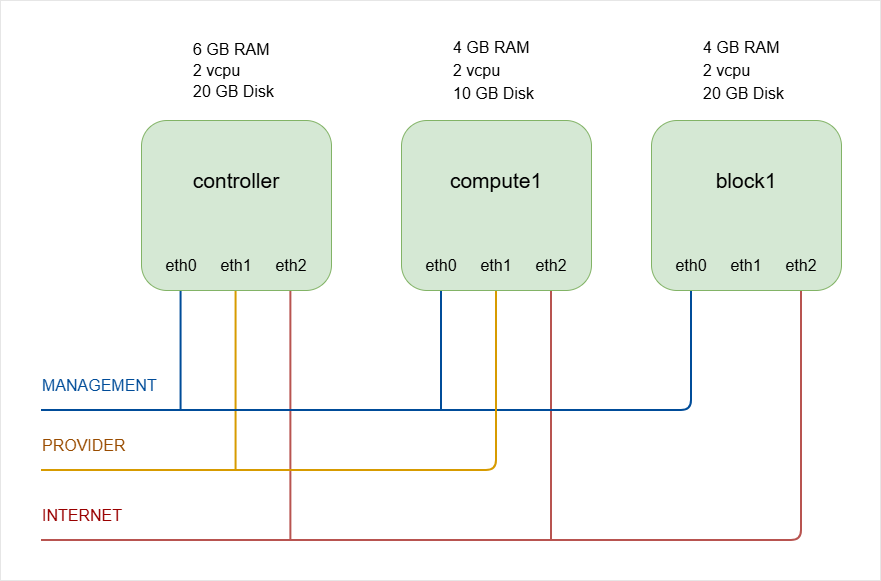
NOTES: The hostnames of all the nodes in this lab are configured in the /etc/hosts file in each node (See Networking and Security).
Lab diagram:
Configure MySQL Database
Start by preparing the database for Keystone. Log in as root on the controller node.
-
Loging to MySQL:
sudo mysql -
Create the database:
CREATE DATABASE keystone;Output:
Query OK, 1 row affectedinfoAlways end MySQL commands with a semicolon.
-
Grant privileges to the
keystoneuser for local access:GRANT ALL PRIVILEGES ON keystone.- TO 'keystone'@'localhost' IDENTIFIED BY 'openstack';Output:
Query OK, 0 row affected -
Grant privileges for remote access:
GRANT ALL PRIVILEGES ON keystone.- TO 'keystone'@'%' IDENTIFIED BY 'openstack';Output:
Query OK, 0 row affected -
Exit the database:
exit
The database is now ready for Keystone, which completes the backend setup for identity management.
Install Required Packages
Install Keystone and its dependencies. Keystone runs as a WSGI module under Apache.
apt install -y keystone apache2 libapache2-mod-wsgi-py3 crudini
Packages installed:
- Keystone for identity management
- Apache2 as the HTTP server
- WSGI module for integration
- Crudini for easier configuration editing
After installation, the system is ready for configuration.
Configure Keystone Database Access
The main configuration file is:
/etc/keystone/keystone.conf
In this setup, we can use crudini to set the database connection in the [database] section.
This command sets the connection parameter:
crudini --set /etc/keystone/keystone.conf \
database connection mysql+pymysql://keystone:openstack@controller/keystone
Here, the openstack is the password:
keystone:openstack
Output: No visible output if successful.
This connects Keystone to the MySQL database created earlier.
Configure Token Provider
Set the token provider to fernet in the [token] section:
crudini --set /etc/keystone/keystone.conf token provider fernet
Output: No visible output if successful.
Fernet is the recommended token provider for secure identity tokens. This completes the main Keystone configuration.
Initialize Keystone
Populate the database using the keystone-manage tool.
-
Run the database sync as the
keystoneuser:su -s /bin/sh -c "keystone-manage db_sync" keystone -
Initialize Fernet keys:
keystone-manage fernet_setup \--keystone-user keystone \--keystone-group keystone -
Initialize credential keys:
keystone-manage credential_setup \--keystone-user keystone \--keystone-group keystone -
Bootstrap the identity service with admin credentials.
keystone-manage bootstrap \--bootstrap-password openstack \--bootstrap-admin-url http://controller:5000/v3/ \--bootstrap-internal-url http://controller:5000/v3/ \--bootstrap-public-url http://controller:5000/v3/ \--bootstrap-region-id RegionOneThis command sets:
- Admin password (
openstack) - Admin URL (port 35357) --> Use 5000
- Internal URL (port 5000)
- Public URL (port 5000)
- Region name
UPDATE: In modern deployments, port 35357 is not actually used anymore. Port 5000 is used for everything (public, internal, admin). If you use port 35357 for the admin URL, it will only create the endpoint records in the Keystone database but it will NOT configure Apache or bind Keystone to port 35357.
You can verify this by running in the controller node:
ss -ltnp | grep 35357If this shows nothing, then Keystone is NOT listening there.
- Admin password (
Keystone is now initialized and ready to serve identity requests.
Configure Apache Server
Keystone runs through Apache. Set the ServerName in the Apache configuration file.
sudo vi /etc/apache2/apache2.conf
Add this line under global configuration:
#ServerRoot "/etc/apache2"
ServerName controller
Restart Apache:
sudo systemctl restart apache2
sudo systemctl status apache2
Keystone is now active and accessible via Apache. The identity service is fully installed and ready to authenticate OpenStack services.
Client Environment Scripts
Keystone is installed and the admin user exists. Now we prepare environment scripts so the OpenStack CLI can authenticate properly.
- Create one script per user
- Set required OS environment variables
- Secure the file because it contains passwords
Make sure to load the correct variables so the CLI can talk to Keystone correctly.
Create Admin Environment Script
First, create a script named admin-openrc in the home directory. This file is used for management tasks and will export the following variables:
cat > admin-openrc.sh <<EOF
export OS_PROJECT_DOMAIN_NAME=Default
export OS_USER_DOMAIN_NAME=Default
export OS_PROJECT_NAME=admin
export OS_USERNAME=admin
export OS_PASSWORD=openstack
export OS_AUTH_URL=http://controller:5000/v3
export OS_IDENTITY_API_VERSION=3
export OS_IMAGE_API_VERSION=2
EOF
In the example above:
OS_PASSWORDis the admin password set during bootstrapOS_AUTH_URLuses the admin endpoint on port5000.
Restrict access because the password is stored in plain text.
chmod 600 admin-openrc.sh
This protects your credentials and completes the admin environment setup.
Test Admin Script�
Load the variables using source. This executes all export statements in the file.
source admin-openrc.sh
Verify that the variable OS_USERNAME is set:
echo $OS_USERNAME
Output:
admin
Now test authentication by requesting a token from Keystone using the OpenStack CLI.
openstack token issue
Sample output:
+------------+-----------------------------------------------------------------------------------------------------------------------------------------------------------------------------------------+
| Field      | Value

   |
+------------+-----------------------------------------------------------------------------------------------------------------------------------------------------------------------------------------+
| expires    | 2024-02-28T18:04:43+0000

   |
| id         | ********************************* |
| project_id | ********************

   |
| user_id    | ******************************

   |
+------------+-----------------------------------------------------------------------------------------------------------------------------------------------------------------------------------------+
You should see a token table with an ID, expiration time, project name, and user name.
If this works, Keystone and the admin environment are correctly configured.
Create Demo Environment Script
We'll also prepare a script for a regular user named demo. This script is used for regular user access. It will also use the public endpoint on port 5000.
Note: The distinction between admin and demo users is not the port, but rather the project, username, and password.
Example:
cat > demo-openrc.sh <<EOF
export OS_PROJECT_DOMAIN_NAME=Default
export OS_USER_DOMAIN_NAME=Default
export OS_PROJECT_NAME=demo
export OS_USERNAME=demo
export OS_PASSWORD=openstack
export OS_AUTH_URL=http://controller:5000/v3
export OS_IDENTITY_API_VERSION=3
export OS_IMAGE_API_VERSION=2
EOF
Set proper permissions again:
chmod 600 demo-openrc.sh
Before you can use the script, you will need to create the project, user, and role for demo. See next section.
Project, User, and Role
Now that Keystone is installed, we will create essential projects, users, and roles to use OpenStack. These are needed for both service operations and for testing OpenStack features.
Before anything else, make sure you source the admin script from the previous step:
source admin-openrc.sh
Create Service Project
Service users are created for nearly every OpenStack service, and they use this project as their primary project. The command below creates a project named service in domain default:
openstack project create \
--domain default \
--description "Service Project" service
Output:
+-------------+----------------------------------+
| Field       | Value                            |
+-------------+----------------------------------+
| description | Service Project                  |
| domain_id   | default                          |
| enabled     | True                             |
| id          | 297c43239a924e3b831dbd2cedb8f6d7 |
| is_domain   | False                            |
| name        | service                          |
| options     | {}                               |
| parent_id   | default                          |
| tags        | []                               |
+-------------+----------------------------------+
This ensures all service users have a dedicated project to operate in.
Create Demo Project
The demo project is used for testing and experimenting with OpenStack.
openstack project create \
--domain default \
--description "Demo Project" demo
Output:
+-------------+----------------------------------+
| Field       | Value                            |
+-------------+----------------------------------+
| description | Demo Project                     |
| domain_id   | default                          |
| enabled     | True                             |
| id          | 635187ee20ca40228ddef1bd4fb85600 |
| is_domain   | False                            |
| name        | demo                             |
| options     | {}                               |
| parent_id   | default                          |
| tags        | []                               |
+-------------+----------------------------------+
This project lets you safely explore OpenStack without affecting services.
Create Demo User
Now we create a demo user who will work within the demo project.
openstack user create \
--domain default \
--password-prompt demo
Note:
- Username is
demo - User belongs to domain
default - User is enabled and password does not expire
Provide a password when prompted:
User Password:
Repeat User Password:
Output:
+---------------------+----------------------------------+
| Field               | Value                            |
+---------------------+----------------------------------+
| domain_id           | default                          |
| enabled             | True                             |
| id                  | cb17f17c923e471f8eb380fd9a570921 |
| name                | demo                             |
| options             | {}                               |
| password_expires_at | None                             |
+---------------------+----------------------------------+
Create User Role
OpenStack uses role-based access control. Assigning a role defines what a user can do in a project.
openstack role create user

openstack role add \
--project demo \
--user demo user
Note:
- Assigns the
userrole to the demo user in the demo project - No output is returned, but the role is active
Roles ensure users only have permissions suitable for their tasks.
Verify Setup
You can check the demo environment by sourcing the credentials and issuing a token.
source demo-openrc.sh
openstack token issue
Note:
- Demo user gets a token to interact with OpenStack
- Admin user has broader permissions compared to demo user
Listing users as demo:
openstack user list
As expected, this will return an error because the demo user is not authorized to see other users.
You are not authorized to perform the requested action: identity:list_users. (HTTP 403) (Request-ID: req-20f90292-4c0d-4ece-9223-191caa17e111)
Try with the admin user:
source admin-openrc.sh
openstack user list
Output:
+----------------------------------+-------+
| ID                               | Name  |
+----------------------------------+-------+
| 9deb02e4c0df40349976aaccd6a2683c | admin |
| cb17f17c923e471f8eb380fd9a570921 | demo  |
+----------------------------------+-------+
This demonstrates role-based access how different users have different permissions depending on their role.