Install Glance
Overview
Glance is the OpenStack Image Service. It stores and serves virtual machine images and other compute-related images. The installation is straightforward and is done on the controller node.
- Set up the SQL database for Glance
- Create the Glance user and assign roles
- Create the Glance service and endpoints
- Install the Glance package
- Configure API and registry files
- Populate the database and restart services
These steps ensure Glance is ready to manage and serve images in your OpenStack cloud.
NOTE: The succeeding steps are performed on the controller node only.
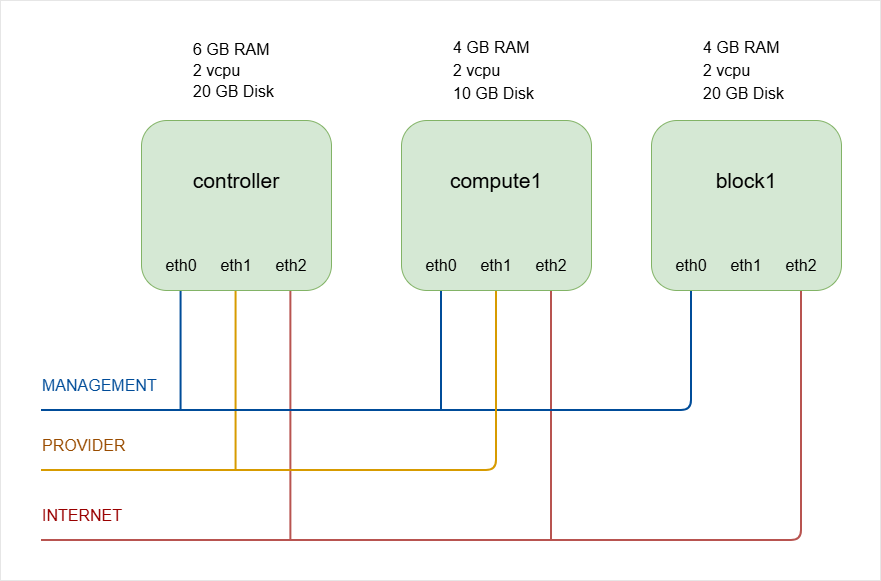
The hostnames of all the nodes in this lab are configured in the /etc/hosts file in each node (See Networking and Security).
Lab diagram:
Configure SQL Database
Start on the controller node as a superuser.
ssh -i ~/.ssh/vbox jmeden@10.0.0.11
sudo su
Create the database and grant privileges to the glance user:
sudo mysql
CREATE DATABASE glance;
GRANT ALL PRIVILEGES ON glance.* TO 'glance'@'localhost' IDENTIFIED BY 'openstack';
GRANT ALL PRIVILEGES ON glance.* TO 'glance'@'%' IDENTIFIED BY 'openstack';
FLUSH PRIVILEGES;
EXIT
Notes:
glanceuser has full access to the Glance database- Password for
glanceisopenstack
This prepares the database for Glance to store its state and image metadata.
Create Glance User and Assign Role
Authenticate to OpenStack CLI using the client environment script:
source admin-openrc.sh
Create the Glance user in Keystone:
openstack user create \
--domain default \
--password-prompt glance
Provide a password when prompted:
User Password:
Repeat User Password:
Assigns admin role in the service project:
openstack role add \
--project service \
--user glance admin
This allows Glance to authenticate with Keystone and operate as a service.
Create Glance Service and Endpoints
Register the Glance service and its three endpoints (public, internal, admin), all pointing to the same URL for simplicity:
openstack service create \
--name glance \
--description "OpenStack Image" image

openstack endpoint create \
--region RegionOne image public http://controller:9292

openstack endpoint create \
--region RegionOne image internal http://controller:9292

openstack endpoint create \
--region RegionOne image admin http://controller:9292
This exposes the image service to users and other OpenStack components.
Verify:
-
Confirm Glance is registered:
openstack service listOutput:
+----------------------------------+----------+----------+| ID | Name | Type |+----------------------------------+----------+----------+| 2527ec34edbc471b9fcd4d22390b5b17 | keystone | identity || 81096520cafe403384b652442a6c00d9 | glance | image |+----------------------------------+----------+----------+ -
List the Glance endpoints:
openstack endpoint list --service imageOutput:
+----------------------------------+-----------+--------------+--------------+---------+-----------+------------------------+| ID | Region | Service Name | Service Type | Enabled | Interface | URL |+----------------------------------+-----------+--------------+--------------+---------+-----------+------------------------+| 0f0a4ded78fd4b45af3946b3d1622f9b | RegionOne | glance | image | True | public| http://controller:9292 || 45c5095f9b004ae2993fe557630dba8c | RegionOne | glance | image | True | admin| http://controller:9292 || 6a19f9490ad246c09cebabb699f158bd | RegionOne | glance | image | True | internal| http://controller:9292 |+----------------------------------+-----------+--------------+--------------+---------+-----------+------------------------+
Install Glance Package
Update repositories and install Glance:
sudo apt update
sudo apt install -y glance
This installs the API and registry services needed for Glance to operate.
Check the status:
systemctl status glance-api
Configure API and Registry
Glance API
Update the /etc/glance/glance-api.conf and setup database connection, Keystone authentication, and image storage.
-
In our setup, we can use Crudini to configure the database for Glance.
crudini --set /etc/glance/glance-api.conf \database connection mysql+pymysql://glance:openstack@controller/glance -
Next, configure the identity service access.
If you are using modern OpenStack, Keystone should use port 5000 only. Port 35357 is no longer required.
crudini --set /etc/glance/glance-api.conf keystone_authtoken auth_uri http://controller:5000crudini --set /etc/glance/glance-api.conf keystone_authtoken auth_url http://controller:5000crudini --set /etc/glance/glance-api.conf keystone_authtoken memcached_servers controller:11211crudini --set /etc/glance/glance-api.conf keystone_authtoken auth_type passwordcrudini --set /etc/glance/glance-api.conf keystone_authtoken project_domain_name defaultcrudini --set /etc/glance/glance-api.conf keystone_authtoken user_domain_name defaultcrudini --set /etc/glance/glance-api.conf keystone_authtoken project_name servicecrudini --set /etc/glance/glance-api.conf keystone_authtoken username glancecrudini --set /etc/glance/glance-api.conf keystone_authtoken password openstackcrudini --set /etc/glance/glance-api.conf paste_deploy flavor keystone -
Set the local filesystem as the default image store
crudini --set /etc/glance/glance-api.conf glance_store stores "file,http"crudini --set /etc/glance/glance-api.conf glance_store default_store filecrudini --set /etc/glance/glance-api.conf glance_store filesystem_store_datadir /var/lib/glance/images/ -
Check the configuration file (
/etc/glance/glance-api.conf).[database]connection = mysql+pymysql://glance:openstack@controller/glance[glance_store]stores = file,httpdefault_store = filefilesystem_store_datadir = /var/lib/glance/images/[image_format]disk_formats = ami,ari,aki,vhd,vhdx,vmdk,raw,qcow2,vdi,iso,ploop.root-tar[keystone_authtoken]auth_uri = http://controller:5000auth_url = http://controller:5000memcached_servers = controller:11211auth_type = passwordproject_domain_name = defaultuser_domain_name = defaultproject_name = serviceusername = glancepassword = openstack[paste_deploy]flavor = keystone
Glance Registry
glance-registryhas been removed in newer releases (OpenStack Queens and later). Glance now runs API-only mode. You can skip this step.
The steps for configuring database and Keystone authentication for Glance registry is similar with the Glance API.
-
Configure the database access for Glance Registry.
crudini --set /etc/glance/glance-registry.conf \database connection mysql+pymysql://glance:openstack@controller/glance -
Configure the identity service access for Glance Registry.
If you are using modern OpenStack, Keystone should use port 5000 only. Port 35357 is no longer required.
crudini --set /etc/glance/glance-registry.conf keystone_authtoken auth_uri http://controller:5000crudini --set /etc/glance/glance-registry.conf keystone_authtoken auth_url http://controller:5000crudini --set /etc/glance/glance-registry.conf keystone_authtoken memcached_servers controller:11211crudini --set /etc/glance/glance-registry.conf keystone_authtoken auth_type passwordcrudini --set /etc/glance/glance-registry.conf keystone_authtoken project_domain_name defaultcrudini --set /etc/glance/glance-registry.conf keystone_authtoken user_domain_name defaultcrudini --set /etc/glance/glance-registry.conf keystone_authtoken project_name servicecrudini --set /etc/glance/glance-registry.conf keystone_authtoken username glancecrudini --set /etc/glance/glance-registry.conf keystone_authtoken password openstackcrudini --set /etc/glance/glance-registry.conf paste_deploy flavor keystone -
Check the configuration file (
/etc/glance/glance-registry.conf).[database]connection = mysql+pymysql://glance:openstack@controller/glance[keystone_authtoken]auth_uri = http://controller:5000auth_url = http://controller:5000memcached_servers = controller:11211auth_type = passwordproject_domain_name = defaultuser_domain_name = defaultproject_name = serviceusername = glancepassword = openstack[paste_deploy]flavor = keystone -
(Optional) You can verify if the services are using the correct ports.
Check if Glance is listening on 9292:
root@controller:/home/jmeden# ss -ltnp | grep 9292LISTEN 0 4096 0.0.0.0:9292 0.0.0.0:* users:(("glance-api",pid=28136,fd=4),("glance-api",pid=28135,fd=4),("glance-api",pid=28128,fd=4))Check if Keystone is listening on 5000:
root@controller:/home/jmeden# ss -ltnp | grep 5000LISTEN 0 511 *:5000 *:* users:(("apache2",pid=17401,fd=6),("apache2",pid=17400,fd=6),("apache2",pid=17394,fd=6))Verify Glance API directly with curl:
curl http://controller:9292 | jq -
After changing the config files, restart the services.
systemctl restart glance-apisystemctl restart glance-registryUPDATE: You may get this error when restarting
glance-registry:Failed to restart glance-registry.service: Unit glance-registry.service not found.This is normal in modern OpenStack. In OpenStack Queens (and other newer releases),the
glance-registryservice is fully removed. Glance runs in API-only architecture.
Populate Database and Restart Services
Populates database tables required for Glance:
su -s /bin/sh -c "glance-manage db_sync" glance
Output:
Upgraded database to: wallaby_contract01, current revision(s): wallaby_contract01
INFO  [alembic.runtime.migration] Context impl MySQLImpl.
INFO  [alembic.runtime.migration] Will assume non-transactional DDL.
Database is synced successfully.
Finally, enable and restart API and registry services:
sudo systemctl restart glance-api
sudo systemctl enable glance-api
sudo systemctl status glance-api

## SKIP: glance-registry has been removed in OpenStack
sudo systemctl restart glance-registry
sudo systemctl enable glance-registry
sudo systemctl status glance-registry
Glance is now fully installed and ready to manage images in OpenStack.
Verify Glance: Upload a Test Image
After installing Glance, test it by uploading a small image. This will confirm that the image service works correctly.
- Download a small test image
- Upload the image to OpenStack
- Verify the image appears in the list
- Optionally upload another version
Download a Test Image
Use a small Linux test image like Cirros. It is lightweight and made for OpenStack testing. Download the cirros-0.3.5-x86_64-disk.img file using wget.
wget http://download.cirros-cloud.net/0.3.5/cirros-0.3.5-x86_64-disk.img
Result:
- The file downloads successfully
- The file appears in your current directory
You can confirm:
root@controller:/home/jmeden# ls -lh

total 32M
-rw-r--r-- 1 root   root    264 Feb 28 17:26 admin-openrc.sh
-rw-r--r-- 1 root   root    13M Dec  7  2021 cirros-0.3.5-x86_64-disk.img
-rw------- 1 root   root    262 Feb 28 17:09 demo-openrc.sh
drwxr-xr-x 3 jmeden jmeden 4.0K Feb 28 11:54 etcd-v3.5.0-linux-amd64
-rw-rw-r-- 1 jmeden jmeden  19M Dec  6  2021 etcd-v3.5.0-linux-amd64.tar.gz
If the file exists, the download worked and you are ready to upload it.
Upload the Image to Glance
Now create an image in OpenStack using the downloaded file.
In the example below:
- The image name is
cirros-0.3.5 - The file is
cirros-0.3.5-x86_64-disk.img - The disk format is
qcow2 - The container format is
bare - The image is public
openstack image create "cirros-0.3.5" \
  --file cirros-0.3.5-x86_64-disk.img \
  --disk-format qcow2 \
  --container-format bare \
  --public
Output:
+------------------+--------------------------------------------------------------------------------------------------------------------------------------------------+
| Field            | Value
+------------------+--------------------------------------------------------------------------------------------------------------------------------------------------+
| container_format | bare
| created_at       | 2023-08-03T21:16:11Z
| disk_format      | qcow2
| file             | /v2/images/a3900299-cd8e-4d78-887a-dfb047fa4d12/file
| id               | a3900299-cd8e-4d78-887a-dfb047fa4d12
| min_disk         | 0
| min_ram          | 0
| name             | cirros-0.3.5
| owner            | 2448a3bc5e264464a3d20ed6012206bf
| properties       | os_hidden='False', owner_specified.openstack.md5='', owner_specified.openstack.object='images/cirros-0.3.5', owner_specified.openstack.sha256='' |
| protected        | False
| schema           | /v2/schemas/image
| status           | queued
| tags             |
| updated_at       | 2023-02-28T21:16:11Z
| visibility       | public
+------------------+--------------------------------------------------------------------------------------------------------------------------------------------------+
This confirms that Glance successfully stored the image.
Verify the Image List
List all images currently stored in Glance.
openstack image list
Output:
+--------------------------------------+--------------+--------+
| ID                                   | Name         | Status |
+--------------------------------------+--------------+--------+
| a3900299-cd8e-4d78-887a-dfb047fa4d12 | cirros-0.3.5 | active |
+--------------------------------------+--------------+--------+
This confirms that the image service can list stored images correctly.
Upload Another Version
You can upload another version to confirm multiple images work properly.
In the example below, we download cirros-0.4.0-x86_64-disk.img.
wget http://download.cirros-cloud.net/0.4.0/cirros-0.4.0-x86_64-disk.img
Now create the second image named cirros-0.4.0.
openstack image create "cirros-0.4.0" \
  --file cirros-0.4.0-x86_64-disk.img \
  --disk-format qcow2 \
  --container-format bare \
  --public
List images again:
openstack image list
Output:
+--------------------------------------+--------------+--------+
| ID                                   | Name         | Status |
+--------------------------------------+--------------+--------+
| a3900299-cd8e-4d78-887a-dfb047fa4d12 | cirros-0.3.5 | active |
| b76c870f-944a-47af-acf1-7996f92b18e8 | cirros-0.4.0 | active |
+--------------------------------------+--------------+--------+
This confirms that Glance handles multiple images correctly.