Install Nova Compute
Overview
Nova is the OpenStack compute service. It has two parts:
- Controller
- Compute agent (on each compute host)
The steps below will ensure that the compute service can manage virtual machines and schedule them across available compute nodes.
- Set up SQL databases for Nova and placement services
- Create OpenStack users for Nova and placement with admin roles
- Create Nova and placement services with endpoints
- Install and configure Nova packages on controller and compute nodes
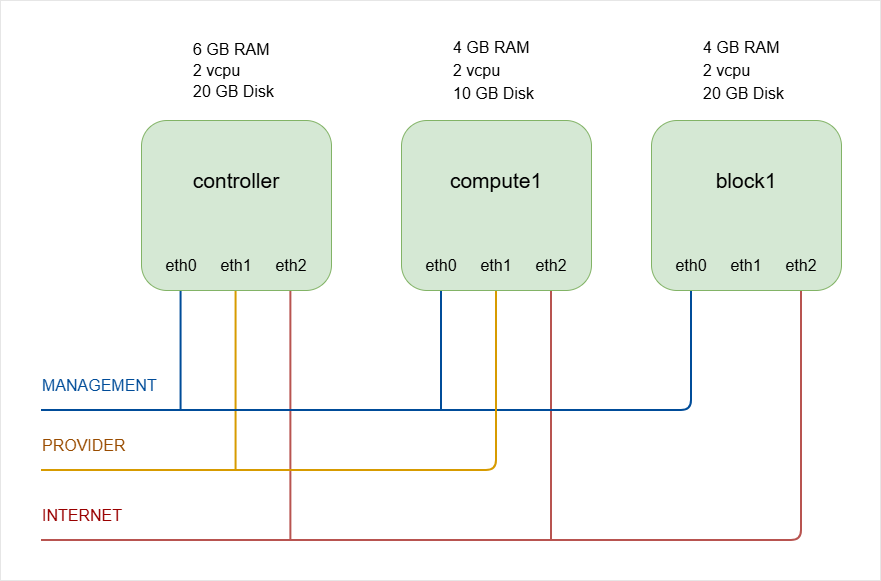
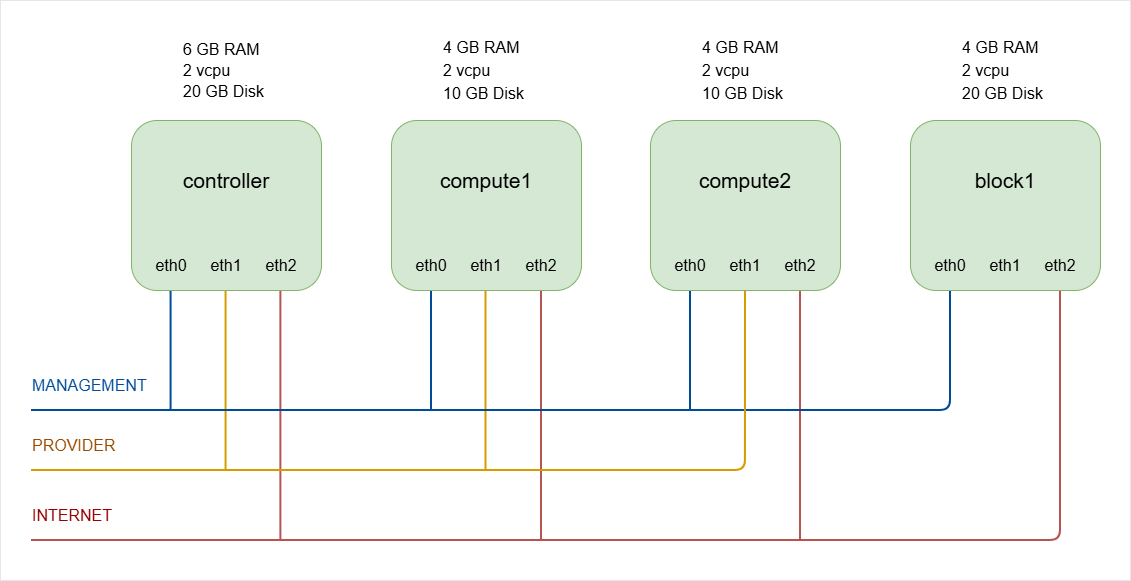
As a recap, below is the lab diagram.
NOTE:
The hostnames of all the nodes in this lab are configured in the /etc/hosts file in each node (See Networking and Security).
The number of compute nodes will be increased to two in a later step.
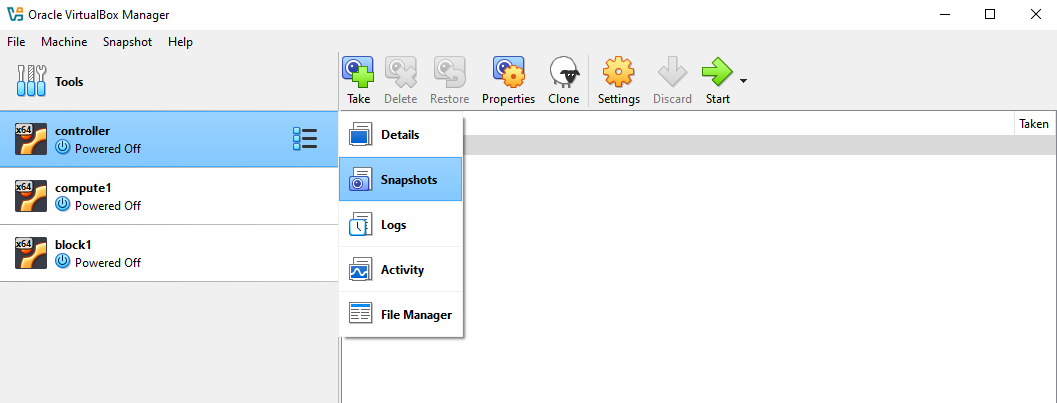
Snapshot the VMs
Before setting up Nova Compute, make sure to snapshot all three virtual machines. This allows you to revert to a clean state if needed during installation.
In VirtualBox, make sure all the three nodes are shut down.
-
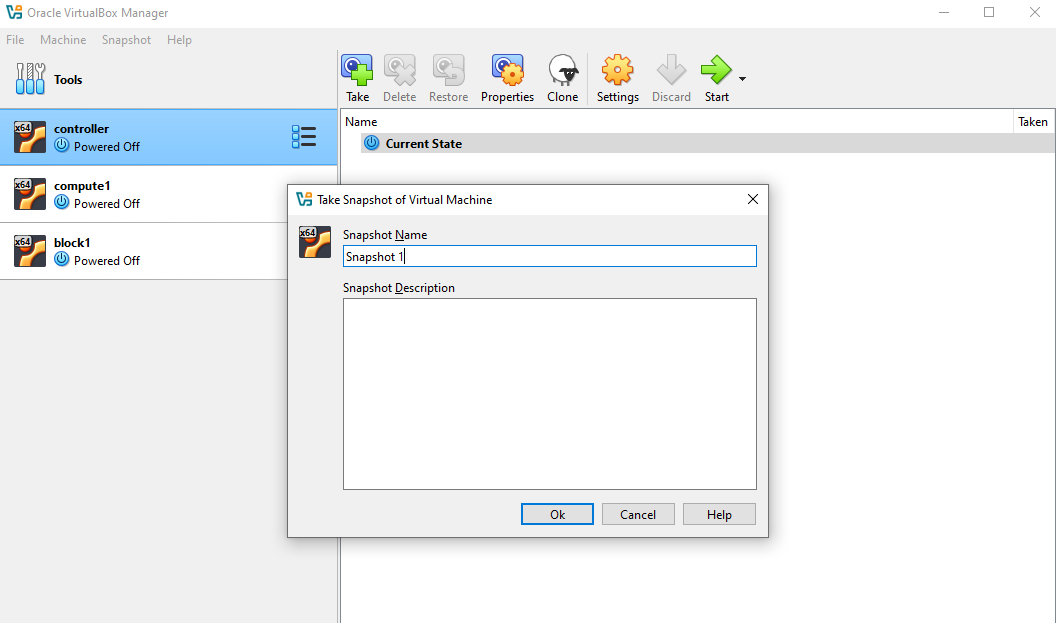
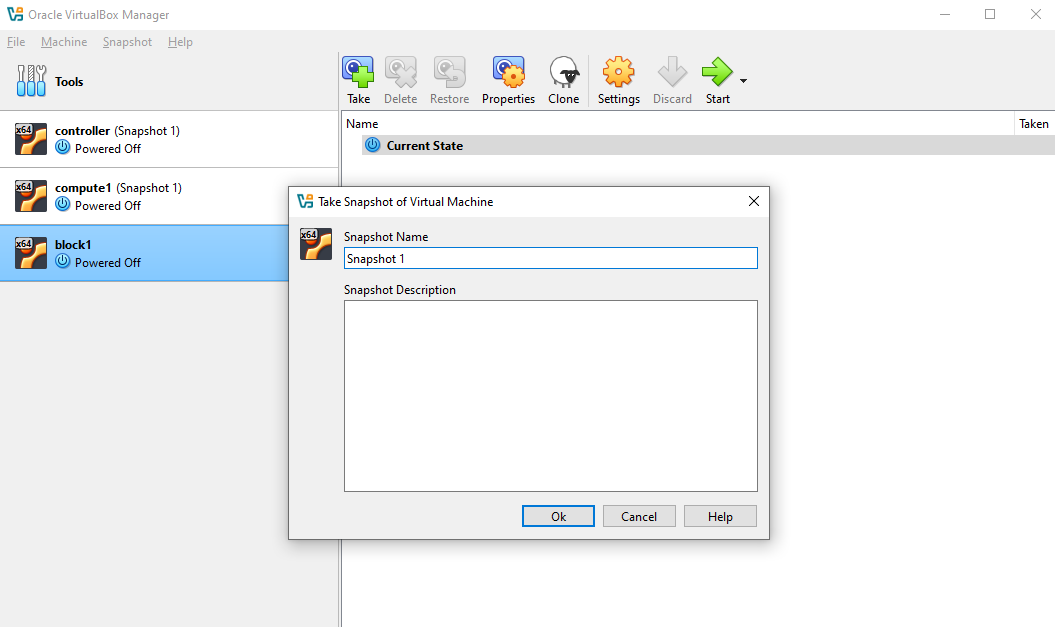
Click the menu icon on the controller node ➔ Snapshots ➔ Take
-
Click Ok.
-
Click the compute node ➔ Take ➔ Ok

-
Click the block node ➔ Take ➔ Ok
-
You can now start all three nodes.
Controller Node Setup
Start by preparing the controller node:
-
Log in to controller and switch to root.
ssh -i ~/.ssh/vbox jmeden@10.0.0.11sudo su -
Start MySQL and create the databases: nova API, nova main, and placement
sudo mysqlCREATE DATABASE nova_api;CREATE DATABASE nova;CREATE DATABASE nova_cell0;CREATE DATABASE placement; -
Grant appropriate privileges to Nova and placement users:
GRANT ALL PRIVILEGES ON nova_api.* TO 'nova'@'localhost' IDENTIFIED BY 'openstack';GRANT ALL PRIVILEGES ON nova_api.* TO 'nova'@'%' IDENTIFIED BY 'openstack';GRANT ALL PRIVILEGES ON nova.* TO 'nova'@'localhost' IDENTIFIED BY 'openstack';GRANT ALL PRIVILEGES ON nova.* TO 'nova'@'%' IDENTIFIED BY 'openstack';GRANT ALL PRIVILEGES ON nova_cell0.* TO 'nova'@'localhost' IDENTIFIED BY 'openstack';GRANT ALL PRIVILEGES ON nova_cell0.* TO 'nova'@'%' IDENTIFIED BY 'openstack';## PlacementGRANT ALL PRIVILEGES ON placement.* TO 'placement'@'localhost' IDENTIFIED BY 'openstack';GRANT ALL PRIVILEGES ON placement.* TO 'placement'@'%' IDENTIFIED BY 'openstack';FLUSH PRIVILEGES;EXIT;Exit the database:
EXIT -
Verify that the databases and user privileges are correctly set.
Login to the database:
## Enter passwordsudo mysql -uroot -pInside MySQL:
-- List databasesSHOW DATABASES;-- Check privileges for NovaSHOW GRANTS FOR 'nova'@'localhost';SHOW GRANTS FOR 'nova'@'%';-- Check privileges for PlacementSHOW GRANTS FOR 'placement'@'localhost';SHOW GRANTS FOR 'placement'@'%';Example:
MariaDB [(none)]> SHOW DATABASES;+--------------------+| Database |+--------------------+| glance || information_schema || keystone || mysql || nova || nova_api || nova_cell0 || performance_schema || placement || sys |+--------------------+10 rows in set (0.006 sec)MariaDB [(none)]> SHOW GRANTS FOR 'nova'@'localhost';+-------------------------------------------------------------------------------------------------------------+| Grants for nova@localhost|+-------------------------------------------------------------------------------------------------------------+| GRANT USAGE ON *.* TO `nova`@`localhost` IDENTIFIED BY PASSWORD '*3A4A03AC22526F6B591010973A741D59A71D728E' || GRANT ALL PRIVILEGES ON `nova`.* TO `nova`@`localhost`|| GRANT ALL PRIVILEGES ON `nova_api`.* TO `nova`@`localhost`|| GRANT ALL PRIVILEGES ON `nova_cell0`.* TO `nova`@`localhost`|+-------------------------------------------------------------------------------------------------------------+4 rows in set (0.001 sec)MariaDB [(none)]> SHOW GRANTS FOR 'nova'@'%';+-----------------------------------------------------------------------------------------------------+| Grants for nova@% |+-----------------------------------------------------------------------------------------------------+| GRANT USAGE ON *.* TO `nova`@`%` IDENTIFIED BY PASSWORD '*3A4A03AC22526F6B591010973A741D59A71D728E' || GRANT ALL PRIVILEGES ON `nova`.* TO `nova`@`%` || GRANT ALL PRIVILEGES ON `nova_api`.* TO `nova`@`%` || GRANT ALL PRIVILEGES ON `nova_cell0`.* TO `nova`@`%` |+-----------------------------------------------------------------------------------------------------+4 rows in set (0.000 sec)MariaDB [(none)]> SHOW GRANTS FOR 'placement'@'localhost';+------------------------------------------------------------------------------------------------------------------+| Grants for placement@localhost|+------------------------------------------------------------------------------------------------------------------+| GRANT USAGE ON *.* TO `placement`@`localhost` IDENTIFIED BY PASSWORD '*3A4A03AC22526F6B591010973A741D59A71D728E' || GRANT ALL PRIVILEGES ON `placement`.* TO `placement`@`localhost`|+------------------------------------------------------------------------------------------------------------------+2 rows in set (0.001 sec)MariaDB [(none)]> SHOW GRANTS FOR 'placement'@'%';+----------------------------------------------------------------------------------------------------------+| Grants for placement@%|+----------------------------------------------------------------------------------------------------------+| GRANT USAGE ON *.* TO `placement`@`%` IDENTIFIED BY PASSWORD '*3A4A03AC22526F6B591010973A741D59A71D728E' || GRANT ALL PRIVILEGES ON `placement`.* TO `placement`@`%`|+----------------------------------------------------------------------------------------------------------+2 rows in set (0.000 sec) -
Before running the OpenStack commands, make sure to source the client environment script.
source admin-openrc.sh -
Create OpenStack service users for Nova.
openstack user create \--domain default \--password-prompt novaProvide a password when prompted:
User Password:Repeat User Password:Add the admin role:
openstack role add --project service --user nova adminVerify:
openstack role assignment list --user nova --project serviceOutput:
+----------------------------------+----------------------------------+-------+----------------------------------+--------+--------+-----------+| Role | User | Group | Project | Domain | System | Inherited |+----------------------------------+----------------------------------+-------+----------------------------------+--------+--------+-----------+| 39fc9013a56b409f8cb15cfeae1e1a6a | ddbb9586104e45949a4166b53fea1d94 | | 297c43239a924e3b831dbd2cedb8f6d7 | | | False |+----------------------------------+----------------------------------+-------+----------------------------------+--------+--------+-----------+ -
Create another service user for the Placement service.
openstack user create \--domain default \--password-prompt placementAdd the admin role:
openstack role add --project service --user placement adminVerify that the users:
root@controller:/home/jmeden# openstack user list+----------------------------------+-----------+| ID | Name |+----------------------------------+-----------+| 9deb02e4c0df40349976aaccd6a2683c | admin || cb17f17c923e471f8eb380fd9a570921 | demo || c3e98b280b254a679616e3115bbcaae7 | glance || ddbb9586104e45949a4166b53fea1d94 | nova || ce32f7827d714a43a05a1eb76ef2b8b3 | placement |+----------------------------------+-----------+ -
Create services and API endpoints for Nova.
Note: For OpenStack Zed, the endpoints and ports have mostly stayed the same as in previous releases for Nova and Placement services.
Default port is 8774 for HTTP (or HTTPS if using TLS).
If you enable HTTPS on Nova or Placement, you need to change
http://tohttps://and make sure certificates are in place.openstack service create --name nova --description "OpenStack Compute" computeopenstack endpoint create --region RegionOne compute public http://controller:8774/v2.1openstack endpoint create --region RegionOne compute internal http://controller:8774/v2.1openstack endpoint create --region RegionOne compute admin http://controller:8774/v2.1 -
Create services and API endpoints for the Placement service.
Placement API default port is 8778, which is unchanged in OpenStack Zed and in other newer releases.
openstack service create --name placement --description "Placement API" placementopenstack endpoint create --region RegionOne placement public http://controller:8778openstack endpoint create --region RegionOne placement internal http://controller:8778openstack endpoint create --region RegionOne placement admin http://controller:8778 -
Install the Placement API
Although Nova uses Placement, the Placement API runs as a separate service under Apache WSGI. You need to install and configure it before starting Nova services.
Install the Placement API package.
sudo apt install -y placement-apiThis installs:
- Placement API service
- Apache WSGI configuration
- Placement management utilities
Verify the Apache site configuration exists.
ls -la /etc/apache2/sites-enabled/Output:
lrwxrwxrwx 1 root root 35 Feb 28 16:36 000-default.conf -> ../sites-available/000-default.conflrwxrwxrwx 1 root root 32 Feb 28 16:36 keystone.conf -> ../sites-available/keystone.conflrwxrwxrwx 1 root root 37 Mar 7 08:43 placement-api.conf -> ../sites-available/placement-api.confIf the file is not enabled (doesn't exist yet), enable it manually:
a2ensite placement-apisystemctl restart apache2 -
Configure the Placement service.
Edit the configuration file:
sudo vi /etc/placement/placement.confAdd the following configuration.
#Placement database connection[placement_database]connection = mysql+pymysql://placement:openstack@controller/placement#connection = sqlite:////var/lib/placement/placement.sqlite#Keystone authentication[api]auth_strategy = keystone[keystone_authtoken]auth_url = http://controller:5000/v3memcached_servers = controller:11211auth_type = passwordproject_domain_name = Defaultuser_domain_name = Defaultproject_name = serviceusername = placementpassword = openstack -
Initialize the Placement database schema.
su -s /bin/sh -c "placement-manage db sync" placementRestart Apache to load the Placement API.
systemctl restart apache2Confirm the Placement API is listening.
ss -lntp | grep 8778Output:
LISTEN 0 511 *:8778 *:* users:(("apache2",pid=10903,fd=8),("apache2",pid=10902,fd=8),("apache2",pid=10891,fd=8))Test the Placement API endpoint.
curl -s http://controller:8778 | jqExpected response:
{"versions": [{"id": "v1.0","max_version": "1.39","min_version": "1.0","status": "CURRENT","links": [{"rel": "self","href": ""}]}]}If you receive this output, the Placement API is functioning correctly.
-
Verify Placement Setup and Sync Aggregates.
Once the Placement service is installed and configured, we need to verify that it can be used by Nova.
First, make sure to source the client environment script.
source admin-openrc.shVerify that the
serviceproject exists:root@controller:/home/jmeden# openstack project list+----------------------------------+---------+| ID | Name |+----------------------------------+---------+| 2448a3bc5e264464a3d20ed6012206bf | admin || 297c43239a924e3b831dbd2cedb8f6d7 | service || 635187ee20ca40228ddef1bd4fb85600 | demo |+----------------------------------+---------+Now, sync the placement aggregates:
su -s /bin/sh -c "nova-manage placement sync_aggregates" novaIf successful, this command will not return any errors.
If it returns
HTTP 401 Unauthorized, theplacementuser missing the admin role. See step 7. -
Install Nova controller packages.
Note: The setup I'm using for this lab is OpenStack Zed. On modern Ubuntu (22.04/24.04) for OpenStack Zed, the
nova-*packages are not in the default Ubuntu repositories. They are only available if you add the OpenStack Zed repository (Ubuntu Cloud Archive).sudo add-apt-repository cloud-archive:zedsudo apt update -yInstall Nova packages for controller:
sudo apt update -ysudo apt install -y \nova-api \nova-conductor \nova-scheduler \nova-novncproxy \python3-novaclient## SKIP THIS PARTsudo apt install -y \nova-consoleauth \nova-placement-apiUPDATE:
nova-consoleauthis no longer separate. It is included innova-apiandnova-novncproxy.- Placement API is packaged separately as
placement-apifor Ubuntu Zed packages.
-
Check installed services.
systemctl list-units | grep novaOutput:
nova-api.service loaded active running OpenStack Compute APInova-conductor.service loaded active running OpenStack Compute Conductornova-novncproxy.service loaded active running OpenStack Compute novncproxynova-scheduler.service loaded active running OpenStack Compute Scheduler -
Configure
/etc/nova/nova.confon the controller.- Set MySQL connection parameters for API and main database
- Configure RabbitMQ access
- Configure identity service access
- Enable networking service with Neutron
- Set VNC proxy addresses
- Configure Glance endpoint and log paths
- Configure placement API
To simplify the steps, we will use Crudini. Proceed with the next steps.
-
Configure MySQL & RabbitMQ parameters.
crudini --set /etc/nova/nova.conf api_database connection mysql+pymysql://nova:openstack@controller/nova_apicrudini --set /etc/nova/nova.conf database connection mysql+pymysql://nova:openstack@controller/novacrudini --set /etc/nova/nova.conf DEFAULT transport_url rabbit://openstack:openstack@controller -
Configure the identity service access.
If you are using modern OpenStack, Keystone should use port 5000 only. Port 35357 is no longer required.
crudini --set /etc/nova/nova.conf api auth_strategy keystonecrudini --set /etc/nova/nova.conf keystone_authtoken auth_uri http://controller:5000crudini --set /etc/nova/nova.conf keystone_authtoken auth_url http://controller:5000crudini --set /etc/nova/nova.conf keystone_authtoken memcached_servers controller:11211crudini --set /etc/nova/nova.conf keystone_authtoken auth_type passwordcrudini --set /etc/nova/nova.conf keystone_authtoken project_domain_name Defaultcrudini --set /etc/nova/nova.conf keystone_authtoken user_domain_name Defaultcrudini --set /etc/nova/nova.conf keystone_authtoken project_name servicecrudini --set /etc/nova/nova.conf keystone_authtoken username novacrudini --set /etc/nova/nova.conf keystone_authtoken password openstack -
Configure support for Networking Service (Neutron).
This will allow Nova to delegate networking tasks to Neutron and the instances will get proper network connectivity.
crudini --set /etc/nova/nova.conf DEFAULT service_user_token_roles_required Truecrudini --set /etc/nova/nova.conf DEFAULT my_ip 10.0.0.11crudini --set /etc/nova/nova.conf DEFAULT use_neutron Truecrudini --set /etc/nova/nova.conf DEFAULT firewall_driver nova.virt.firewall.NoopFirewallDriverNote:
my_ip➔ IP of your controller node’s management interface -
Enable service user token roles required.
The
service_userin Nova is used for internal API calls that Nova services make to Keystone.By setting
service_user_token_roles_requiredtoTrue, you ensure that when Nova uses theservice_usertoken to authenticate with Keystone, it must have the appropriate roles assigned. This is a security best practice that prevents unauthorized access to Keystone when Nova services communicate with it.# Ensure [DEFAULT] has only the service_user reference:crudini --set /etc/nova/nova.conf DEFAULT service_user novacrudini --set /etc/nova/nova.conf DEFAULT service_user_token_roles_required True# Ensure [service_user] is correct:crudini --set /etc/nova/nova.conf service_user username novacrudini --set /etc/nova/nova.conf service_user password openstackcrudini --set /etc/nova/nova.conf service_user project_name servicecrudini --set /etc/nova/nova.conf service_user user_domain_name Defaultcrudini --set /etc/nova/nova.conf service_user project_domain_name Defaultcrudini --set /etc/nova/nova.conf service_user auth_type passwordcrudini --set /etc/nova/nova.conf service_user auth_url http://controller:5000/v3crudini --set /etc/nova/nova.conf service_user service_user_token_roles_required True -
Configure VNC proxy on Controller Node.
You need to configure VNC console proxy to access VM consoles via Horizon or CLI.
crudini --set /etc/nova/nova.conf vnc enabled Truecrudini --set /etc/nova/nova.conf vnc vncserver_listen 10.0.0.11crudini --set /etc/nova/nova.conf vnc vncserver_proxyclient_address 10.0.0.11Notes:
vncserver_listen➔ the IP the VNC server listens on (usually the controller).vncserver_proxyclient_address➔ IP used by clients connecting through the proxy.
-
Configure the Glance location.
This allows Nova to download images for new instances. Make sure the URL matches the Glance endpoint created when setting up Glance.
crudini --set /etc/nova/nova.conf glance api_servers http://controller:9292 -
Configure Lock Path for Oslo Concurrency.
Nova uses Oslo concurrency for database and resource locks. You must set a valid path for temporary lock files.
crudini --set /etc/nova/nova.conf oslo_concurrency lock_path /var/lib/nova/tmp -
Configure Placement API.
Placement service tracks compute resources. Nova needs credentials and endpoint information to communicate with it.
crudini --set /etc/nova/nova.conf placement os_region_name RegionOnecrudini --set /etc/nova/nova.conf placement project_domain_name Defaultcrudini --set /etc/nova/nova.conf placement project_name servicecrudini --set /etc/nova/nova.conf placement auth_type passwordcrudini --set /etc/nova/nova.conf placement user_domain_name Defaultcrudini --set /etc/nova/nova.conf placement auth_url http://controller:5000/v3crudini --set /etc/nova/nova.conf placement username placementcrudini --set /etc/nova/nova.conf placement password openstack -
Remove
log_dirparameter fromDEFAULTsection.In modern Ubuntu packages for Zed, the
log_dirparameter can conflict with systemd logging.Remove it:
crudini --del /etc/nova/nova.conf DEFAULT log_dir -
Populate the
nova_apiDatabase.Nova’s API database needs to be initialized so the API service can store requests, service data, and track instance operations.
sudo susu -s /bin/sh -c "nova-manage api_db sync" novaIf you get this output:
Modules with known eventlet monkey patching issues were imported prior to eventlet monkey patching: urllib3. This warning can usually be ignored if the caller is only importing and not executing nova code.This is not an error.
nova-manageuses eventlet for concurrency, but some Python modules (like urllib3) were loaded before eventlet patched the standard library. This is safe to ignore. -
Register the
cell0Database and create thecell1Cell.Nova uses cells to scale across multiple compute nodes. You must register
cell0(default cell for unmapped instances).su -s /bin/sh -c "nova-manage cell_v2 map_cell0" novaNext, create
cell1(the main cell where compute nodes will be added) so Nova can schedule instances correctly.su -s /bin/sh -c "nova-manage cell_v2 create_cell --name=cell1 --verbose" novaIf you get this error:
--transport-url not provided in the command line, using the value [DEFAULT]/transport_url from the configuration file--database_connection not provided in the command line, using the value [database]/connection from the configuration fileThis is not an error. It just means that
nova-manageis using the configuration file values for transport URL and database connection, which is expected. The commands will still use the correct RabbitMQ (transport) and MySQL (database) settings from your configuration. -
Populate the Nova database with initial schema and API data.
This ensures the database is ready for Nova to track instances, networks, and compute nodes
su -s /bin/sh -c "nova-manage db sync" nova -
Verify the configuration of Cells.
nova-manage cell_v2 list_cellsOutput:
Name UUID Transport URL Database Connection Disabled cell0 00000000-0000-0000-0000-000000000000 none:/ mysql+pymysql://nova:****@controller/nova_cell0 False cell1 d181ba72-3ed3-42d4-8d3a-082db4037430 rabbit://openstack:****@controller mysql+pymysql://nova:****@controller/nova False -
Restart Nova services so the change takes effect.
sudo systemctl restart nova-api nova-scheduler nova-conductor nova-novncproxyConfirm all Nova services are running:
systemctl status nova-apisystemctl status nova-schedulersystemctl status nova-conductorsystemctl status nova-novncproxy
After this, Nova is fully ready on the controller and can manage compute nodes.
Compute Node Setup
On the compute node:
-
Log in and switch to root:
ssh -i ~/.ssh/vbox jmeden@10.0.0.21sudo su -
Run an update and install Nova compute packages and Crudini.
Same with the controller node, we'll use Crudini to set the configurations in the next step.
sudo apt update -ysudo apt install -y nova-compute crudini -
Set RabbitMQ access.
The configuration file can be found here:
/etc/nova/nova.confBut we'll use Crudini for easier setup:
crudini --set /etc/nova/nova.conf DEFAULT transport_url rabbit://openstack:openstack@controller -
Configure the identity service access.
crudini --set /etc/nova/nova.conf api auth_strategy keystonecrudini --set /etc/nova/nova.conf keystone_auth auth_uri http://controller:5000crudini --set /etc/nova/nova.conf keystone_auth auth_url http://controller:5000crudini --set /etc/nova/nova.conf keystone_auth memcached_servers controller:11211crudini --set /etc/nova/nova.conf keystone_auth auth_type passwordcrudini --set /etc/nova/nova.conf keystone_auth project_domain_name defaultcrudini --set /etc/nova/nova.conf keystone_auth user_domain_name defaultcrudini --set /etc/nova/nova.conf keystone_auth project_name servicecrudini --set /etc/nova/nova.conf keystone_auth username novacrudini --set /etc/nova/nova.conf keystone_auth password openstack -
Enable support for networking service and set management IP.
infoFor later setup: Make sure to use
10.0.0.22asmy_ipforcompute2crudini --set /etc/nova/nova.conf DEFAULT my_ip 10.0.0.21crudini --set /etc/nova/nova.conf DEFAULT use_neutron Truecrudini --set /etc/nova/nova.conf DEFAULT firewall_driver nova.virt.firewall.NoopFirewallDriverFor multiple compute nodes, the
my_ipis the compute node’s management IP. This ensures Nova on the compute node advertises its own IP to the controller and integrates with Neutron. -
Configure VNC console access on the compute node.
infoFor later setup: Make sure to use
10.0.0.22asvncserver_proxyclient_addressforcompute2crudini --set /etc/nova/nova.conf vnc enabled Truecrudini --set /etc/nova/nova.conf vnc vncserver_listen 0.0.0.0crudini --set /etc/nova/nova.conf vnc vncserver_proxyclient_address 10.0.0.21crudini --set /etc/nova/nova.conf vnc novncproxy_base_url http://10.0.0.11:6080/vnc_auto.htmlNotes:
- The
vncserver_proxyclient_addressis the compute node's own IP address. - The
novncproxy_base_urlis the controller;s IP address where users access VNC console
- The
-
Configure the Glance location.
The URL should match the Glance endpoint created when setting up Glance.
crudini --set /etc/nova/nova.conf glance api_servers http://controller:9292 -
Configure the Lock Path for Oslo Concurrency.
crudini --set /etc/nova/nova.conf oslo_concurrency lock_path /var/lib/nova/tmp -
Configure Placement API.
crudini --set /etc/nova/nova.conf placement os_region_name RegionOnecrudini --set /etc/nova/nova.conf placement project_domain_name Defaultcrudini --set /etc/nova/nova.conf placement project_name servicecrudini --set /etc/nova/nova.conf placement auth_type passwordcrudini --set /etc/nova/nova.conf placement user_domain_name Defaultcrudini --set /etc/nova/nova.conf placement auth_url http://controller:5000/v3crudini --set /etc/nova/nova.conf placement username placementcrudini --set /etc/nova/nova.conf placement password openstack -
Remove problematic log parameters from default section.
In modern Ubuntu packages for Zed, the
log_dirparameter can conflict with systemd logging.Remove it:
crudini --del /etc/nova/nova.conf DEFAULT log_dir -
If you are using VirtualBox, you need to set the virtualization type to
QEMU.crudini --set /etc/nova/nova-compute.conf libvirt virt_type qemu -
If you are using bare metal hosts, set the virtualization type to
KVM.If you did step 11, you can skip this step and proceed to step 13.
First, verify the host capabilities:
sudo sukvm-okuname -mInstall KVM and other utilities:
sudo apt-get install -y qemu-kvm libvirt-bin bridge-utilsVerify the KVM installation:
virsh list --allFinally, set the virtualization type:
crudini --set /etc/nova/nova-compute.conf libvirt virt_type kvm -
Restart the Nova compute service.
sudo systemctl restart nova-computesudo systemctl status nova-compute
Register the Compute Node
Once we have installed Nova on compute node, we need to discover compute nodes.
-
Login to the controller node again and run:
sudo susu -s /bin/sh -c "nova-manage cell_v2 discover_hosts --verbose" novaOutput:
Found 2 cell mappings.Skipping cell0 since it does not contain hosts.Getting computes from cell 'cell1': d181ba72-3ed3-42d4-8d3a-082db4037430Checking host mapping for compute host 'compute1': 44c813e6-c2d1-48df-8d13-0e3eb4e4775bCreating host mapping for compute host 'compute1': 44c813e6-c2d1-48df-8d13-0e3eb4e4775bFound 1 unmapped computes in cell: d181ba72-3ed3-42d4-8d3a-082db4037430 -
Before proceeding, do some quick checks:
-
List the mapped cells:
su -s /bin/sh -c "nova-manage cell_v2 list_cells" novaOutput:
+-------+--------------------------------------+------------------------------------+-------------------------------------------------+----------+| Name | UUID | Transport URL | Database Connection | Disabled|+-------+--------------------------------------+------------------------------------+-------------------------------------------------+----------+| cell0 | 00000000-0000-0000-0000-000000000000 | none:/ | mysql+pymysql://nova:****@controller/nova_cell0 | False|| cell1 | d181ba72-3ed3-42d4-8d3a-082db4037430 | rabbit://openstack:****@controller | mysql+pymysql://nova:****@controller/nova | False|+-------+--------------------------------------+------------------------------------+-------------------------------------------------+----------+ -
List the host in the cells:
su -s /bin/sh -c "nova-manage cell_v2 list_hosts" novaOutput:
+-----------+--------------------------------------+----------+| Cell Name | Cell UUID | Hostname |+-----------+--------------------------------------+----------+| cell1 | d181ba72-3ed3-42d4-8d3a-082db4037430 | compute1 |+-----------+--------------------------------------+----------+
-
-
Make sure to source the client environment script.
source admin-openrc.sh -
Verify compute services:
openstack compute service listOutput:
+--------------------------------------+----------------+------------+----------+---------+-------+----------------------------+| ID | Binary | Host | Zone | Status | State | Updated At |+--------------------------------------+----------------+------------+----------+---------+-------+----------------------------+| 581b85d1-692d-424a-9243-f0643b476a12 | nova-conductor | controller | internal | enabled | up | 2023-03-07T09:42:58.000000 || 63f0da09-4fa5-4915-af27-b7cbf66937e9 | nova-scheduler | controller | internal | enabled | up | 2023-03-07T09:42:58.000000 || 1cf5dcc4-f3cd-434e-9622-55e8fd24cce5 | nova-compute | compute1 | nova | enabled | up | 2023-03-07T09:42:58.000000 |+--------------------------------------+----------------+------------+----------+---------+-------+----------------------------+ -
Perform some additional verifications:
-
Check the service catalog:
openstack catalog listOutput:
+-----------+-----------+-----------------------------------------+| Name | Type | Endpoints |+-----------+-----------+-----------------------------------------+| placement | placement | RegionOne || | | public: http://controller:8778 || | | RegionOne || | | internal: http://controller:8778 || | | RegionOne || | | admin: http://controller:8778 || | | || keystone | identity | RegionOne || | | public: http://controller:5000/v3/ || | | RegionOne || | | internal: http://controller:5000/v3/ || | | RegionOne || | | admin: http://controller:5000/v3/ || | | || glance | image | RegionOne || | | public: http://controller:9292 || | | RegionOne || | | admin: http://controller:9292 || | | RegionOne || | | internal: http://controller:9292 || | | || nova | compute | RegionOne || | | internal: http://controller:8774/v2.1 || | | RegionOne || | | public: http://controller:8774/v2.1 || | | RegionOne || | | admin: http://controller:8774/v2.1 || | | |+-----------+-----------+-----------------------------------------+ -
Check available images:
openstack image listOutput:
+--------------------------------------+--------------+--------+| ID | Name | Status |+--------------------------------------+--------------+--------+| a3900299-cd8e-4d78-887a-dfb047fa4d12 | cirros-0.3.5 | active || b76c870f-944a-47af-acf1-7996f92b18e8 | cirros-0.4.0 | active |+--------------------------------------+--------------+--------+
-
-
Verify databases and overall Nova health:
nova-status upgrade checkOutput:
+---------------------------------------------------------------------+| Upgrade Check Results |+---------------------------------------------------------------------+| Check: Cells v2 || Result: Success || Details: None |+---------------------------------------------------------------------+| Check: Placement API || Result: Success || Details: None |+---------------------------------------------------------------------+| Check: Cinder API || Result: Success || Details: None |+---------------------------------------------------------------------+| Check: Policy File JSON to YAML Migration || Result: Success || Details: None |+---------------------------------------------------------------------+| Check: Older than N-1 computes || Result: Success || Details: None |+---------------------------------------------------------------------+| Check: hw_machine_type unset || Result: Success || Details: None |+---------------------------------------------------------------------+Note: You may see a failure for Service User Token Configuration:
+---------------------------------------------------------------------+| Check: Service User Token Configuration || Result: Failure || Details: Service user token configuration is required for all Nova || services. For more details see the following: https://docs || .openstack.org/latest/nova/admin/configuration/service- || user-token.html |+---------------------------------------------------------------------+This can be safely skipped for now. Nova services (API, scheduler, compute, etc.) will continue to work. However, you should revisit this configuration before upgrading Nova or enabling features that require service tokens. It’s not a blocker for initial deployment or testing.
Adding a Second Compute Node
You can expand your OpenStack setup by adding more compute nodes. This improves resource management and lets you schedule or migrate virtual machines across hosts.
Updated diagram:
Steps:
-
Start by cloning the first compute VM.
In VirtualBox, select the
compute1➔Snapshot 1➔ Clone
Rename it to
compute2and make sure all network cards get new MAC addresses to avoid conflicts.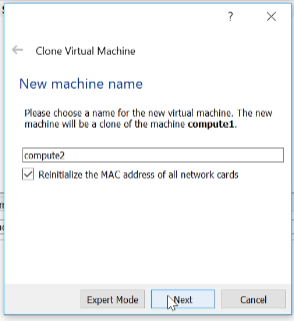
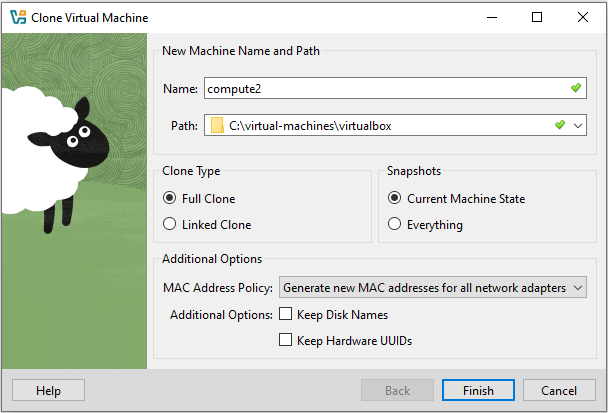
UPDATE: In newer VirtualBox versions, you will need to set the following:
Setting Recommended Option Notes MAC Address Policy Generate new MAC addresses for all network interfaces Ensures unique network addresses and avoids conflicts Keep disk names / hardware UUIDs Optional Preserve VM identity for snapshots if needed Click Finish.
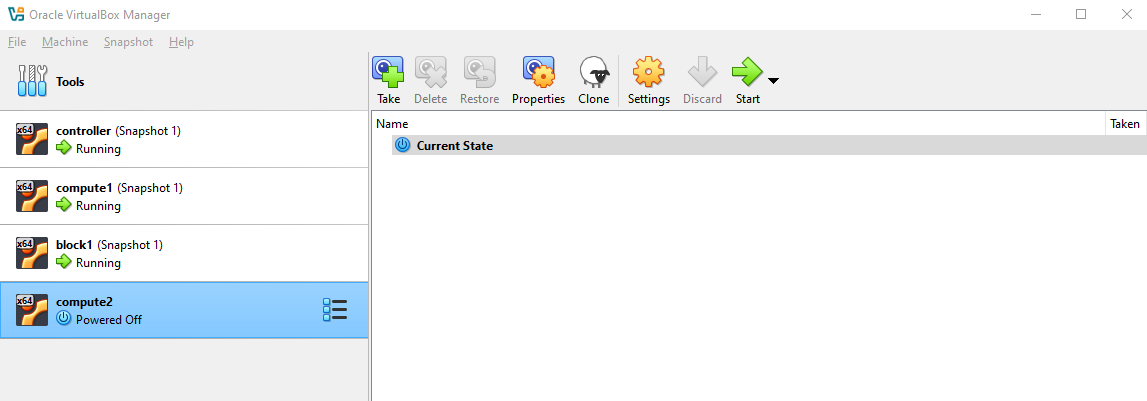
Once done, you should now see the second compute node.
Start the node.
-
Login to
compute2and change hostname and management IP.Switch to root.
sudo suSince this is a clone of
compute, it should also have the public key that was previously copied tocompute1. To verify, check the~/.ssh:ls -al ~/.ssh/total 12drwx------ 2 jmeden jmeden 4096 Feb 17 16:00 .drwxr-x--- 4 jmeden jmeden 4096 Feb 28 10:53 ..-rw------- 1 jmeden jmeden 178 Feb 17 16:01 authorized_keysCheck the
authorized_keys:cat ~/.ssh/authorized_keysIf the public key exists, then you can SSH to
compute2from your local terminal.ssh -i ~/.ssh/vbox jmeden@10.0.0.22 -
Change hostname and management IP inside the VM.
Set the hostname first:
sudo suhostnamectl set-hostname compute2(OUTDATED STEP) Next, update the network configuration:
vi /etc/network/interfaces## Update IPauto eth0iface eth0 inet staticaddress 10.0.0.21netmask 255.255.255.0UPDATE: For newer Ubuntu (22.04+) versions, the network configuration no longer uses
/etc/network/interfacesby default. Ubuntu now uses Netplan for network management.Check the
/etc/netplan/directory:root@compute2:/home/jmeden# ls -la /etc/netplantotal 20drwxr-xr-x 2 root root 4096 Feb 17 15:59 .drwxr-xr-x 122 root root 12288 Mar 3 06:01 ..-rw------- 1 root root 689 Mar 7 08:08 50-cloud-init.yamlroot@compute1:/home/jmeden#You may see
50-cloud-init.yaml, which is auto-generated bycloud-init. Editing it directly will not survive reboot unlesscloud-init’s network management is disabled.To disable, create the file:
sudo vi /etc/cloud/cloud.cfg.d/99-disable-network-config.cfgAdd this line:
network: {config: disabled}infoThis tells
cloud-initto stop overwriting your Netplan config on reboot.Now you can safely edit
/etc/netplan/50-cloud-init.yaml:sudo vi /etc/netplan/50-cloud-init.yamlUpdate the IP address for the management interface:
network:ethernets:enp0s3:addresses:- 10.0.0.22/24nameservers:addresses: [8.8.8.8,8.8.8.4]search: []enp0s8:dhcp4: noaddresses:- 10.10.10.22/24nameservers:addresses: []search: []enp0s9:dhcp4: trueversion: 2 -
Update
/etc/hostson all nodes, then reboot the new node.On all nodes:
sudo vi /etc/hosts127.0.0.1 localhost10.0.0.11 controller10.0.0.21 compute110.0.0.22 compute210.0.0.31 block1On the new node:
sudo rebootAfter the reboot, make sure the
controller,compute1, andblock1can pingcompute2:ping compute2 -
Next, install Nova compute on the new node.
You will need to update packages, install Nova, and configure services.
Perform all the steps in the Compute Node Setup section.
-
Finally, go to the controller node to discover the new compute node:
sudo susu -s /bin/sh -c "nova-manage cell_v2 discover_hosts --verbose" novaOutput:
Found 2 cell mappings.Skipping cell0 since it does not contain hosts.Getting computes from cell 'cell1': d181ba72-3ed3-42d4-8d3a-082db4037430Checking host mapping for compute host 'compute2': 94e4a182-47fa-4ca0-bd10-3acda778b10bCreating host mapping for compute host 'compute2': 94e4a182-47fa-4ca0-bd10-3acda778b10bFound 1 unmapped computes in cell: d181ba72-3ed3-42d4-8d3a-082db4037430Check the list of services:
nova service-listopenstack compute service listOutput:
+--------------------------------------+----------------+------------+----------+---------+-------+----------------------------+-----------------+-------------+| Id | Binary | Host | Zone | Status | State | Updated_at | Disabled Reason | Forced down |+--------------------------------------+----------------+------------+----------+---------+-------+----------------------------+-----------------+-------------+| 581b85d1-692d-424a-9243-f0643b476a12 | nova-conductor | controller | internal | enabled | up | 2023-03-07T12:28:50.000000 | - | False || 63f0da09-4fa5-4915-af27-b7cbf66937e9 | nova-scheduler | controller | internal | enabled | up | 2023-03-07T12:28:50.000000 | - | False || 1cf5dcc4-f3cd-434e-9622-55e8fd24cce5 | nova-compute | compute1 | nova | enabled | up | 2023-03-07T12:28:52.000000 | - | False || 4c360d20-6029-489b-8ab6-b59e1dffe162 | nova-compute | compute2 | nova | enabled | up | 2023-03-07T12:28:50.000000 | - | False |+--------------------------------------+----------------+------------+----------+---------+-------+----------------------------+-----------------+-------------+Checking the service list using OpenStack CLI:
openstack compute service listOutput:
+--------------------------------------+----------------+------------+----------+---------+-------+----------------------------+| ID | Binary | Host | Zone | Status | State | Updated At|+--------------------------------------+----------------+------------+----------+---------+-------+----------------------------+| 581b85d1-692d-424a-9243-f0643b476a12 | nova-conductor | controller | internal | enabled | up | 2023-03-07T12:31:40.000000 || 63f0da09-4fa5-4915-af27-b7cbf66937e9 | nova-scheduler | controller | internal | enabled | up | 2023-03-07T12:31:40.000000 || 1cf5dcc4-f3cd-434e-9622-55e8fd24cce5 | nova-compute | compute1 | nova | enabled | up | 2023-03-07T12:31:42.000000 || 4c360d20-6029-489b-8ab6-b59e1dffe162 | nova-compute | compute2 | nova | enabled | up | 2023-03-07T12:31:41.000000 |+--------------------------------------+----------------+------------+----------+---------+-------+----------------------------+
After registration, both compute nodes appear in the service list and are ready to run instances.
- Nova manages multiple compute nodes automatically
- Placement service schedules instances efficiently
- You can add more nodes in the future by repeating the same process
This ensures Nova is fully operational across all compute nodes, allowing you to launch, migrate, and manage virtual machines.