Create a Rails App
Overview
Make sure have installed Ruby and Rails.
To create a Rails application, run the following command in your terminal:
rails new test_rails_app
If you have a specific version that you want the Rails app to use, you can do:
rails _<version-number> new test_rails_app

# Example:
rails _5.2.1.4_ new test_rails_app
Additional notes: In my setup, the Rails app directory already existed because it was a Git submodule inside a parent repository. Instead of creating a new folder or Git repo, I generated the Rails app in the current directory:
cd test-rails-app  # This is a submodule
rails new . --force --skip-git
After your application is created, switch to its directory:
cd test_rails_app
To start the server:
rails server

# Another way
rails s
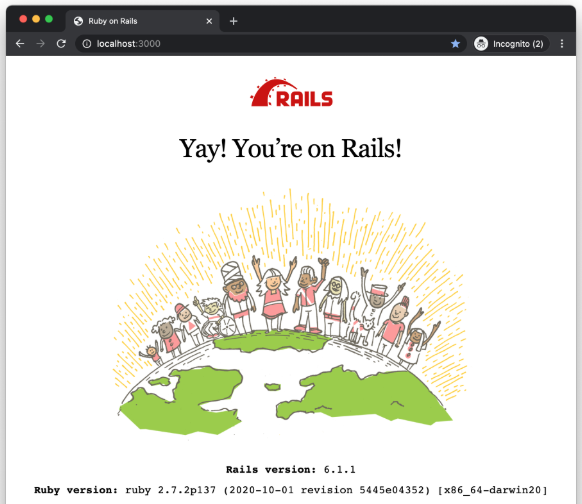
Open a web browser and navigate to:
http://localhost:3000
The default Rails welcome page is displayed. This confirms the application is running and the root route is active.
To stop the server, press Ctrl+C in the terminal.
For now, we'll keep the server running so we can simply refresh the page when we introduce configuration changes in the next steps.
Directory Structure
The main directories in a Rails app are:
test_rails_app/app

├── assets
├── controllers
├── helpers
├── javascript
├── jobs
├── mailers
├── models
└── views
These directories separate logic, data, and presentation, which keeps the application organized as it grows.
For more information, please see Rails App Structure.
Inside the controllers directory, application_controller.rb serves as the base controller and will be used in the next step to control how the root route responds.
test_rails_app/app/controllers/
├── application_controller.rb
└─�─ concerns
Root Route
The root route is the default page shown when no extra path is provided.
- It is the base URL of the application
- It handles the first incoming request
- It can be customized in the routes file
For example:
http://example.comhttp://localhost:3000
This route is what users see first, so changing it lets us control the initial page of the application.
- Routes are defined in
config/routes.rb - Where each route maps a request to a controller action.
- Root route is usually the starting point for this flow.
To update the route, edit the config/routes.rb:
Rails.application.routes.draw do
  root "application#hello"

  get "up" => "rails/health#show", as: :rails_health_check
end
This tells Rails to send the root request to the ApplicationController and handle it using the hello method for that controller.
This Hello method doesn't actually exist yet, and will be created in the next step.
Application Controller
The application controller is the base controller for the entire app.
- Other controllers inherit from it
- Shared behavior is defined here
- It can directly handle routes if needed
Open app/controllers/application_controller.rb:
class ApplicationController < ActionController::Base

  allow_browser versions: :modern

  stale_when_importmap_changes
end
The class definition ApplicationController inherits from ActionController, which gives it core controller features such as handling requests and rendering responses.
This line limits supported browsers to modern versions:
allow_browser versions: :modern
This line helps Rails manage caching when JavaScript import maps change:
stale_when_importmap_changes
To define a hello method, edit app/controllers/application_controller.rb:
class ApplicationController < ActionController::Base

  allow_browser versions: :modern
  stale_when_importmap_changes

  def hello
    render html: "Hello, world!"
  end

end
Back in the web browser, refresh the page. The page now displays "Hello world!", which confirms that the root route and controller action are working as expected.

Note that this approach does not follow Rails conventions. The HTML should not be defined in the application controller, but instead placed inside .html.erb files within the views directory, where presentation logic belongs.
Conventional Expectations
Rails follows "convention over configuration," which means it expects code and files to follow standard patterns.
- Define a route pointing to
controller#action - Create a controller with a meaningful name
- Add an action/method in that controller
- Place the corresponding
.html.erbtemplate in the matching folder under views
For example, for static pages:
- Controller:
pages_controller - Action:
home
Rails will then expect:
app/views/pagesfolder matching the controller namehome.html.erbtemplate inside that folder matching the action name
These conventions keeps the app organized and allows Rails to automatically link routes, controllers, and views.
Go back to the app/controllers/application_controller.rb and remove the hello action to reset the application controller to only contain shared behavior.
class ApplicationController < ActionController::Base

  allow_browser versions: :modern
  stale_when_importmap_changes

end
Update Route
Following the conventional way, update the config/routes.rb to point the root route to a new controller called pages:
Rails.application.routes.draw do
  root "pages#home"
  get "up" => "rails/health#show", as: :rails_health_check
end
Note: You can use a different controller name here instead of pages, as long as it matches the controller created in the next step. The home action can also be changed, but it must match the method defined in that controller.
Create a Controller
Controllers handle actions that respond to routes.
To create a new controller called pages, run:
rails generate controller pages
This will create the following:
app/controllers/pages_controller.rbtemplateapp/pages/pages_helper.rbmoduleapp/views/pagesfolder
Add a Controller Action
After creating the pages controller, the next step is to define a controller action to handle the root route.
Edit app/controllers/pages_controller.rb:
class PagesController < ApplicationController
  def home
  end
end
This prepares the controller to render a view automatically.
Create the View
Once the home action is defined in PagesController, next is to create its view so the content can be displayed in the browser.
To do this, create the app/views/pages/home.html.erb:
Hello, world!
Go back to the browser and refresh the page. The text "Hello, world!" now appears at http://localhost:3000.
How the Request Flows
Rails follows a clear pattern when handling requests.
- User sends a request from the browser
- Router receives the request
- Router determines the destination based on defined routes
- Router sends the request to the correct controller action
- If needed, the action interacts with models to fetch or save data
- Model returns data to the controller
- Controller selects the appropriate view template
- View renders the response and sends it back to the user
In this case:
- No database or models are involved
- The controller directly renders the view
This same pattern repeats throughout Rails applications and becomes the foundation for more complex features.
Add an About page
We can add a simple About page to the application that can be accessed at /about in the browser. The About page will use a GET request and be handled by the existing pages controller.
Update config/routes.rb to add a route for /about using to: to point it to the pages controller:
Rails.application.routes.draw do
  root "pages#home"
  get "about", to: "pages#about"
  get "up" => "rails/health#show", as: :rails_health_check
end
Next, add a new about action in app/controllers/pages_controller.rb:
class PagesController < ApplicationController
  def home
  end

  def about
  end
end
Create the view file for the About page. Inside app/views/pages, create about.html.erb with:
<h1>This is the about page</h1>
You can also update app/views/pages/home.html.erb to add a heading for the home page:
<h1>This is the home page</h1>
Once the view exists, Rails can render the About page in the browser. Refresh the page and go to /about to see it in action.
Home page:

About page:

Deploy App to Heroku
We can deploy the Rails application so it is live online and accessible from any browser.
Production runs separately from local development, uses a persistent web server, and has its own database.
Firstly, make sure to do the following first:
Steps
-
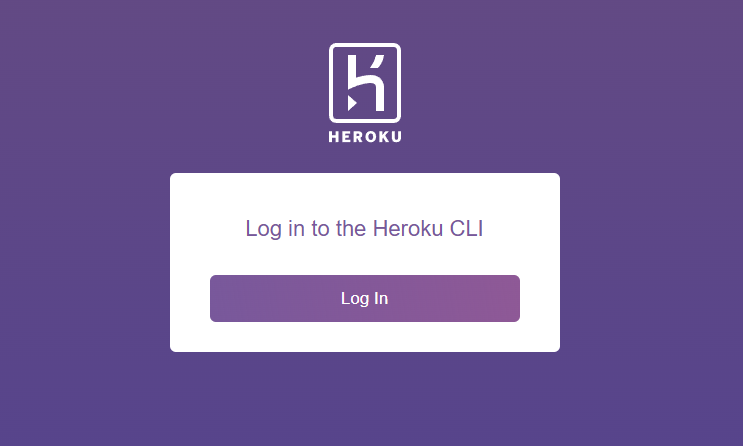
In your terminal, use Heroku CLI to login:
heroku loginNote: If you encountered an issue, please see Heroku page.
This will open a web browser. Click Log in.
-
Create a Heroku app from your application directory:
heroku createSample output:
Creating app... done, ⬢ arcane-caverns-35777https://arcane-caverns-35777-419bbd25c167.herokuapp.com/ | https://git.heroku.com/arcane-caverns-35777.git -
(Optional) You can rename your Heroku app:
heroku rename alphardOutput:
Renaming arcane-caverns-35777 to alphard... donehttps://arcane-caverns-35777-419bbd25c167.herokuapp.com/ | https://git.heroku.com/alphard.gitGit remote heroku updatedGit remote heroku updated› Warning: Don't forget to update git remotes for all other local checkouts of the app.Now run:
heroku open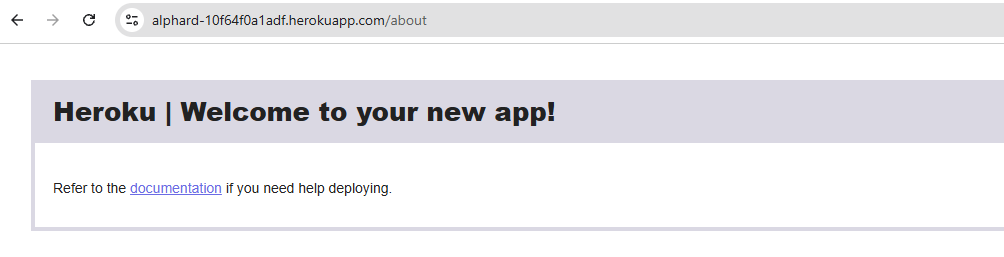
At this stage, the app is still using Heroku’s default page.
The Rails application will be deployed in the next step.
-
Update the
Gemfileto use PostgreSQL in production instead of SQLite.source "https://rubygems.org"# Railsgem "rails", "~> 8.1.1"# Web servergem "puma", ">= 5.0"# Assets & frontendgem "propshaft"gem "importmap-rails"gem "turbo-rails"gem "stimulus-rails"# JSON APIsgem "jbuilder"# Time zones for Windowsgem "tzinfo-data", platforms: %i[ windows jruby ]# Rails 8 database-backed featuresgem "solid_cache"gem "solid_queue"gem "solid_cable"# Performance & bootgem "bootsnap", require: false# Deploymentgem "kamal", require: falsegem "thruster", require: false# Image processinggem "image_processing", "~> 1.2"# ======================# Development & Test# ======================group :development, :test dogem "sqlite3", ">= 1.4"gem "debug", platforms: %i[ mri windows ], require: "debug/prelude"gem "bundler-audit", require: falsegem "brakeman", require: falsegem "rubocop-rails-omakase", require: falseend# ======================# Development only# ======================group :development dogem "web-console"end# ======================# Test only# ======================group :test dogem "capybara"gem "selenium-webdriver"end# ======================# Production (Heroku)# ======================group :production dogem "pg"endUpdate: Heroku doesn't support SQLite, only PostgreSQL for Rails apps.
-
Update your
config/database.ymlfor production to use PostgreSQL.# ===========================================================================# SQLite (Local)# ===========================================================================sqlite: &sqliteadapter: sqlite3pool: <%= ENV.fetch("RAILS_MAX_THREADS") { 5 } %>timeout: 5000development:<<: *sqlitedatabase: storage/development.sqlite3test:<<: *sqlitedatabase: storage/test.sqlite3# ===========================================================================# PostgreSQL (Heroku)# ===========================================================================postgres: &postgresadapter: postgresqlpool: <%= ENV.fetch("RAILS_MAX_THREADS") { 5 } %>production:primary:<<: *postgresurl: <%= ENV["DATABASE_URL"] %>cache:<<: *postgresurl: <%= ENV["DATABASE_URL"] %>migrations_paths: db/cache_migratequeue:<<: *postgresurl: <%= ENV["DATABASE_URL"] %>migrations_paths: db/queue_migratecable:<<: *postgresurl: <%= ENV["DATABASE_URL"] %>migrations_paths: db/cable_migrate -
Important step: Make sure to commit the changes:
git add -Agit commit -m "Deploy app" -
Push the app to Heroku:
git push heroku masterSample output:
remote: -----> Compressing...remote: Done: 60.1Mremote: -----> Launching...remote: Released v3remote: https://alphard-10f64f0a1adf.herokuapp.com/ deployed to Herokuremote:remote: Verifying deploy... done.To https://git.heroku.com/alphard.git* [new branch] master -> master -
Open the app.
heroku openThis will open the app in the browser:
