Advanced VPC with ALB and EC2
Overview
In this lab, we'll create the following:
- a VPC spanning two availability zones
- each AZ will have a public and private subnet
- internet gateway and a NAT gateway
- Public and private routes
- a security group
- an Application load BalAncer (ALB)
- autoscaling group of t3.micro instances with NGINX installed
Local environment used for this lab.
- Windows machine/laptop
- Visual Studio Code v1.67.2 (VSCode)
- WSL on Visual Studio Code
- Amazon Web Services (AWS) resources
Pre-requisites
- Setup Keys and Permissions
- Setup your Local Environment and Install Extensions
- Configure the Credentials File
- Install Terraform
Create the Provider file
### provider.tf
terraform {
  required_version = ">= 0.12"

  required_providers {
    aws = {
      source  = "hashicorp/aws"
      version = ">= 4.16.0"
    }
  }
}

provider "aws" {
  region                   = var.aws_region
  shared_credentials_files = var.my_credentials
  profile                  = var.my_profile
}
Create the datasources file
Here we'll define the AMI to be fetched and used for the launch template later.
### datasources.tf
data "aws_ami" "lab04_ami" {
  most_recent = true
  owners      = ["099720109477"]

  filter {
    name   = "name"
    values = ["ubuntu//img/docs/hvm-ssd/ubuntu-jammy-22.04-amd64-server-*"]
  }

  filter {
    name = "virtualization-type"
    values = ["hvm"]
  }
}
Create the Main file
### main.tf
#-------------------------------------------
# This terraform template deploys a VPC with 2 public subnets that has
# a security group, an internet gateway, a NAT gateway, and an
# Application loadbalancer. Traffic will be loadbalanced between the
# EC2 instances in the autoscaling group. Finally, the instances are
# bootstrapped with an NGINX webserver.
#-------------------------------------------

resource "aws_vpc" "lab04-vpc" {
  cidr_block           = var.cidr_block
  instance_tenancy     = "default"
  enable_dns_support   = "true"
  enable_dns_hostnames = "true"

  tags = {
    Name = "lab04-vpc"
  }
}

# Creates the first public subnet.
resource "aws_subnet" "lab04-public-subnet-1" {
  vpc_id     = aws_vpc.lab04-vpc.id
  cidr_block = cidrsubnet(var.cidr_block, 8, 1)
  # map_public_ip_on_launch = true
  availability_zone = var.avail_zones[0]

  tags = {
    Name = "lab04-public-subnet-1"
    Type = "Public"
  }
}

# Creates the second public subnet.
resource "aws_subnet" "lab04-public-subnet-2" {
  vpc_id     = aws_vpc.lab04-vpc.id
  cidr_block = cidrsubnet(var.cidr_block, 8, 2)
  # map_public_ip_on_launch = true
  availability_zone = var.avail_zones[1]

  tags = {
    Name = "lab04-public-subnet-2"
    Type = "Public"
  }
}

# Creates the first private subnet.
resource "aws_subnet" "lab04-private-subnet-1" {
  vpc_id            = aws_vpc.lab04-vpc.id
  cidr_block        = cidrsubnet(var.cidr_block, 8, 3)
  availability_zone = var.avail_zones[0]

  tags = {
    Name = "lab04-private-subnet-1"
    Type = "Private"
  }
}

# Creates the second private subnet.
resource "aws_subnet" "lab04-private-subnet-2" {
  vpc_id            = aws_vpc.lab04-vpc.id
  cidr_block        = cidrsubnet(var.cidr_block, 8, 4)
  availability_zone = var.avail_zones[1]

  tags = {
    Name = "lab04-private-subnet-2"
    Type = "Private"
  }
}

resource "aws_internet_gateway" "lab04-igw" {
  vpc_id = aws_vpc.lab04-vpc.id

  tags = {
    Name = "lab04-igw"
  }
}

# Create the Elastic IP to be used by the NAT gateway.
resource "aws_eip" "lab04-eip-nat" {
  vpc = true
}

# Creates the NAT gateway - Public NAT.
# The NAT gateway is provisioned in the first public subnet
resource "aws_nat_gateway" "lab04-natgw" {
  allocation_id = aws_eip.lab04-eip-nat.id
  subnet_id     = aws_subnet.lab04-public-subnet-1.id

  tags = {
    Name = "lab04-natgw"
  }

  # To ensure proper ordering, it is recommended to add an
  # explicit dependency on the Internet Gateway for the VPC.
  depends_on = [aws_internet_gateway.lab04-igw]
}

# Creates the route table. One route table per AZ
# This is a public route table that routes to the IGW.
resource "aws_route_table" "lab04-rt-public-1" {
  vpc_id = aws_vpc.lab04-vpc.id

  route {
    cidr_block = "0.0.0.0/0"
    gateway_id = aws_internet_gateway.lab04-igw.id
  }

  tags = {
    Name = "lab04-rt-public-1"
  }
}

# This is a private route table that routes to the NAT-GW.
resource "aws_route_table" "lab04-rt-private-2" {
  vpc_id = aws_vpc.lab04-vpc.id

  route {
    cidr_block = "0.0.0.0/0"
    gateway_id = aws_nat_gateway.lab04-natgw.id
  }

  tags = {
    Name = "lab04-rt-private-2"
  }
}

# Associates the route table to the first public subnet
resource "aws_route_table_association" "lab04-route-assoc-1" {
  subnet_id      = aws_subnet.lab04-public-subnet-1.id
  route_table_id = aws_route_table.lab04-rt-public-1.id
}

# Associates the route table to the second public subnet
resource "aws_route_table_association" "lab04-route-assoc-2" {
  subnet_id      = aws_subnet.lab04-public-subnet-2.id
  route_table_id = aws_route_table.lab04-rt-public-1.id
}

# Associates the route table to the first private subnet
resource "aws_route_table_association" "lab04-route-assoc-3" {
  subnet_id      = aws_subnet.lab04-private-subnet-1.id
  route_table_id = aws_route_table.lab04-rt-private-2.id
}

# Associates the route table to the second private subnet
resource "aws_route_table_association" "lab04-route-assoc-4" {
  subnet_id      = aws_subnet.lab04-private-subnet-2.id
  route_table_id = aws_route_table.lab04-rt-private-2.id
}

# Creates the security group for the autoscaling group of wenservers
# Note that the egress traffic is routed to the ALB.
# This can be seen on the cidr_blocks of the second ingress.
resource "aws_security_group" "lab04-secgroup-1" {
  name        = "lab04-secgroup-1"
  description = "Allow web server network traffic"
  vpc_id      = aws_vpc.lab04-vpc.id

  ingress {
    description = "SSH from my IP"
    from_port   = 22
    to_port     = 22
    protocol    = "tcp"
    cidr_blocks = [var.my_ip]
  }

  ingress {
    description = "HTTP from anywhere, through the ALB"
    from_port   = 80
    to_port     = 80
    protocol    = "tcp"
    cidr_blocks = [
      cidrsubnet(var.cidr_block, 8, 1),
      cidrsubnet(var.cidr_block, 8, 2)
    ]
  }

  egress {
    from_port   = 0
    to_port     = 0
    protocol    = "-1"
    cidr_blocks = ["0.0.0.0/0"]
  }

  tags = {
    Name = "lab04-secgroup-1"
  }
}

# Creates the security group for the ALB
# This allows inbound traffic from the internet and
# allows outbound traffic to go through only the webserber security group
resource "aws_security_group" "lab04-secgroup-2" {
  name        = "lab04-secgroup-2"
  description = "Allow ALB network traffic"
  vpc_id      = aws_vpc.lab04-vpc.id

  ingress {
    description = "HTTP from anywhere"
    from_port   = 80
    to_port     = 80
    protocol    = "tcp"
    cidr_blocks = ["0.0.0.0/0"]
  }

  egress {
    from_port       = 0
    to_port         = 0
    protocol        = "-1"
    security_groups = [aws_security_group.lab04-secgroup-1.id]
  }

  tags = {
    Name = "lab04-secgroup-1"
  }
}

# Launch template for the autoscaling group
# The "webserver.tpl" bootstraps the instances in the ASG wIth NGINX.
# This uses string interpolation to inject the current module path.
resource "aws_launch_template" "lab04-launchtemplate-webserver" {
  name = "lab04-launchtemplate-webserver"

  image_id               = data.aws_ami.lab04_ami.id
  instance_type          = var.instance_type
  key_name               = aws_key_pair.lab04-keypair.id
  vpc_security_group_ids = [aws_security_group.lab04-secgroup-1.id]

  tag_specifications {
    resource_type = "instance"

    tags = {
      Name = "lab04-webserver"
    }
  }
  user_data = filebase64("${path.module}/webserver.tpl")
}

# Creates the external-facing ALB.
resource "aws_lb" "lab04-alb" {
  name                       = "lab04-alb"
  internal                   = false
  load_balancer_type         = "application"
  security_groups            = [aws_security_group.lab04-secgroup-2.id]
  enable_deletion_protection = false

  subnets = [
    aws_subnet.lab04-public-subnet-1.id,
    aws_subnet.lab04-public-subnet-2.id
  ]

  # access_logs {
  #   bucket  = aws_s3_bucket.lb_logs.bucket
  #   prefix  = "test-lb"
  #   enabled = true
  # }

  tags = {
    Environment = "PRD"
  }
}

resource "aws_lb_target_group" "lab04-alb-target-group" {
  name     = "lab04-alb-target-group"
  port     = 80
  protocol = "HTTP"
  vpc_id   = aws_vpc.lab04-vpc.id
}

resource "aws_lb_listener" "lab04-alb-front_end" {
  load_balancer_arn = aws_lb.lab04-alb.arn
  port              = "80"
  protocol          = "HTTP"

  default_action {
    type             = "forward"
    target_group_arn = aws_lb_target_group.lab04-alb-target-group.arn
  }
}

# Forwards the route path to the target group
resource "aws_lb_listener_rule" "lab04-alb-listener-rule-1" {
  listener_arn = aws_lb_listener.lab04-alb-front_end.arn
  priority     = 100

  action {
    type             = "forward"
    target_group_arn = aws_lb_target_group.lab04-alb-target-group.arn
  }

  condition {
    path_pattern {
      values = ["/"]
    }
  }
}

# Creates the ASG of webserver instances.
resource "aws_autoscaling_group" "lab04-asg" {
  name             = "lab04-asg"
  desired_capacity = 2
  max_size         = 5
  min_size         = 2

  target_group_arns = [
    aws_lb_target_group.lab04-alb-target-group.arn
    ]

  vpc_zone_identifier = [
    aws_subnet.lab04-private-subnet-1.id,
    aws_subnet.lab04-private-subnet-2.id
  ]


  launch_template {
    id      = aws_launch_template.lab04-launchtemplate-webserver.id
    version = "$Latest"
  }
}

# Imports the keypair
resource "aws_key_pair" "lab04-keypair" {
  key_name   = "lab04-keypair"
  public_key = file("~/.ssh/tf-keypair.pub")
}
Notice here we're using cidrblock variable which is declared in variables.tf and assigned a value in terraform.tfvars. We also leveraged cidrsubnet function which calculates a subnet within a given IP network address prefix.
cidrsubnet function
cidrsubnet(prefix, newbits, netnum)
From the Hashicorp documentation on cidrsubnet Function::
This function accepts both IPv6 and IPv4 prefixes, and the result always uses the same addressing scheme as the given prefix.
prefix must be given in CIDR notation, as defined in RFC 4632 section 3.1.
newbits is the number of additional bits with which to extend the prefix. For example, if given a prefix ending in /16 and a newbits value of 4, the resulting subnet address will have length /20.
netnum is a whole number that can be represented as a binary integer with no more than newbits binary digits, which will be used to populate the additional bits added to the prefix.
We can also check the IP by running console command.
 terraform console
> cidrsubnet(var.cidr_block, 8, 1)
"10.0.1.0/24"
> cidrsubnet(var.cidr_block, 8, 2)
"10.0.2.0/24"
> cidrsubnet(var.cidr_block, 8, 3)
"10.0.3.0/24"
> cidrsubnet(var.cidr_block, 8, 4)
"10.0.4.0/24"
> cidrsubnet(var.cidr_block, 8, 0)
"10.0.0.0/24"
Launch template
From the main.tf, we used a aws_launch_template instead of an aws_instance resource. Here we define the launch configurations for the instances that will be launched in the auto-scaling group. The template also utilize a webserver.tpl template which will bootstrap the EC2 instances with NGINX webserver.
Validate
Initialize the working directory.
terraform init
To correct any formatting errors,
terraform fmt
To validate if our configuration files are valid,
terraform validate
Test it out
Before we proceed, let's get our IP from whatsmyip.. After that, we can assign our IP to a variable which will be used during the execution.
export TF_VAR_my_ip=1.2.3.4/32
To check the environment variables,
set | grep TF_VAR
Do a "dry-run" of the execution before actually applying the changes. This will return the list of resources that will be created when the change is actually ran.
terraform plan
If no errors were returned from the plan command, run the changes. This should return a list of output values.
terraform apply -auto-approve
Apply complete! Resources: 2 added, 1 changed, 0 destroyed.

Outputs:

alb_dns_name = "lab04-alb-716526745.ap-southeast-1.elb.amazonaws.com"
private_subnet1_id = "subnet-0a363c73f6656849a"
private_subnet2_id = "subnet-048ae0b3b75413895"
public_subnet1_id = "subnet-02849a1abd4e3da0b"
public_subnet2_id = "subnet-030bd5c1d9462303b"
vpc_id = "vpc-0e359f5f3a28c047e"
Test the ALB by doing a curl on the ALB dns. This should return a "200 OK" response which indicates success. It should also how that the response originated from an NGINX web server.
 curl -I lab04-alb-123456789.ap-southeast-1.elb.amazonaws.com

HTTP/1.1 200 OK
Date: Mon, 06 Jun 2022 04:50:40 GMT
Content-Type: text/html
Content-Length: 612
Connection: keep-alive
Server: nginx/1.18.0 (Ubuntu)
Last-Modified: Mon, 06 Jun 2022 04:12:17 GMT
ETag: "629d7ea1-264"
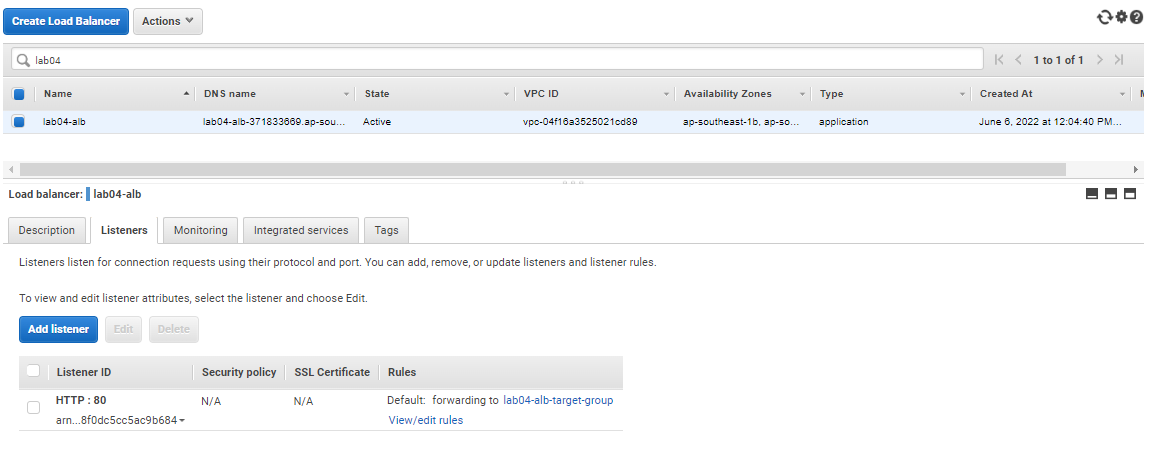
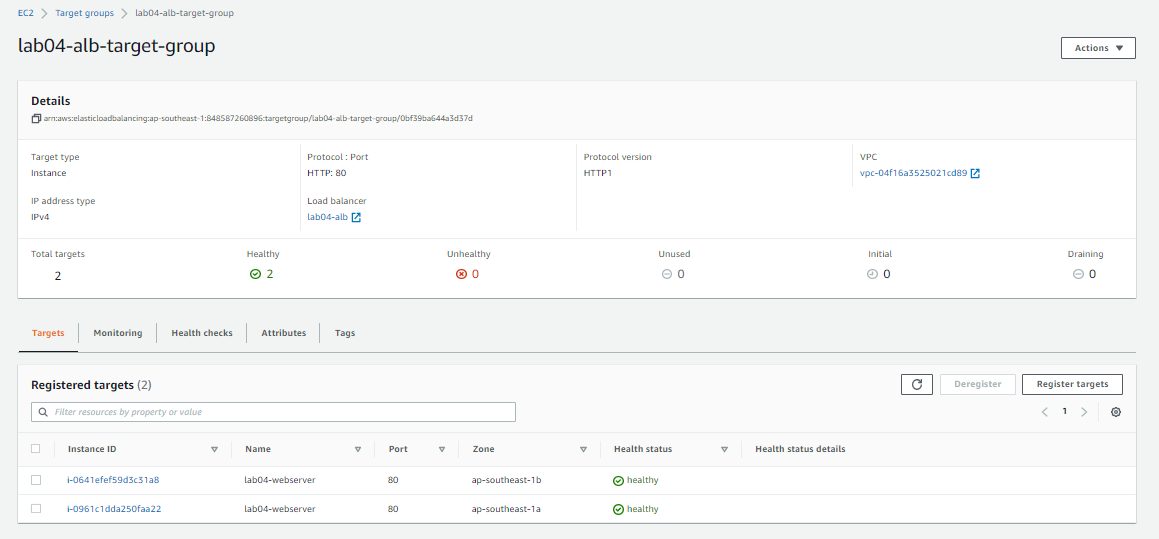
Check the resources if they are created through the AWS Console.


Cleanup
To delete all the resources, just run the destroy command.
terraform destroy -auto-approve