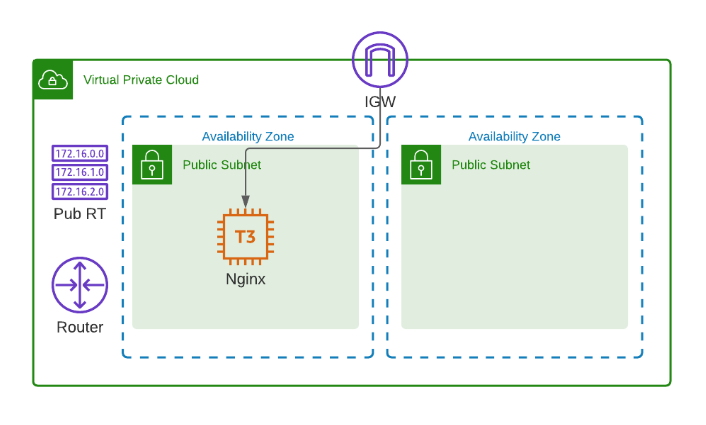
VPC with EC2 and NGINX
Overview
In this lab, we'll create the following:
- A VPC spanning two availability zones
- Two public subnets
- Internet gateway and a single route table
- A security group
- A t3.micro instance with NGINX installed
Diagram:
Local environment used for this lab.
- Windows machine/laptop
- Visual Studio Code v1.67.2 (VSCode)
- WSL on Visual Studio Code
- Amazon Web Services (AWS) resources
Pre-requisites
- Setup Keys and Permissions
- Setup your Local Environment and Install Extensions
- Configure the Credentials File
- Install Terraform
Create the Provider file
Create the provider file.
### provider.tf
 terraform {
  required_version = ">= 0.12"

  required_providers {
    aws = {
      source  = "hashicorp/aws"
      version = ">= 4.16.0"
    }
  }
}

provider "aws" {
  region                   = var.aws_region
  shared_credentials_files = var.my_credentials
  profile                  = var.my_profile
}
Create the Main file
Create the main file which will contain all the core configurations.
### main.tf
# This terraform template deploys a VPC with 2 public subnets
# that has a security group, an internet gateway, and a
# single route table.
# An EC2 is also created with Nginx installe.

#--------------------------------------------------------------

# Creates the VPC.
resource "aws_vpc" "lab03-vpc" {
  cidr_block           = "10.0.0.0/16"
  instance_tenancy     = "default"
  enable_dns_support   = "true"
  enable_dns_hostnames = "true"

  tags = {
    Name = "lab03-vpc"
  }
}

# Creates the first public subnet.
resource "aws_subnet" "lab03-public-1" {
  vpc_id                  = aws_vpc.lab03-vpc.id
  cidr_block              = "10.0.1.0/24"
  map_public_ip_on_launch = true
  availability_zone       = var.avail_zones[0]

  tags = {
    Name = "lab03-public-1"
    Type = "Public"
  }
}

# Creates the second public subnet.
resource "aws_subnet" "lab03-public-2" {
  vpc_id                  = aws_vpc.lab03-vpc.id
  cidr_block              = "10.0.2.0/24"
  map_public_ip_on_launch = true
  availability_zone       = var.avail_zones[1]

  tags = {
    Name = "lab03-public-2"
    Type = "Public"
  }
}

# Creates the internet gateway.
resource "aws_internet_gateway" "lab03-gw" {
  vpc_id = aws_vpc.lab03-vpc.id

  tags = {
    Name = "lab03-gw"
  }
}

# Creates the route table.
resource "aws_route_table" "lab03-route-table" {
  vpc_id = aws_vpc.lab03-vpc.id

  route {
    cidr_block = "0.0.0.0/0"
    gateway_id = aws_internet_gateway.lab03-gw.id
  }

  tags = {
    Name = "lab03-route-table"
  }
}

# Associates the route table to the first public subnet
resource "aws_route_table_association" "lab03-route-assoc-1" {
  subnet_id      = aws_subnet.lab03-public-1.id
  route_table_id = aws_route_table.lab03-route-table.id
}

# Associates the route table to the second public subnet
resource "aws_route_table_association" "lab03-route-assoc-2" {
  subnet_id      = aws_subnet.lab03-public-2.id
  route_table_id = aws_route_table.lab03-route-table.id
}

# Creates the security group for the EC2-Nginx server.
resource "aws_security_group" "lab03-secgroup-1" {
  name        = "lab03-secgroup-1"
  description = "Allow web server network traffic"
  vpc_id      = aws_vpc.lab03-vpc.id

  ingress {
    description = "SSH from my IP"
    from_port   = 22
    to_port     = 22
    protocol    = "tcp"
    cidr_blocks = [var.my_ip]
  }

  ingress {
    description = "HTTP from anywhere"
    from_port   = 80
    to_port     = 80
    protocol    = "tcp"
    cidr_blocks = ["0.0.0.0/0"]
  }

  egress {
    from_port   = 0
    to_port     = 0
    protocol    = "-1"
    cidr_blocks = ["0.0.0.0/0"]
  }

  tags = {
    Name = "lab03-secgroup-1"
  }
}

# Creates the EC2 instance with NGINX installed
resource "aws_instance" "lab03-node-1" {
  instance_type               = var.instance_type
  ami                         = var.amis[var.aws_region]
  key_name                    = aws_key_pair.lab03-keypair.id
  vpc_security_group_ids      = [aws_security_group.lab03-secgroup-1.id]
  subnet_id                   = aws_subnet.lab03-public-1.id
  associate_public_ip_address = true
  user_data                   = file("webserver.tpl")

  root_block_device {
    volume_size = 10
  }

  tags = {
    Name = "lab03-node-1"
  }
}

# Imports the keypair
resource "aws_key_pair" "lab03-keypair" {
  key_name   = "lab03-keypair"
  public_key = file("~/.ssh/tf-keypair.pub")
}
Create the Variables files
Notice that the main.tf has alot of var. statements. These reference the variables that are declared in the variables.tf. Note that you declare the variables in variables.tf, and you assign values to these variables through the terraform.tfvars.
### variables.tf
# Variables for setting up terraform
variable "aws_region" {
  description = "AWS region"
  type        = string
}

variable "my_credentials" {
  description = "Credentials to be used to connect to AWS"
  type        = list(string)
}

variable "my_profile" {
  description = "Profile to be used to connect to AWS"
  type        = string
}

# Variables for creating the VPC and EC2 instances
variable "instance_type" {
  type = string
}

variable "avail_zones" {
  type = list(string)
}

variable "my_ip" {
  type = string
}

variable "amis" {
  type = map(any)
  default = {
    "ap-southeast-1" : "ami-04d9e855d716f9c99"
    "ap-northeast-1" : "ami-081ce1b631be2b337"
  }
}
### terraform.tfvars
# Variables for setting up terraform
aws_region     = "ap-southeast-1"
my_credentials = ["/mnt/c/Users/Eden.Jose/.aws/credentials"]
my_profile     = "vscode-dev"

# Variables for creating the VPC and EC2 instances
avail_zones   = ["ap-southeast-1a", "ap-southeast-1b", "ap-southeast-1c"]
instance_type = "t3.micro"
We can assign values to the variables in the .tfvars file but we can also assign values through the commandline as environment variables.
Create the Outputs file
Create the outputs file. These contains the values that will be returned after we run the Terraform template.
### outputs.tf
output "vpc_id" {
  value = aws_vpc.lab03-vpc.id
}

output "public_subnet1_id" {
  value = aws_subnet.lab03-public-1.id
}

output "public_subnet2_id" {
  value = aws_subnet.lab03-public-2.id
}

output "server_public_ip" {
  value = aws_instance.lab03-node-1.public_ip
}
Test it out
Before we proceed, let's get our IP from whatsmyip.. After that, we can assign our IP to a variable which will be used during the execution.
export TF_VAR_my_ip=1.2.3.4/32
Initialize the working directory.
terraform init
To check the environment variables,
set | grep TF_VAR
We can now do a review by running the command below. This will return the expected changes that will be provision once we apply them.
terraform plan
If no errors were returned, then we can now run the Terraform automation.
terraform apply -auto-approve
It should return this message if the run was successful.
Apply complete! Resources: 10 added, 0 changed, 0 destroyed.
Outputs:
public_subnet1_id = "subnet-0f314a6a058f979e5"
public_subnet2_id = "subnet-036370db7375dbb57"
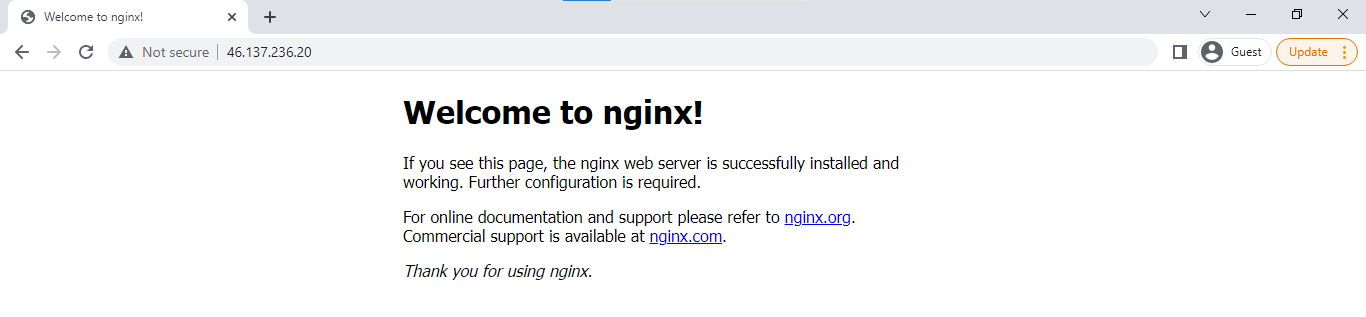
server_public_ip = "46.137.236.20"
vpc_id = "vpc-01ecb171bd04a12e8"
Go to the AWS Console and check if the resources are created.


Now let's test the webserver. Curl the IP. It should return a "200 OK" response.
 curl -I 46.137.236.20

HTTP/1.1 200 OK
Server: nginx/1.18.0 (Ubuntu)
Date: Sun, 05 Jun 2022 10:23:40 GMT
Content-Type: text/html
Content-Length: 612
Last-Modified: Sun, 05 Jun 2022 10:07:14 GMT
Connection: keep-alive
ETag: "629c8052-264"
Accept-Ranges: bytes
You can also copy the IP and open it in a browser. You should see the NGINX landing page.
Cleanup
To delete all the resources, just run the destroy command.
terraform destroy -auto-approve