Install Cinder
Overview
Cinder block storage installation starts differently from most OpenStack services.
Instead of starting on the controller node, the setup begins on the block storage node because the storage backend must exist before Cinder can create volumes.
NOTES: The hostnames of all the nodes in this lab are configured in the /etc/hosts file in each node (See Networking and Security).
On the storage node:
- Preparing a storage disk
- Configure the LVM
- Install the Cinder services
- Enable the storage backend
On the controller node:
- Create the Cinder database
- Create the Cinder service user
- Register Cinder services and endpoints
- Install and configure Cinder components
As a recap, below is the lab diagram.
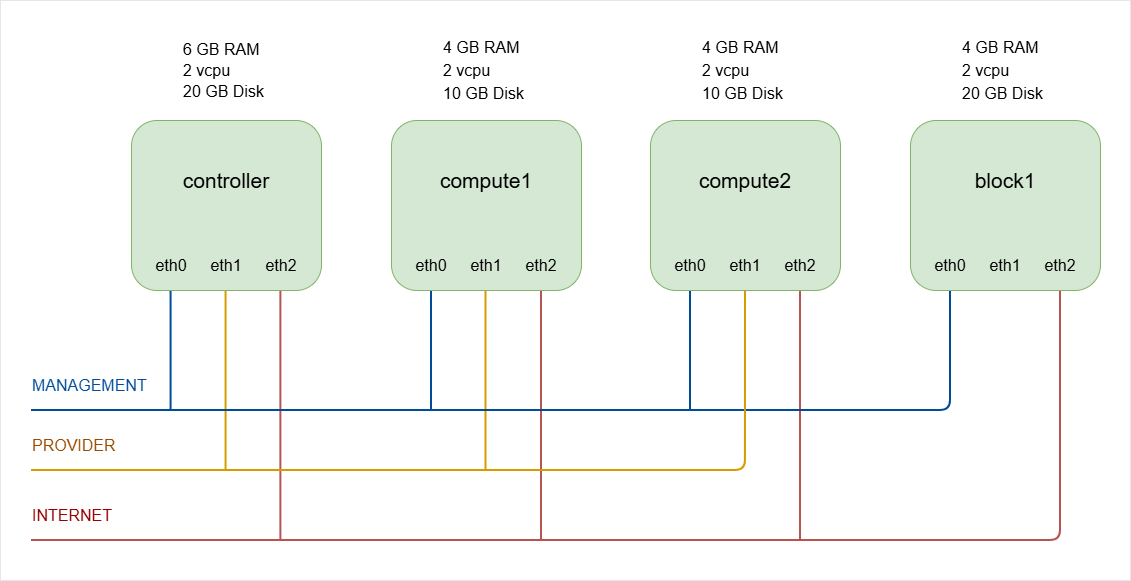
Cinder Storage Node
Prepare Storage for Cinder
Cinder needs a storage pool where volumes will be created. In most deployments, a second disk is used for block storage.
- In physical servers, this would normally be a dedicated disk.
- In a lab environment, this can be a virtual disk attached to the VM.
For example:
- Primary disk:
20GBsystem disk (/dev/sda) - Second disk:
30GBstorage disk (/dev/sdb)
A 30GB disk is enough for a small lab because the minimum OpenStack volume size is usually 1GB.
-
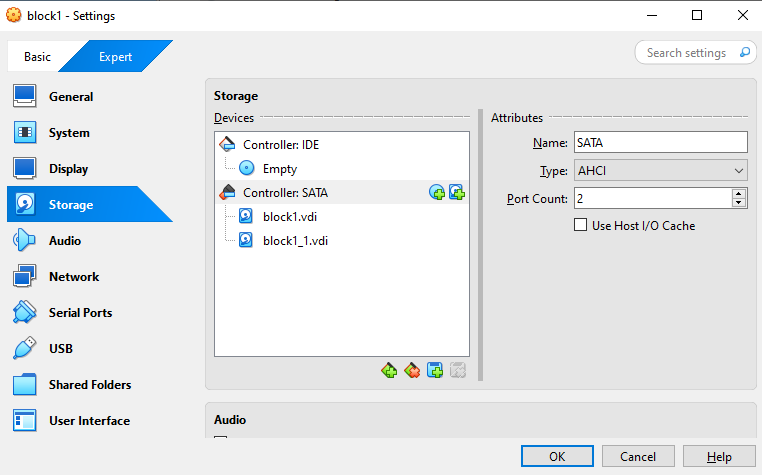
In the
block1VM, it currently only has one disk, as seen in the VM settings: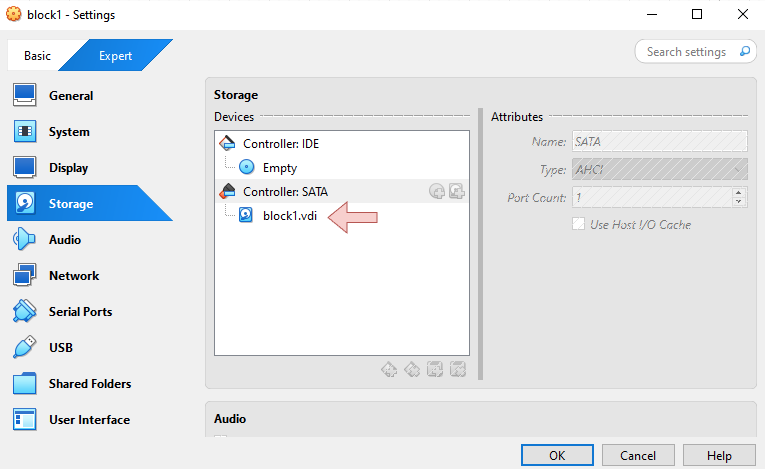
To add a second disk, turn off the VM first.
-
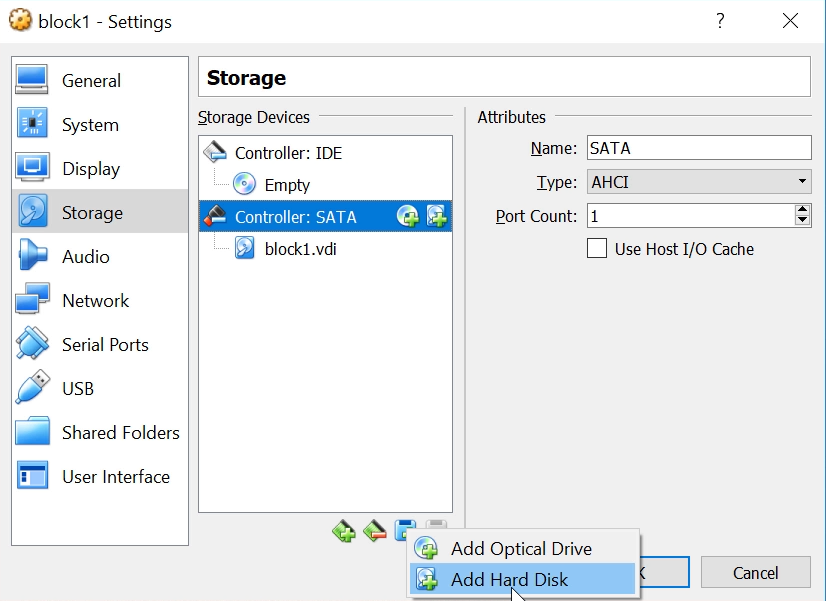
Once the VM is off, go back to the Settings ➔ Storage.
Click the Add attachment button ➔ Add Hard Disk
In the old VirtualBox, you need to select the following:
➔ Create new disk➔ Hard disk file type: VDI➔ Storage on physical hard disk: Dynamically allocated➔ File location and size: 30 GB➔ Then click CreateIn the new VirtualBox, select the following:
➔ Create➔ Hard Disk Location and Size: 30 GB➔ Hard Disk File Type and Variant: VDI➔ Then click Finish➔ Then click Choose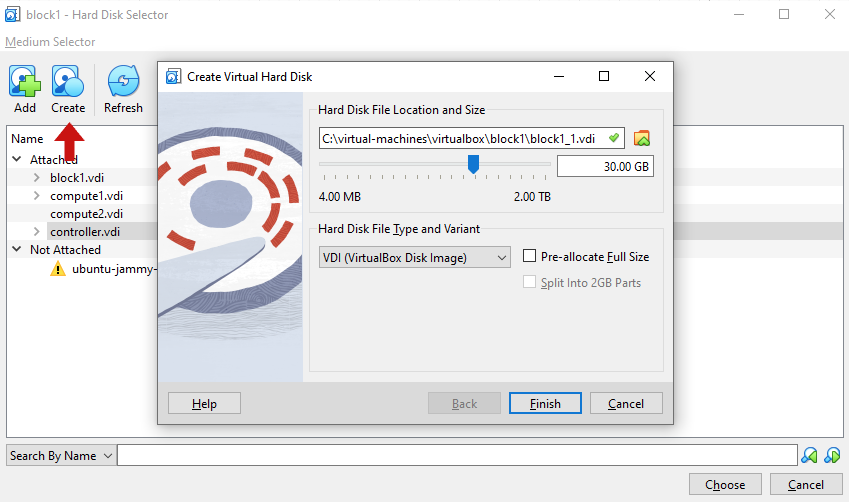
You should now have two disk attached to the VM.
This disk will later become the storage pool for Cinder volumes.
Click OK and start the VM again.
-
Log in to block storage node and switch to root.
ssh -i ~/.ssh/vbox jmeden@10.0.0.31sudo su -
Install the LVM tools to manage storage volumes.
sudo apt update -ysudo apt install -y lvm2 thin-provisioning-tools crudini python3-pymysqlNotes:
lvm2manages logical volumes in Linuxthin-provisioning-toolssupports efficient storage allocationcrudiniwill be used to set the configurations later (OPTIONAL)python3-pymysqldriver allows Cinder to talk to the database
-
Verify the storage disk.
Confirm that the second disk exists before configuring storage.
sudo fdisk -lOutput:
Disk /dev/sda: 20 GiB, 21474836480 bytes, 41943040 sectorsDisk model: VBOX HARDDISKUnits: sectors of 1 * 512 = 512 bytesSector size (logical/physical): 512 bytes / 512 bytesI/O size (minimum/optimal): 512 bytes / 512 bytesDisklabel type: gptDisk identifier: 6C8DFB85-7BBA-4454-B22F-DC09CF51CE18Device Start End Sectors Size Type/dev/sda1 2048 4095 2048 1M BIOS boot/dev/sda2 4096 3719167 3715072 1.8G Linux filesystem/dev/sda3 3719168 41940991 38221824 18.2G Linux filesystemDisk /dev/sdb: 30 GiB, 32212254720 bytes, 62914560 sectorsDisk model: VBOX HARDDISKUnits: sectors of 1 * 512 = 512 bytesSector size (logical/physical): 512 bytes / 512 bytesI/O size (minimum/optimal): 512 bytes / 512 bytesHere, we can see the primary disk (
/dev/sda) which has the three partitions. We can also see the new storage disk that was created earlier (/dev/sdb)The storage disk should not contain partitions, because it will be used directly by LVM.
This confirms the disk is ready to be used for Cinder storage.
Configure the LVM
In this setup, we'll use Linux LVM to create and manage block storage volumes. The disk will first become a physical volume, and then it will be grouped into a volume group called cinder-volumes.
-
Create the LVM physical volume.
Create a physical volume using the storage disk
/dev/sdb.sudo pvcreate /dev/sdbOutput:
Physical volume "/dev/sdb" successfully created.This command converts the disk into an LVM physical volume. The physical volume becomes the base storage layer used by Cinder.
-
Create the Cinder volume group.
This volume group will store all OpenStack block volumes.
sudo vgcreate cinder-volumes /dev/sdbOutput:
Volume group "cinder-volumes" successfully createdNotes:
cinder-volumesis the storage pool name used by Cinder/dev/sdbis the physical volume created earlier
-
Verify the volume group.
sudo vgsOutput:
VG #PV #LV #SN Attr VSize VFreecinder-volumes 1 0 0 wz--n- <30.00g <30.00gubuntu-vg 1 1 0 wz--n- 18.22g 8.22gThis confirms that the Cinder storage pool has been created.
-
Configure LVM device filtering.
LVM should only scan the disks used by the system and Cinder.
First, verify the LVM files exist:
root@block1:/home/jmeden# ls -la /etc/lvm/total 128drwxr-xr-x 5 root root 4096 Mar 9 15:51 .drwxr-xr-x 106 root root 4096 Mar 9 13:54 ..drwx------ 2 root root 4096 Mar 9 15:51 archivedrwx------ 2 root root 4096 Mar 9 15:51 backup-rw-r--r-- 1 root root 103434 Feb 16 2022 lvm.conf-rw-r--r-- 1 root root 2301 Feb 16 2022 lvmlocal.confdrwxr-xr-x 2 root root 4096 Feb 17 16:14 profileEdit the LVM configuration file.
sudo vi /etc/lvm/lvm.confFind the
devicessection and configure the filter. Thefilterline is commented by default, so you can just insert the line inside thedevicessection.devices {filter = [ "a/sda/", "a/sdb/", "r/.*/" ].....}Notes:
a/sda/allows the system diska/sdb/allows the Cinder diskr/.*/rejects all other devices
This prevents LVM from scanning unwanted devices.
The system now has a clean storage pool ready for Cinder.
Setup Cinder Services (on Storage)
After preparing the storage backend, install the Cinder service that manages block volumes.
-
Install the Cinder volume service.
sudo apt install -y cinder-volume tgtThe
cinder-volumeservice manages storage backends and creates volumes for OpenStack instances. -
Update the config file with the required configurations.
Verify the Cinder files exist:
ls -la /etc/cinder/Edit the Cinder configuration file.
sudo vi /etc/cinder/cinder.confCinder must communicate with the OpenStack database and RabbitMQ message queue. It must also authenticate with the OpenStack identity service.
[DEFAULT]iscsi_helper = lioadmvolume_name_template = volume-%svolume_group = cinder-volumesverbose = Trueauth_strategy = keystonestate_path = /var/lib/cinderlock_path = /var/lock/cindervolumes_dir = /var/lib/cinder/volumesenabled_backends = lvmtransport_url = rabbit://openstack:openstack@controllermy_ip = 10.0.0.31glance_api_servers = http://controller:9292[database]connection = mysql+pymysql://cinder:openstack@controller/cinder[keystone_authtoken]auth_uri = http://controller:5000auth_url = http://controller:5000memcached_servers = controller:11211auth_type = passwordproject_domain_name = Defaultuser_domain_name = Defaultproject_name = serviceusername = cinderpassword = openstack[lvm]volume_driver = cinder.volume.drivers.lvm.LVMVolumeDrivervolume_group = cinder-volumesiscsi_protocol = iscsiiscsi_helper = tgtadm[oslo_concurrency]lock_path = /var/lib/cinder/tmpUPDATE: The correct syntax for OpenStack Zed is:
[lvm]volume_driver = cinder.volume.drivers.lvm.LVMVolumeDrivervolume_group = cinder-volumestarget_protocol = iscsitarget_helper = tgtadmNotes:
volume_drivertells Cinder to use the LVM drivervolume_groupspecifies the storage pooltarget_protocoluses iSCSI to export volumestarget_helperuses the TGT iSCSI service
This allows OpenStack volumes to be exported from the block node through iSCSI.
UPDATE: Some newer OpenStack releases use LIO instead of TGT for the iSCSI helper.
target_helper = lioadmOlder documentations often still use TGT, so both may appear depending on the OpenStack version.
The ideal is still the same: the block node prepares an LVM storage pool and Cinder exports those volumes through iSCSI so instances can attach block storage dynamically.
-
Restart the services.
sudo systemctl enable --now tgtsudo systemctl enable --now cinder-volumesudo systemctl status tgtsudo systemctl status cinder-volumeNotes:
tgtprovides the iSCSI target servicecinder-volumemanages volume creation
Once the services restart successfully, the block node can provide block storage to OpenStack instances.
Controller node
After preparing the block storage node, the controller node must be configured to manage the Cinder service. The controller handles API requests, scheduling, and service registration.
Create the Cinder DB and Service User
Cinder requires a database and a service account so it can interact with other OpenStack components.
-
Log in to controller node and switch to root.
ssh -i ~/.ssh/vbox jmeden@10.0.0.11sudo su -
Create the database and allow the Cinder service to access it.
Start MySQL:
sudo mysqlHere, the database name is
cinder, the database user iscinder, and the password isopenstack.CREATE DATABASE cinder;GRANT ALL PRIVILEGES ON cinder.* TO 'cinder'@'localhost' IDENTIFIED BY 'openstack';GRANT ALL PRIVILEGES ON cinder.* TO 'cinder'@'%' IDENTIFIED BY 'openstack';EXIT; -
Before running OpenStack CLI, make sure to source the client environment script.
source admin-openrc.sh -
Create the service user in OpenStack.
The service user name is
cinderand the password isopenstack.openstack user create --domain default --password openstack cinder -
Assign the admin role to the user in the
serviceproject.openstack role add --project service --user cinder admin
Register Cinder services and Endpoints
Cinder must be registered in the OpenStack service catalog so other components can locate it.
-
Create the Cinder service.
openstack service create --name cinderv3 --description "OpenStack Block Storage" volumev3Older deployments may also register the v2 service.
openstack service create --name cinderv2 --description "OpenStack Block Storage" volumev2 -
Next, create the API endpoints.
Registering the service and endpoints ensures that the Cinder API can be discovered by the OpenStack environment.
The variable
controllerrepresents the controller node's hostname, which is already configured in the node's/etc/hostsfile (See Networking and Security).NOTE: Copy the commands as is.
openstack endpoint create --region RegionOne volumev2 public http://controller:8776/v2/%\(project_id\)sopenstack endpoint create --region RegionOne volumev2 internal http://controller:8776/v2/%\(project_id\)sopenstack endpoint create --region RegionOne volumev2 admin http://controller:8776/v2/%\(project_id\)sopenstack endpoint create --region RegionOne volumev3 public http://controller:8776/v3/%\(project_id\)sopenstack endpoint create --region RegionOne volumev3 internal http://controller:8776/v3/%\(project_id\)sopenstack endpoint create --region RegionOne volumev3 admin http://controller:8776/v3/%\(project_id\)sThese endpoints allow other OpenStack services to communicate with the Cinder API.
UPDATE: In newer OpenStack releases, v3 is the primary API, and some deployments no longer register the v2 endpoint.
-
Verify the Cinder endpoints.
After creating the endpoints, you should confirm that Keystone registered them correctly.
openstack endpoint list | grep cinderOutput:
| 71f2de81ea8f44beb0c849e3109fad62 | RegionOne | cinderv3 | volumev3 | True | admin | http://controller:8776/v3/%(project_id)s || 858ba226fa334c7db5c1ea631d028e26 | RegionOne | cinderv2 | volumev2 | True | admin | http://controller:8776/v2/%(project_id)s || 91933eb84d26436bbd8f9b499509c274 | RegionOne | cinderv3 | volumev3 | True | internal | http://controller:8776/v3/%(project_id)s || c0e6089bb82441bbbbb0cc4d53fba5b4 | RegionOne | cinderv2 | volumev2 | True | internal | http://controller:8776/v2/%(project_id)s || c5a675aaef944f93b1a7a172c03cb0d9 | RegionOne | cinderv2 | volumev2 | True | public | http://controller:8776/v2/%(project_id)s || ed39a29065ee4ca09329f019ebef87ce | RegionOne | cinderv3 | volumev3 | True | public | http://controller:8776/v3/%(project_id)s |You can also confirm the Cinder service exists.
openstack service listOutput:
+----------------------------------+-----------+-----------+| ID | Name | Type |+----------------------------------+-----------+-----------+| 1edcdee79b2f49cf9d4bea83ee6eb138 | placement | placement || 2527ec34edbc471b9fcd4d22390b5b17 | keystone | identity || 7eaebe1c38504451959477ade3cea3b7 | cinderv3 | volumev3 || 81096520cafe403384b652442a6c00d9 | glance | image || a0be92e24edd416f9b34c001e4dac4b4 | neutron | network || bae0a47df7f8496e94a3df92180ff6bd | cinderv2 | volumev2 || bdc0221735714a57a53af04f3a9e2dc5 | nova | compute |+----------------------------------+-----------+-----------+
Setup Cinder services (on Controller)
After registering the service, install the required Cinder components on the controller node.
-
Install the required packages.
sudo apt install -y cinder-api cinder-schedulerIf you get this prompt, press tab to navigate and select Ok.

-
Update the configurations for Cinder.
Edit the Cinder configuration file.
sudo vi /etc/cinder/cinder.confMake sure to set the
my_ipto the management IP of your controller node.[DEFAULT]rootwrap_config = /etc/cinder/rootwrap.confapi_paste_confg = /etc/cinder/api-paste.iniiscsi_helper = lioadmvolume_name_template = volume-%svolume_group = cinder-volumesverbose = Trueauth_strategy = keystonestate_path = /var/lib/cinderlock_path = /var/lock/cindervolumes_dir = /var/lib/cinder/volumesenabled_backends = lvmtransport_url = rabbit://openstack:openstack@controllermy_ip = 10.0.0.11[database]connection = mysql+pymysql://cinder:openstack@controller/cinder[keystone_authtoken]auth_uri = http://controller:5000auth_url = http://controller:5000memcached_servers = controller:11211auth_type = passwordproject_domain_name = Defaultuser_domain_name = Defaultproject_name = serviceusername = cinderpassword = openstack[oslo_concurrency]lock_path = /var/lib/cinder/tmpThese settings will allow the controller node to run the Cinder API and communicate with the rest of the OpenStack environment.
Initialize the DB and Enable Integration
After configuration, initialize the Cinder database and connect the compute service with Cinder.
-
Populate the database using the
cinder-managecommand.This command creates all required database tables.
su -s /bin/sh -c "cinder-manage db sync" cinderOutput:
2023-03-09 16:40:03.641 155351 INFO cinder.db.migration [-] Applying migration(s)2023-03-09 16:40:03.643 155351 INFO alembic.runtime.migration [-] Context impl MySQLImpl.2023-03-09 16:40:03.644 155351 INFO alembic.runtime.migration [-] Will assume non-transactional DDL.2023-03-09 16:40:03.673 155351 INFO alembic.runtime.migration [-] Running upgrade -> 921e1a36b076, Initial migration.2023-03-09 16:40:07.730 155351 INFO alembic.runtime.migration [-] Running upgrade 921e1a36b076 -> c92a3e68beed, Make shared_targets nullable2023-03-09 16:40:07.805 155351 INFO cinder.db.migration [-] Migration(s) applied -
Configure Nova so that instances can attach volumes.
Edit the Nova configuration file.
sudo vi /etc/nova/nova.confAdd the following setting.
[cinder]os_region_name = RegionOne -
Restart the required services.
sudo systemctl restart nova-apisudo systemctl restart cinder-schedulersudo systemctl restart apache2sudo systemctl status nova-apisudo systemctl status cinder-schedulersudo systemctl status apache2
These steps connect the compute service with the block storage service so instances can attach volumes.
Verify Cinder Operation
After installation, confirm that the Cinder services are running.
openstack volume service list
Output:
+------------------+------------+------+---------+-------+----------------------------+
| Binary           | Host       | Zone | Status  | State | Updated At                 |
+------------------+------------+------+---------+-------+----------------------------+
| cinder-volume    | block1@lvm | nova | enabled | up    | 2023-03-09T16:42:41.000000 |
| cinder-scheduler | controller | nova | enabled | up    | 2023-03-09T16:42:48.000000 |
+------------------+------------+------+---------+-------+----------------------------+
Notes:
cinder-schedulerruns on the controller nodecinder-volumeruns on the block storage node
This confirms that the controller and block node are communicating correctly.
Test Volume Creation
Still in the controller node, create a test volume to confirm that Cinder can allocate storage.
In the example below, the volume size is 1GB and the volume name is test-volume.
openstack volume create --size 1 test-volume
Check the volume status.
openstack volume list
Output:
+--------------------------------------+-------------+-----------+------+-------------+
| ID                                   | Name        | Status    | Size | Attached to |
+--------------------------------------+-------------+-----------+------+-------------+
| e66bc75a-04da-4ed0-9ded-1459dfb6250e | test-volume | available |    1 |             |
+--------------------------------------+-------------+-----------+------+-------------+
If the status shows available, the volume was successfully created.
Verify Volume Creation
Cinder volumes are stored as LVM logical volumes on the block storage node.
To display the logical volumes, run the command below on the block node:
sudo lvs
Output:
LV                                          VG             Attr       LSize  Pool                Origin Data%  Meta%  Move Log Cpy%Sync Convert
cinder-volumes-pool                         cinder-volumes twi-aotz-- 28.50g                            0.00   10.46
volume-e66bc75a-04da-4ed0-9ded-1459dfb6250e cinder-volumes Vwi-a-tz--  1.00g cinder-volumes-pool        0.00
ubuntu-lv                                   ubuntu-vg      -wi-ao---- 10.00g
The new volume (test-volume) with 1 GB size that was created in the previous step:
LV                                        VG              Attr       LSize
volume-7f8a1c20-9e9e-4f91-a7c3-7a3f2d9f3abc cinder-volumes -wi-a----- 1.00g
This confirms that Cinder created the logical volume inside the cinder-volumes group.
Notes:
- The logical volume name starts with
volume-UUID - The UUID matches the OpenStack volume ID
The controller now manages the Cinder API and scheduler, and the block node provides the storage backend. This completes a working OpenStack block storage setup.