Install Neutron
Overview
OpenStack networking is provided by Neutron. The installation flow is similar to other OpenStack services like Nova or Glance.
Steps:
- Create the Neutron SQL database
- Create the Neutron service user and endpoints
- Install Neutron packages
- Configure Neutron and ML2 plugin
- Populate the database and restart services
After these steps, the controller will manage networking services for the OpenStack environment.
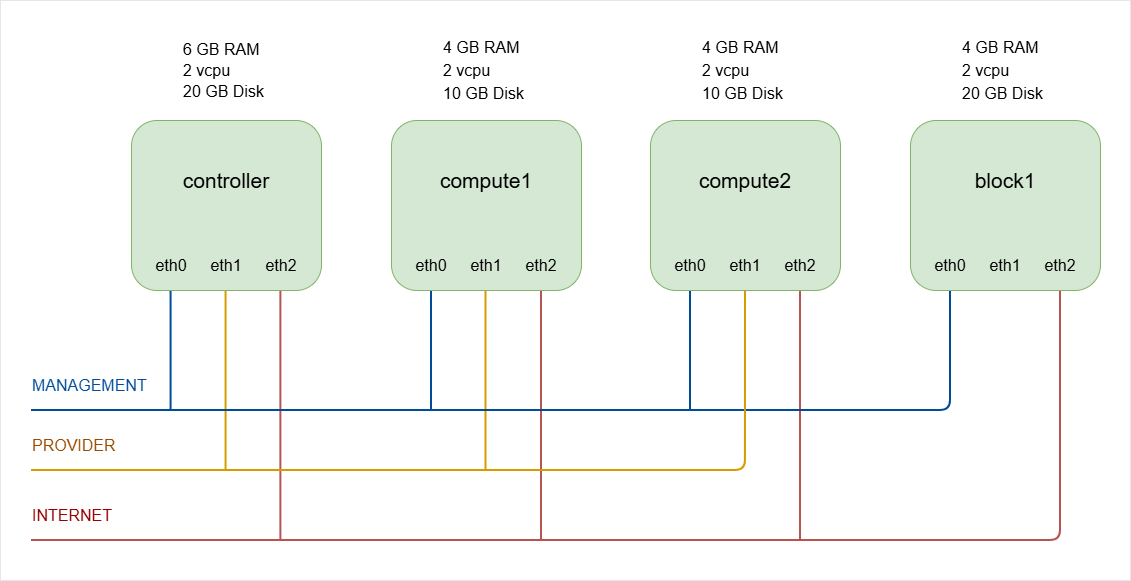
NOTES: The hostnames of all the nodes in this lab are configured in the /etc/hosts file in each node (See Networking and Security).
As a recap, below is the lab diagram.
Controller Node Setup
Database, User, and Service
-
Log in to controller and switch to root.
ssh -i ~/.ssh/vbox jmeden@10.0.0.11sudo su -
Create the Neutron Database.
Neutron stores its state in a SQL database. The database and permissions must be created first. Start MySQL:
sudo mysqlRun the following commands inside MySQL.
Note: The database name is
neutronand the password isopenstack.CREATE DATABASE neutron;GRANT ALL PRIVILEGES ON neutron.* TO 'neutron'@'localhost' IDENTIFIED BY 'openstack';GRANT ALL PRIVILEGES ON neutron.* TO 'neutron'@'%' IDENTIFIED BY 'openstack';FLUSH PRIVILEGES;EXITThe database is now ready for the Neutron service to use.
To verify:
show databases;Output:
+--------------------+| Database |+--------------------+| glance || information_schema || keystone || mysql || neutron || nova || nova_api || nova_cell0 || performance_schema || placement || sys |+--------------------+11 rows in set (0.007 sec) -
Before running OpenStack commands, make sure to source the client environment script.
source admin-openrc.sh -
Create the Neutron Service User
Neutron must authenticate with the Identity service (Keystone).
Create the Neutron user and assign the admin role
openstack user create --domain default --password openstack neutronopenstack role add --project service --user neutron adminThe user is
neutronand the password isopenstack. -
Create the Neutron service entry.
This will allow other OpenStack services to locate and use the Neutron API.
openstack service create --name neutron \--description "OpenStack Networking" networkOutput:
+-------------+----------------------------------+| Field | Value |+-------------+----------------------------------+| description | OpenStack Networking || enabled | True || id | a0be92e24edd416f9b34c001e4dac4b4 || name | neutron || type | network |+-------------+----------------------------------+
Neutron API Endpoints
Endpoints allow OpenStack services to reach the Neutron API.
- Public endpoint for external access
- Internal endpoint for service communication
- Admin endpoint for administrative access
In many lab environments, these endpoints use the same URL.
Neutron runs an API service called neutron-server. By default it listens on port 9696, which is defined in the Neutron configuration.
In the commands below, the API runs on port 9696.
openstack endpoint create --region RegionOne network public http://controller:9696
openstack endpoint create --region RegionOne network internal http://controller:9696
openstack endpoint create --region RegionOne network admin http://controller:9696
Neutron endpoints are now registered in Keystone.
To verify, list the network service endpoints:
openstack endpoint list --service network
Output:
+----------------------------------+-----------+--------------+--------------+---------+-----------+------------------------+
| ID                               | Region    | Service Name | Service Type | Enabled | Interface | URL                    |
+----------------------------------+-----------+--------------+--------------+---------+-----------+------------------------+
| 0cc909e9ad2046ae961beea5d1f8273a | RegionOne | neutron      | network      | True    | public    | http://controller:9696 |
| ca24596e7e5e46f283c805301b0d3152 | RegionOne | neutron      | network      | True    | internal  | http://controller:9696 |
| f4165332d457456186458f00d182ca00 | RegionOne | neutron      | network      | True    | admin     | http://controller:9696 |
+----------------------------------+-----------+--------------+--------------+---------+-----------+------------------------+
The output should show three endpoints for the network service: public, internal, and admin. This confirms that the Neutron API endpoints are correctly registered in Keystone and are reachable through port 9696.
NOTE: In many production deployments, the endpoint does not directly expose port 9696. Instead, the flow may look like this:
Client
  ↓
HAProxy / Nginx
  ↓
Neutron API (9696)
The sample endpoint may look like this:
http://openstack.example.com:9696
https://openstack.example.com/network
But internally the Neutron API service still runs on port 9696.
Install Neutron Packages
Update the package list and install the required packages.
sudo apt update -y
Install Neutron server and related components.
sudo apt install -y \
  neutron-server \
  neutron-plugin-ml2 \
  neutron-linuxbridge-agent \
  neutron-dhcp-agent \
  neutron-metadata-agent \
  neutron-l3-agent
NOTE: In modern OpenStack deployments (including Zed), many production environments prefer Open vSwitch (OVS) instead of Linux Bridge. However, Linux Bridge is still fully supported and commonly used for lab environments and small deployments.
Next, perform some checks:
-
Verify that the Neutron packages were installed successfully.
dpkg -l | grep neutronOutput:
ii neutron-common 2:21.2.0-0ubuntu1~cloud1 all Neutron is a virtual network service for Openstack - commonii neutron-dhcp-agent 2:21.2.0-0ubuntu1~cloud1 all Neutron is a virtual network service for Openstack - DHCP agentii neutron-l3-agent 2:21.2.0-0ubuntu1~cloud1 all Neutron is a virtual network service for Openstack - l3 agentii neutron-linuxbridge-agent 2:21.2.0-0ubuntu1~cloud1 all Neutron is a virtual network service for Openstack - linuxbridge agentii neutron-metadata-agent 2:21.2.0-0ubuntu1~cloud1 all Neutron is a virtual network service for Openstack - metadata agentii neutron-plugin-ml2 2:21.2.0-0ubuntu1~cloud1 all Neutron is a virtual network service for Openstack - ML2 pluginii neutron-server 2:21.2.0-0ubuntu1~cloud1 all Neutron is a virtual network service for Openstack - serverii python3-neutron 2:21.2.0-0ubuntu1~cloud1 all Neutron is a virtual network service for Openstack - Python libraryii python3-neutron-lib 3.1.2-0ubuntu1~cloud0 all Neutron shared routines and utilities - Python 3.xii python3-neutronclient 1:8.1.0-0ubuntu1~cloud0 all client API library for Neutron - Python 3.x -
Check that the services exist in the system service manager.
systemctl list-unit-files | grep neutronOutput:
neutron-dhcp-agent.service enabled enabledneutron-l3-agent.service enabled enabledneutron-linuxbridge-agent.service enabled enabledneutron-linuxbridge-cleanup.service enabled enabledneutron-metadata-agent.service enabled enabledneutron-server.service enabled enabled -
After configuration and service restart, verify that the services are running.
systemctl status neutron-serversystemctl status neutron-linuxbridge-agentsystemctl status neutron-dhcp-agentsystemctl status neutron-metadata-agentsystemctl status neutron-l3-agentAll services should show active (running).
-
Finally, verify that the Neutron service is registered in OpenStack.
openstack service list | grep networkOutput:
| a0be92e24edd416f9b34c001e4dac4b4 | neutron | network |This confirms that the Neutron service is registered in Keystone. Note that it does not confirm that the Neutron API server is running. This will be verified later after setting up the configuration file.
Setting up the Configuration
The main Neutron configuration file is:
/etc/neutron/neutron.conf
Important configuration areas include:
- Database connection
- Message queue (RabbitMQ)
- Keystone authentication
To simplify configuration, the commands below use Crudini to update parameters in neutron.conf.
-
Configure Database and RabbitMQ.
Neutron stores network state in the SQL database and uses RabbitMQ for messaging.
crudini --set /etc/neutron/neutron.conf database connection mysql+pymysql://neutron:openstack@controller/neutroncrudini --set /etc/neutron/neutron.conf DEFAULT transport_url rabbit://openstack:openstack@controllerThis connects Neutron to:
- The MySQL database
- The RabbitMQ message queue
Both services must already be running on the controller node.
-
Enable the Modular Layer 2 (ML2) plug-in.
Neutron uses plug-ins to support different networking technologies. The ML2 plug-in is the most common choice for modern OpenStack deployments.
crudini --set /etc/neutron/neutron.conf DEFAULT core_plugin ml2crudini --set /etc/neutron/neutron.conf DEFAULT service_plugins routercrudini --set /etc/neutron/neutron.conf DEFAULT allow_overlapping_ips true -
Configure Identity Service access.
Neutron must authenticate with Keystone.
crudini --set /etc/neutron/neutron.conf DEFAULT auth_strategy keystonecrudini --set /etc/neutron/neutron.conf keystone_authtoken auth_uri http://controller:5000crudini --set /etc/neutron/neutron.conf keystone_authtoken auth_url http://controller:5000crudini --set /etc/neutron/neutron.conf keystone_authtoken memcached_servers controller:11211crudini --set /etc/neutron/neutron.conf keystone_authtoken auth_type passwordcrudini --set /etc/neutron/neutron.conf keystone_authtoken project_domain_name Defaultcrudini --set /etc/neutron/neutron.conf keystone_authtoken user_domain_name Defaultcrudini --set /etc/neutron/neutron.conf keystone_authtoken project_name servicecrudini --set /etc/neutron/neutron.conf keystone_authtoken username neutroncrudini --set /etc/neutron/neutron.conf keystone_authtoken password openstackUPDATE: The
auth_uriis deprecated and replaced bywww_authenticate_uriin newer OpenStack releases including Zed.crudini --set /etc/neutron/neutron.conf keystone_authtoken www_authenticate_uri http://controller:5000 -
Configure Networking to notify Compute of network topology changes.
This allows Nova to update instance networking information when ports change.
crudini --set /etc/neutron/neutron.conf DEFAULT notify_nova_on_port_status_changes truecrudini --set /etc/neutron/neutron.conf DEFAULT notify_nova_on_port_data_changes true -
Configure the Nova access.
Neutron also needs credentials for Neutron to communicate with the Nova API.
crudini --set /etc/neutron/neutron.conf nova auth_url http://controller:5000crudini --set /etc/neutron/neutron.conf nova auth_type passwordcrudini --set /etc/neutron/neutron.conf nova project_domain_name Defaultcrudini --set /etc/neutron/neutron.conf nova user_domain_name Defaultcrudini --set /etc/neutron/neutron.conf nova region_name RegionOnecrudini --set /etc/neutron/neutron.conf nova project_name servicecrudini --set /etc/neutron/neutron.conf nova username novacrudini --set /etc/neutron/neutron.conf nova password openstack -
If you are using OpenStack Zed: Enable the
linuxbridgeas experimental.infoStarting with Zed, the Linux Bridge mechanism driver was marked as experimental and eventually deprecated in favor of OVS (Open vSwitch) or OVN. The
neutron-serverwill refuse to start unless you explicitly acknowledge that you are using an experimental feature.You need to add a specific flag to your configuration to allow the Linux Bridge driver to load.
crudini --set /etc/neutron/neutron.conf experimental linuxbridge True -
Verify the Configuration.
After running the configuration commands, verify that the settings were written correctly.
grep -vE '^\s*#|^\s*$' /etc/neutron/neutron.confOutput:
[DEFAULT]core_plugin = ml2transport_url = rabbit://openstack:openstack@controllerservice_plugins = routerallow_overlapping_ips = trueauth_strategy = keystonenotify_nova_on_port_status_changes = truenotify_nova_on_port_data_changes = true[agent]root_helper = "sudo /usr/bin/neutron-rootwrap /etc/neutron/rootwrap.conf"[database]connection = mysql+pymysql://neutron:openstack@controller/neutron[experimental]linuxbridge = True[keystone_authtoken]auth_uri = http://controller:5000auth_url = http://controller:5000memcached_servers = controller:11211auth_type = passwordproject_domain_name = Defaultuser_domain_name = Defaultproject_name = serviceusername = neutronpassword = openstackwww_authenticate_uri = http://controller:5000[nova]auth_url = http://controller:5000auth_type = passwordproject_domain_name = Defaultuser_domain_name = Defaultregion_name = RegionOneproject_name = serviceusername = novapassword = openstack
Configure the ML2 Plugin
The Modular Layer 2 (ML2) plugin supports multiple network technologies.
Configuration file:
/etc/neutron/plugins/ml2/ml2_conf.ini
Using Crudini:
-
Enable the network type drivers.
Neutron must know which network types are supported.
crudini --set /etc/neutron/plugins/ml2/ml2_conf.ini ml2 type_drivers flat,vlan,vxlanThis enables three network types:
flatnetworks for simple provider networksvlannetworks for segmented provider networksvxlannetworks for tenant self-service networks
-
Enable VXLAN Self-service Networks.
This allows projects to create self-service VXLAN networks.
crudini --set /etc/neutron/plugins/ml2/ml2_conf.ini ml2 tenant_network_types vxlan -
Configure the mechanism driver.
crudini --set /etc/neutron/plugins/ml2/ml2_conf.ini ml2 mechanism_drivers linuxbridgeUPDATE: Modern production OpenStack environments usually use Open vSwitch (OVS) instead of Linux Bridge because it provides better scalability and integration with advanced networking features.
However for labs and small deployments, Linux bridge is still a valid option.
-
Enable Port Security Extension Driver.
This enables security groups and port filtering.
crudini --set /etc/neutron/plugins/ml2/ml2_conf.ini ml2 extension_drivers port_security -
Configure the provider Virtual Network as flat Network.
crudini --set /etc/neutron/plugins/ml2/ml2_conf.ini ml2_type_flat flat_networks providerNote:
- provider is the name used when creating external networks
- It will later map to a physical interface
-
Configure VXLAN Network Identifier Range for Self-service Networks
crudini --set /etc/neutron/plugins/ml2/ml2_conf.ini ml2_type_vxlan vni_ranges 1:1000This means up to 1000 VXLAN tenant networks can be created.
UPDATE: VXLAN supports up to 16 million networks, so production deployments typically use much larger ranges.
-
Enable ipset to improve firewall performance.
This improves performance when many security group rules exist.
crudini --set /etc/neutron/plugins/ml2/ml2_conf.ini securitygroup enable_ipset true -
If you are using OpenStack Zed: Enable the ML2
linuxbridgemechanism driver in the[experimental]sectioninfoStarting with Zed, the Linux Bridge mechanism driver was marked as experimental and eventually deprecated in favor of OVS (Open vSwitch) or OVN. The
neutron-serverwill refuse to start unless you explicitly acknowledge that you are using an experimental feature.You need to explicitly enable it in the
[experimental]section to allowneutron-serverto start.sudo crudini --set /etc/neutron/plugins/ml2/ml2_conf.ini experimental ml2_mechanism_drivers linuxbridge -
Verify the ML2 Configuration.
After applying the configuration, verify the settings.
root@controller:/home/jmeden# grep -vE '^\s*#|^\s*$' /etc/neutron/plugins/ml2/ml2_conf.ini[DEFAULT][ml2]type_drivers = flat,vlan,vxlantenant_network_types = vxlanmechanism_drivers = linuxbridgeextension_drivers = port_security[ml2_type_flat]flat_networks = provider[ml2_type_vxlan]vni_ranges = 1:1000[securitygroup]enable_ipset = true[experimental]ml2_mechanism_drivers = linuxbridge
Configuring the Neutron Agents
Follow these steps to configure the Neutron agents on the controller node:
-
Verify Your Network Interfaces.
Before configuring the agents, confirm which interfaces are used for management, provider/external, and NAT networks.
ip routeExample output:
default via 10.0.2.1 dev enp0s9 proto dhcp src 10.0.2.17 metric 10010.0.0.0/24 dev enp0s3 proto kernel scope link src 10.0.0.1110.0.2.0/24 dev enp0s9 proto kernel scope link src 10.0.2.17 metric 10010.0.2.1 dev enp0s9 proto dhcp scope link src 10.0.2.17 metric 10010.10.10.0/24 dev enp0s8 proto kernel scope link src 10.10.10.11192.168.1.1 via 10.0.2.1 dev enp0s9 proto dhcp src 10.0.2.17 metric 100Mapping the interfaces for Neutron:
default via 10.0.2.1 dev enp0s9 ➔ NAT / Internet access10.0.0.0/24 dev enp0s3 ➔ Internal network (controller ↔ compute)10.10.10.0/24 dev enp0s8 ➔ External / provider networkInterface IP Role Notes enp0s310.0.0.11 Management network Used for internal OpenStack communication (VXLAN tunnels, agent RPCs). enp0s810.10.10.11 Provider / external network Maps to physical_interface_mappingsin Linux Bridge agent.enp0s910.0.2.17 NAT / Internet Not used for Neutron, only for host internet access. -
Configure the Linux Bridge Agent.
The Linux Bridge agent connects virtual networks to physical interfaces.
If you do not want to use Crudini, proceed to step 5 to see the configuration file.
Use Crudini to set the configuration:
crudini --set /etc/neutron/plugins/ml2/linuxbridge_agent.ini linux_bridge physical_interface_mappings provider:eth1Notes:
provideris the name used for the provider networketh1is the physical interface connected to the external network
UPDATE: On newer Ubuntu versions (like 22.04), the old
ethXinterface names are not used. Ubuntu now uses predictable network interface names such asenp0s3,enp0s8, etc.crudini --set /etc/neutron/plugins/ml2/linuxbridge_agent.ini linux_bridge physical_interface_mappings provider:enp0s8 -
Configure the VXLAN Tunnels.
VXLAN tunnels allow communication between compute nodes.
crudini --set /etc/neutron/plugins/ml2/linuxbridge_agent.ini vxlan enable_vxlan truecrudini --set /etc/neutron/plugins/ml2/linuxbridge_agent.ini vxlan local_ip 10.0.0.11crudini --set /etc/neutron/plugins/ml2/linuxbridge_agent.ini vxlan l2_population trueNote:
local_ipis the management network IP of the node- VXLAN tunnels allow communication between compute nodes
UPDATE: In production, use a dedicated tunnel network instead of the management network.
-
Configure the Firewall Driver
crudini --set /etc/neutron/plugins/ml2/linuxbridge_agent.ini securitygroup enable_security_group truecrudini --set /etc/neutron/plugins/ml2/linuxbridge_agent.ini securitygroup firewall_driver neutron.agent.linux.iptables_firewall.IptablesFirewallDriverThis enables security groups to enforce firewall rules.
-
Verify the Linux bridge configurations.
grep -vE '^\s*#|^\s*$' /etc/neutron/plugins/ml2/linuxbridge_agent.iniOutput:
[linux_bridge]physical_interface_mappings = provider:enp0s8[securitygroup]enable_security_group = truefirewall_driver = neutron.agent.linux.iptables_firewall.IptablesFirewallDriver[vxlan]enable_vxlan = truelocal_ip = 10.0.0.11l2_population = true -
Configure the Layer-3 Agent.
The L3 agent manages virtual routers and connects tenant networks to external networks.
vi /etc/neutron/l3_agent.ini[DEFAULT]interface_driver = linuxbridgeVerify:
root@controller:/home/jmeden# grep -vE '^\s*#|^\s*$' /etc/neutron/l3_agent.ini[DEFAULT]interface_driver = linuxbridge[agent][network_log][ovs] -
Configure the DHCP Agent.
The DHCP agent provides IP addresses to instances.
Using Crudini:
crudini --set /etc/neutron/dhcp_agent.ini DEFAULT interface_driver linuxbridgecrudini --set /etc/neutron/dhcp_agent.ini DEFAULT dhcp_driver neutron.agent.linux.dhcp.Dnsmasqcrudini --set /etc/neutron/dhcp_agent.ini DEFAULT enable_isolated_metadata trueVerify:
root@controller:/home/jmeden# grep -vE '^\s*#|^\s*$' /etc/neutron/dhcp_agent.ini[DEFAULT]interface_driver = linuxbridgedhcp_driver = neutron.agent.linux.dhcp.Dnsmasqenable_isolated_metadata = true[agent][ovs]This enables DHCP for tenant networks.
-
Configure the Metadata Agent.
The metadata agent allows instances to retrieve metadata such as SSH keys.
crudini --set /etc/neutron/metadata_agent.ini DEFAULT nova_metadata_host controllercrudini --set /etc/neutron/metadata_agent.ini DEFAULT metadata_proxy_shared_secret openstackNotes:
- The
metadata_proxy_shared_secretmust match the password configured in Nova. - In this case, the password is
openstack.
Verify:
root@controller:/home/jmeden# grep -vE '^\s*#|^\s*$' /etc/neutron/metadata_agent.ini[DEFAULT]nova_metadata_host = controllermetadata_proxy_shared_secret = openstack - The
Configure Nova to Use Neutron
Nova must know how to communicate with Neutron. This step will allow Nova to request networking resources from Neutron.
Using Crudini to update /etc/nova/nova.conf:
crudini --set /etc/nova/nova.conf neutron url http://controller:9696
crudini --set /etc/nova/nova.conf neutron auth_url http://controller:5000
crudini --set /etc/nova/nova.conf neutron auth_type password
crudini --set /etc/nova/nova.conf neutron project_domain_name Default
crudini --set /etc/nova/nova.conf neutron user_domain_name Default
crudini --set /etc/nova/nova.conf neutron region_name RegionOne
crudini --set /etc/nova/nova.conf neutron project_name service
crudini --set /etc/nova/nova.conf neutron username neutron
crudini --set /etc/nova/nova.conf neutron password openstack
crudini --set /etc/nova/nova.conf neutron service_metadata_proxy true
crudini --set /etc/nova/nova.conf neutron metadata_proxy_shared_secret openstack
The metadata_proxy_shared_secret is the password/key shared between Nova and the Neutron Metadata Agent to secure metadata requests from instances.
Now verify:
root@controller:/home/jmeden# grep -vE '^\s*#|^\s*$' /etc/nova/nova.conf

[neutron]
url = http://controller:9696
auth_url = http://controller:5000
auth_type = password
project_domain_name = Default
user_domain_name = Default
region_name = RegionOne
project_name = service
username = neutron
password = openstack
service_metadata_proxy = true
metadata_proxy_shared_secret = openstack
Populate the Neutron Database
After configuration, the Neutron database must be initialized.
In the command below, the database user is neutron.
su -s /bin/sh -c "neutron-db-manage --config-file /etc/neutron/neutron.conf \
--config-file /etc/neutron/plugins/ml2/ml2_conf.ini upgrade head" neutron
Expected result:
INFO [alembic.runtime.migration] Running upgrade
The Neutron database is now initialized.
Restart the Services
Restart the affected services so the configuration takes effect.
sudo systemctl restart nova-api
sudo systemctl restart neutron-server
sudo systemctl restart neutron-linuxbridge-agent
sudo systemctl restart neutron-dhcp-agent
sudo systemctl restart neutron-metadata-agent
sudo systemctl restart neutron-l3-agent

sudo systemctl status nova-api
sudo systemctl status neutron-server
sudo systemctl status neutron-linuxbridge-agent
sudo systemctl status neutron-dhcp-agent
sudo systemctl status neutron-metadata-agent
sudo systemctl status neutron-l3-agent
Neutron installation on the controller node is now complete.
Before moving to the Compute nodes, ensure the Neutron API is listening and responding.
-
Verify port
9696is active:ss -lntp | grep 9696Output:
LISTEN 0 4096 0.0.0.0:9696 0.0.0.0:* users:(("neutron-server:",pid=52923,fd=6),("neutron-server:",pid=52922,fd=6),("neutron-server:",pid=52921,fd=6),("neutron-server:",pid=52920,fd=8),("neutron-server:",pid=52920,fd=6),("neutron-server:",pid=52919,fd=8),("neutron-server:",pid=52919,fd=6),("/usr/bin/python",pid=52912,fd=6)) -
Verify the API responds to a local request:
curl -s http://localhost:9696 | jqOutput:
{"versions": [{"id": "v2.0","status": "CURRENT","links": [{"rel": "self","href": "http://localhost:9696/v2.0/"}]}]}
Compute Node Setup
Compute nodes require fewer components. Their main role is to connect virtual machines to the network.
Make sure to perform the steps on all compute nodes.
Install and Configure Neutron
-
Install the Required Packages.
Update the system and install the Linux Bridge agent.
sudo suapt update -yapt install -y neutron-linuxbridge-agent -
Configure the
/etc/neutron/neutron.conf.Using Crudini:
## Configure RabbitMQ accesscrudini --set /etc/neutron/neutron.conf DEFAULT transport_url rabbit://openstack:openstack@controller## Configure Identity Service Accesscrudini --set /etc/neutron/neutron.conf DEFAULT auth_strategy keystonecrudini --set /etc/neutron/neutron.conf keystone_authtoken auth_uri http://controller:5000crudini --set /etc/neutron/neutron.conf keystone_authtoken auth_url http://controller:5000crudini --set /etc/neutron/neutron.conf keystone_authtoken memcached_servers controller:11211crudini --set /etc/neutron/neutron.conf keystone_authtoken auth_type passwordcrudini --set /etc/neutron/neutron.conf keystone_authtoken project_domain_name Defaultcrudini --set /etc/neutron/neutron.conf keystone_authtoken user_domain_name Defaultcrudini --set /etc/neutron/neutron.conf keystone_authtoken project_name servicecrudini --set /etc/neutron/neutron.conf keystone_authtoken username neutroncrudini --set /etc/neutron/neutron.conf keystone_authtoken password openstack -
Verify the configuration.
root@compute1:/home/jmeden# grep -vE '^\s*#|^\s*$' /etc/neutron/neutron.conf[DEFAULT]core_plugin = ml2transport_url = rabbit://openstack:openstack@controllerauth_strategy = keystone[agent]root_helper = "sudo /usr/bin/neutron-rootwrap /etc/neutron/rootwrap.conf"[keystone_authtoken]auth_uri = http://controller:5000auth_url = http://controller:5000memcached_servers = controller:11211auth_type = passwordproject_domain_name = defaultuser_domain_name = defaultproject_name = serviceusername = neutronpassword = openstack
Configure the Linux Bridge Agent
-
Configure provider Virtual Network mapping to Physical Interface
crudini --set /etc/neutron/plugins/ml2/linuxbridge_agent.ini linux_bridge physical_interface_mappings provider:enp0s8 -
Enable VXLAN for Self-service Networks, configure IP address of the Management Interface handling VXLAN traffic
Note: The
local_ipis the management IP of the compute nodes. This will be different for each compute node.crudini --set /etc/neutron/plugins/ml2/linuxbridge_agent.ini vxlan enable_vxlan truecrudini --set /etc/neutron/plugins/ml2/linuxbridge_agent.ini vxlan local_ip 10.0.0.21crudini --set /etc/neutron/plugins/ml2/linuxbridge_agent.ini vxlan l2_population true -
Enable security groups and configure the Linux bridge iptables firewall driver
crudini --set /etc/neutron/plugins/ml2/linuxbridge_agent.ini securitygroup enable_security_group truecrudini --set /etc/neutron/plugins/ml2/linuxbridge_agent.ini securitygroup firewall_driver neutron.agent.linux.iptables_firewall.IptablesFirewallDriver -
Verify the configuration.
root@compute1:/home/jmeden# grep -vE '^\s*#|^\s*$' /etc/neutron/plugins/ml2/linuxbridge_agent.ini[DEFAULT][agent][linux_bridge]physical_interface_mappings = provider:enp0s8[securitygroup]enable_security_group = truefirewall_driver = neutron.agent.linux.iptables_firewall.IptablesFirewallDriver[vxlan]enable_vxlan = truelocal_ip = 10.0.0.21l2_population = true
Configure Nova Compute
Nova on the compute node needs to communicate with Neutron to manage networking for instances.
Use Crudini to update /etc/nova/nova.conf:
crudini --set /etc/nova/nova.conf neutron url http://controller:9696
crudini --set /etc/nova/nova.conf neutron auth_url http://controller:5000
crudini --set /etc/nova/nova.conf neutron auth_type password
crudini --set /etc/nova/nova.conf neutron project_domain_name Default
crudini --set /etc/nova/nova.conf neutron user_domain_name Default
crudini --set /etc/nova/nova.conf neutron region_name RegionOne
crudini --set /etc/nova/nova.conf neutron project_name service
crudini --set /etc/nova/nova.conf neutron username neutron
crudini --set /etc/nova/nova.conf neutron password openstack
Now, verify:
root@compute1:/home/jmeden# grep -vE '^\s*#|^\s*$'  /etc/nova/nova.conf

[DEFAULT]
lock_path = /var/lock/nova
state_path = /var/lib/nova
transport_url = rabbit://openstack:openstack@controller
my_ip = 10.0.0.21
use_neutron = True
firewall_driver = nova.virt.firewall.NoopFirewallDriver

[api]
auth_strategy = keystone

[api_database]
connection = sqlite:////var/lib/nova/nova_api.sqlite

[database]
connection = sqlite:////var/lib/nova/nova.sqlite

[glance]
api_servers = http://controller:9292

[keystone_authtoken]
auth_url = http://controller:5000/v3

[neutron]
url = http://controller:9696
auth_url = http://controller:5000
auth_type = password
project_domain_name = Default
user_domain_name = Default
region_name = RegionOne
project_name = service
username = neutron
password = openstack

[oslo_concurrency]
lock_path = /var/lib/nova/tmp

[placement]
os_region_name = RegionOne
project_domain_name = Default
project_name = service
auth_type = password
user_domain_name = Default
auth_url = http://controller:5000/v3
username = placement
password = openstack

[vnc]
enabled = True
vncserver_listen = 0.0.0.0
vncserver_proxyclient_address = 10.0.0.21
novncproxy_base_url = http://10.0.0.11:6080/vnc_auto.html

[cells]
enable = False

[os_region_name]
openstack =

[keystone_auth]
auth_uri = http://controller:5000
auth_url = http://controller:5000
memcached_servers = controller:11211
auth_type = password
project_domain_name = default
user_domain_name = default
project_name = service
username = nova
password = openstack
Restart Services and Verify
Restart the compute services.
systemctl restart nova-compute
systemctl restart neutron-linuxbridge-agent

systemctl status nova-compute
systemctl status neutron-linuxbridge-agent
The compute node is now connected to the Neutron networking system.
Return to the controller node and verify that agents are running.
openstack network agent list
Expected result:
+--------------------------------------+--------------------+------------+-------------------+-------+-------+---------------------------+
| ID                                   | Agent Type         | Host       | Availability Zone | Alive | State | Binary
          |
+--------------------------------------+--------------------+------------+-------------------+-------+-------+---------------------------+
| 2734ce62-5d85-4c5e-9795-01ad5a7d105f | DHCP agent         | controller | nova              | :-)   | UP    | neutron-dhcp-agent        |
| 6562b95a-c20f-41bc-9f96-07bef77d2e67 | Linux bridge agent | compute2   | None              | :-)   | UP    | neutron-linuxbridge-agent |
| a723eaa4-4ebc-4df0-98f9-3ca75192409f | Linux bridge agent | compute1   | None              | :-)   | UP    | neutron-linuxbridge-agent |
| c8712f57-de1e-40bb-9032-683521a53f42 | Linux bridge agent | controller | None              | :-)   | UP    | neutron-linuxbridge-agent |
| d79653c9-829a-4f1b-9b55-effcfb638146 | L3 agent           | controller | nova              | :-)   | UP    | neutron-l3-agent          |
| fce3793b-b95f-4370-91ac-58e46f1d7d1e | Metadata agent     | controller | None              | :-)   | UP    | neutron-metadata-agent    |
+--------------------------------------+--------------------+------------+-------------------+-------+-------+---------------------------+
Note: A standard Linux Bridge deployment with L3 (Virtual Routers) and DHCP typically includes:
| Agent Name | Location | Primary Purpose |
|---|---|---|
| Linux Bridge Agent | Controller & All Computes | Manages the virtual bridges and TAP devices on each host to connect VMs to the network. |
| DHCP Agent | Controller | Provides IP addresses to instances via dnsmasq for tenant networks. |
| L3 Agent | Controller | Handles routing, NAT (Floating IPs), and provides the gateway for tenant traffic. |
| Metadata Agent | Controller | Proxies requests from instances to Nova to retrieve configuration data (such as SSH keys and user data). |
If you were using Open vSwitch (OVS), you would see Open vSwitch agent instead of Linux bridge agent.
If you weren't using Virtual Routers (e.g., just flat provider networks), the L3 agent would be absent. But for this lab setup, we have all the pieces on the board.
The Neutron installation is now complete and the OpenStack environment can now provide networking for instances.