Elasticsearch SQL
Overview
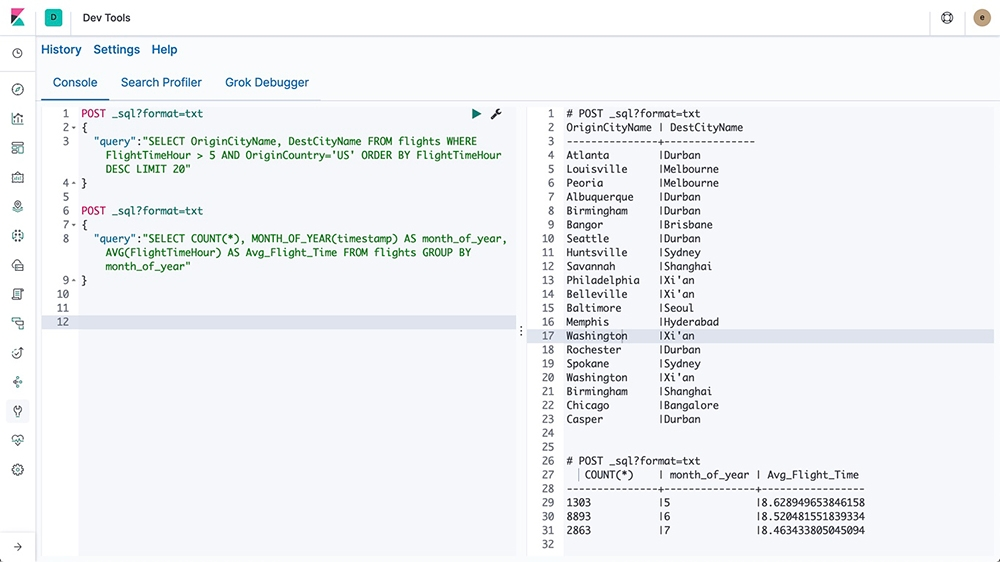
Elasticsearch SQL lets you query data in Elasticsearch using SQL syntax. You can run queries from the Elastic Cloud console or directly via the terminal.
If you're using Elastic Cloud, go to Management > DevTools, enter your SQL commands in the Console Editor, and click the Play button to see results.
If you are using a self-managed Elasticsearch cluster, you can run SQL queries from the terminal using curl:
curl -XPOST https://add-your-endpoint-here/_xpack/sql?format=txt -d '
{
  "query": "DESCRIBE index-name-here"
}'
How it Works
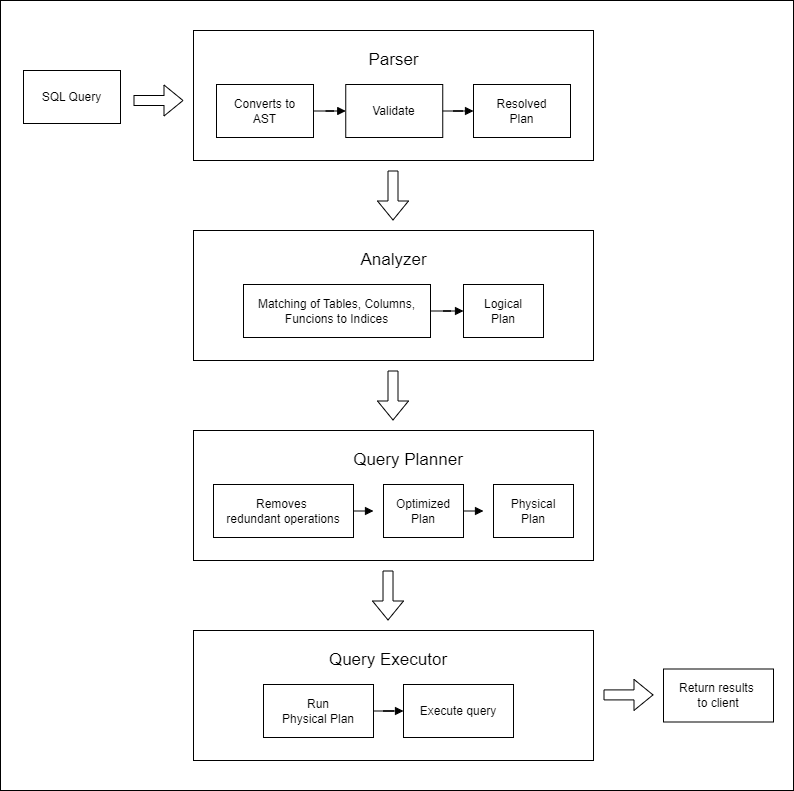
Elasticsearch SQL processes queries in several steps:
- Parser: Converts the SQL query into an internal abstract syntax tree (AST) and validates it.
- Analyzer: Matches tables, columns, and functions to the underlying indices and creates a logical execution plan.
- Query Planner: Optimizes the logical plan by removing redundant operations and generates a physical plan.
- Query Executor: Runs the physical plan to execute the query. Returns the query results to the client.
Here’s a diagram illustrating the Elasticsearch SQL query execution process:
Lab Environment
| Node | Hostname | IP Address |
|---|---|---|
| Node 1 | elasticsearch | 192.168.56.101 |
Setup details:
- The node is created in VirtualBox using Vagrant.
- An SSH key is generated on the Elasticsearch node
- The Logstash node can reach Elasticsearch node via port 9200
- The Logstash node needs to have internet access for this lab.
Pre-requisites
You can run a virtual machine in VirtualBox or use cloud-based compute instances.
- Create the nodes in VirtualBox
- Install Elasticsearch on node 1
- Configure SSL on Elasticsearch
- Install jq
Verify Connection
First, define your Elasticsearch endpoint and credentials:
ELASTIC_ENDPOINT="https://your-elasticsearch-endpoint:9200"
ELASTIC_USER="your-username"
ELASTIC_PW="your-password"
If running these commands on an Elasticsearch node, set the endpoint to https://127.0.0.1.
Run the following command to check connectivity:
curl -s -u $ELASTIC_USER:$ELASTIC_PW \
-XGET $ELASTIC_ENDPOINT:9200
Expected output:
{
  "name" : "node1",
  "cluster_name" : "elasticsearch",
  "cluster_uuid" : "UYlLyPlmRkGGSHGZQxUIhw",
  "version" : {
    "number" : "8.17.0",
    "build_flavor" : "default",
    "build_type" : "deb",
    "build_hash" : "2b6a7fed44faa321997703718f07ee0420804b41",
    "build_date" : "2024-12-11T12:08:05.663969764Z",
    "build_snapshot" : false,
    "lucene_version" : "9.12.0",
    "minimum_wire_compatibility_version" : "7.17.0",
    "minimum_index_compatibility_version" : "7.0.0"
  },
  "tagline" : "You Know, for Search"
}
Import the Dataset
Download the dataset here: movies.json
Run the command below to create the movies index and import the dataset.
curl -s -u $ELASTIC_USER:$ELASTIC_PW \
-H 'Content-Type: application/json' \
-XPUT $ELASTIC_ENDPOINT:9200/_bulk?pretty  \
--data-binary @movies-2.json
Verify the index.
curl -s -u "$ELASTIC_USER:$ELASTIC_PW" \
-XGET $ELASTIC_ENDPOINT:9200/_cat/indices?v
Using Self-Hosted Elasticsearch
To interact with Elasticsearch and run SQL-like queries, you can use the following cURL commands.
Example: Use this command to describe the movies index:
curl -s -u "$ELASTIC_USER:$ELASTIC_PW" \
   -H "Content-Type: application/json" \
   -XPOST "$ELASTIC_ENDPOINT:9200/_sql" -d '
{
  "query": "DESCRIBE movies"
}' | jq
Elasticsearch 7.0 and later replaced _xpack/sql with _sql:
Alternatively, you can try:
curl -s -u "$ELASTIC_USER:$ELASTIC_PW" \
   -H "Content-Type: application/json" \
  -XPOST "$ELASTIC_ENDPOINT:9200/_sql" -d '
{
  "query": "DESCRIBE movies"
}' | jq
Output:
{
  "columns": [
    {
      "name": "column",
      "type": "keyword"
    },
    {
      "name": "type",
      "type": "keyword"
    },
    {
      "name": "mapping",
      "type": "keyword"
    }
  ],
  "rows": [
    [
      "genre",
      "VARCHAR",
      "text"
    ],
    [
      "genre.keyword",
      "VARCHAR",
      "keyword"
    ],
    [
      "id",
      "VARCHAR",
      "text"
    ],
    [
      "id.keyword",
      "VARCHAR",
      "keyword"
    ],
    [
      "title",
      "VARCHAR",
      "text"
    ],
    [
      "title.keyword",
      "VARCHAR",
      "keyword"
    ],
    [
      "year",
      "BIGINT",
      "long"
    ]
  ]
}
You can also format the results for better readability:
curl -s -u "$ELASTIC_USER:$ELASTIC_PW" \
   -H "Content-Type: application/json" \
  -XPOST "$ELASTIC_ENDPOINT:9200/_sql?format=txt" -d '
{
  "query": "DESCRIBE movies"
}'
This will display the results in a table format, similar to SQL:
    column     |     type      |    mapping
---------------+---------------+---------------
genre          |VARCHAR        |text
genre.keyword  |VARCHAR        |keyword
id             |VARCHAR        |text
id.keyword     |VARCHAR        |keyword
title          |VARCHAR        |text
title.keyword  |VARCHAR        |keyword
year           |BIGINT         |long
Other Example Queries
-
To get the first 10 movie titles from the
moviesindex.curl -s -u "$ELASTIC_USER:$ELASTIC_PW" \-H "Content-Type: application/json" \-XPOST "$ELASTIC_ENDPOINT:9200/_sql?format=txt" -d '{"query": "SELECT title FROM movies LIMIT 10"}'Output:
title---------------------------Toy StoryJumanjiGrumpier Old MenWaiting to ExhaleFather of the Bride Part IIHeatSabrinaTom and HuckSudden DeathGoldenEye -
To retrieve the title and year for movies released before 1920, sorted by release year:
curl -s -u "$ELASTIC_USER:$ELASTIC_PW" \-H "Content-Type: application/json" \-XPOST "$ELASTIC_ENDPOINT:9200/_sql?format=txt" -d '{"query": "SELECT title, year FROM movies WHERE year < 1920 ORDER BY year"}'Output:
title | year------------------------------------------------+---------------Trip to the Moon, A |1902The Great Train Robbery |1903The Electric Hotel |1908Birth of a Nation, The |1915Intolerance: Love's Struggle Throughout the Ages|191620,000 Leagues Under the Sea |1916Snow White |1916Rink, The |1916Immigrant, The |1917Daddy Long Legs |1919
Using Elastic Cloud
You can also run SQL commands on indexes in Elastic Cloud. Same as before, set your variables first in a new terminal:
ELASTIC_ENDPOINT="https://your-elasticsearch-endpoint"
ELASTIC_USER="your-username"
ELASTIC_PW="your-password"
Next, ensure the movie dataset is imported:
curl -s -u $ELASTIC_USER:$ELASTIC_PW \
-H 'Content-Type: application/json' \
-XPUT $ELASTIC_ENDPOINT/_bulk?pretty  \
--data-binary @movies-2.json
You can run the same SQL statements:
-
To describe the
moviesindex:curl -s -u "$ELASTIC_USER:$ELASTIC_PW" \-H "Content-Type: application/json" \-XPOST "$ELASTIC_ENDPOINT/_sql?format=txt" -d '{"query": "DESCRIBE movies"}'Output:
column | type | mapping---------------+---------------+---------------genre |VARCHAR |textgenre.keyword |VARCHAR |keywordid |VARCHAR |textid.keyword |VARCHAR |keywordtitle |VARCHAR |texttitle.keyword |VARCHAR |keywordyear |BIGINT |long -
To get the first 10 movie titles in the
moviesindex:curl -s -u "$ELASTIC_USER:$ELASTIC_PW" \-H "Content-Type: application/json" \-XPOST "$ELASTIC_ENDPOINT:9200/_sql?format=txt" -d '{"query": "SELECT title FROM movies LIMIT 10"}'Output:
title---------------------------Toy StoryJumanjiGrumpier Old MenWaiting to ExhaleFather of the Bride Part IIHeatSabrinaTom and HuckSudden DeathGoldenEye -
To get the title and year of movies released before 1920, sorted by release year:
curl -s -u "$ELASTIC_USER:$ELASTIC_PW" \-H "Content-Type: application/json" \-XPOST "$ELASTIC_ENDPOINT/_sql?format=txt" -d '{"query": "SELECT title, year FROM movies WHERE year < 1920 ORDER BY year"}'Output:
title | year------------------------------------------------+---------------Trip to the Moon, A |1902The Great Train Robbery |1903The Electric Hotel |1908Birth of a Nation, The |1915Intolerance: Love's Struggle Throughout the Ages|191620,000 Leagues Under the Sea |1916Snow White |1916Rink, The |1916Immigrant, The |1917Daddy Long Legs |1919
Translate SQL to DSL
To view the DSL (the underlying JSON query), use this command. It works on both self-hosted Elasticsearch clusters and Elastic Cloud deployments. Just ensure you're using the correct endpoint URL.
curl -s -u "$ELASTIC_USER:$ELASTIC_PW" \
    -H "Content-Type: application/json" \
    -XPOST "$ELASTIC_ENDPOINT/_sql/translate?pretty" -d '
  {
    "query": "SELECT title, year FROM movies WHERE year < 1920 ORDER BY year"
  }'
Output:
{
  "size" : 1000,
  "query" : {
    "range" : {
      "year" : {
        "lt" : 1920,
        "boost" : 1.0
      }
    }
  },
  "_source" : false,
  "fields" : [
    {
      "field" : "title"
    },
    {
      "field" : "year"
    }
  ],
  "sort" : [
    {
      "year" : {
        "order" : "asc",
        "missing" : "_last",
        "unmapped_type" : "long"
      }
    }
  ],
  "track_total_hits" : -1
}
Using the SQL Client
You can use the standalone SQL client for running SQL queries, which is similar to querying a database. However, note that this is only available on self-hosted Elasticsearch clusters, as you need access to the executable.
Same as before, set your variables first in a new terminal:
ELASTIC_ENDPOINT="https://your-elasticsearch-endpoint"
ELASTIC_USER="your-username"
ELASTIC_PW="your-password"
To run the SQL client:
sudo /usr/share/elasticsearch/bin/elasticsearch-sql-cli
If you're using HTTPS with a username and password, use this command. Provide the keystore password when prompted.
/usr/share/elasticsearch/bin/elasticsearch-sql-cli  \
https://$ELASTIC_USER:$ELASTIC_PW@$ELASTIC_ENDPOINT:9200 \
-k /etc/elasticsearch/certs/elasticsearch.p12
Once the command runs, you’ll be in the SQL prompt:
                       asticElasticE
                     ElasticE  sticEla
          sticEl  ticEl            Elast
        lasti Elasti                   tic
      cEl       ast                     icE
     icE        as                       cEl
     icE        as                       cEl
     icEla     las                        El
   sticElasticElast                     icElas
 las           last                    ticElast
El              asti                 asti    stic
El              asticEla           Elas        icE
El            Elas  cElasticE   ticEl           cE
Ela        ticEl         ticElasti              cE
 las     astic               last              icE
   sticElas                   asti           stic
     icEl                      sticElasticElast
     icE                       sticE   ticEla
     icE                       sti       cEla
     icEl                      sti        Ela
      cEl                      sti       cEl
       Ela                    astic    ticE
         asti               ElasticElasti
           ticElasti  lasticElas
              ElasticElast

                       SQL
                      8.17.0

sql>
Running some sample queries: