Cinder
Overview
OpenStack provides a block storage service that allows cloud users to create persistent storage volumes. These volumes remain available even if the virtual machine is deleted or restarted. The default block storage service in OpenStack is called Cinder.
Cinder allows instances to attach, detach, and manage block storage volumes independently of the compute lifecycle. This makes it useful for databases, persistent application data, and long-term storage.
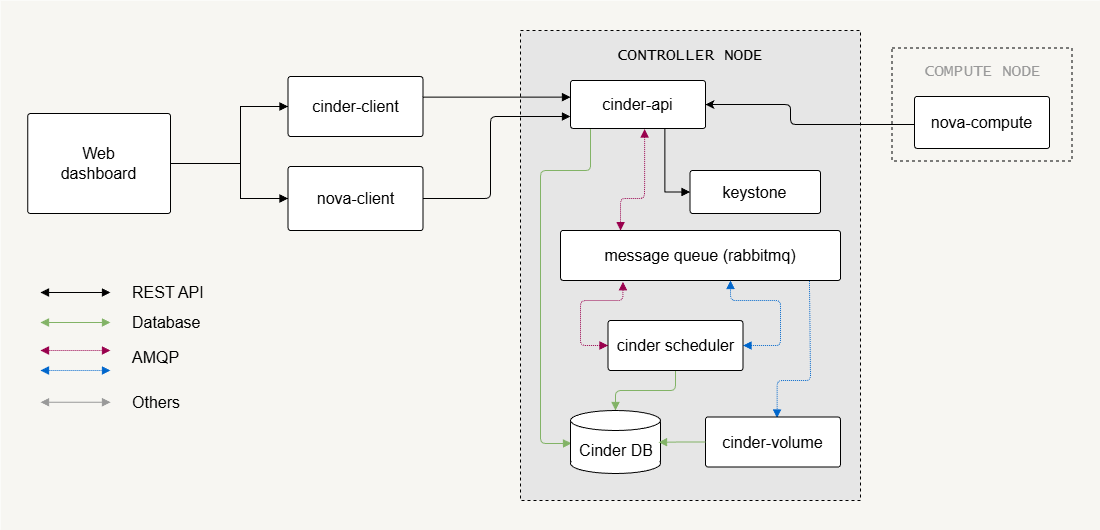
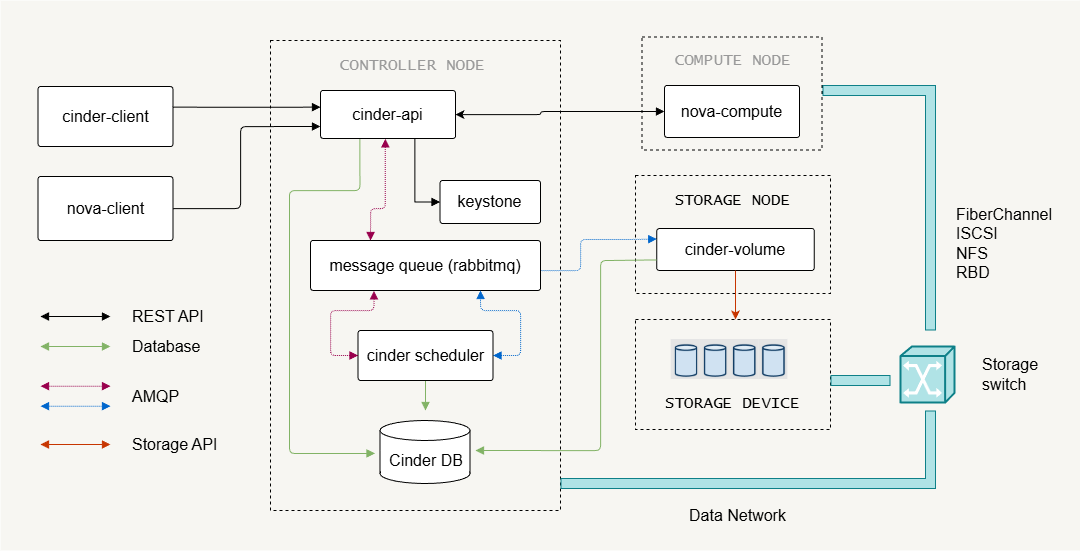
Cinder Architecture
Cinder follows a modular architecture similar to other OpenStack services. It separates control functions from the storage backend that actually holds the data.
- Cinder API server handles block storage API requests
- Cinder scheduler decides where volumes should be created
- Cinder volume manages the storage backends
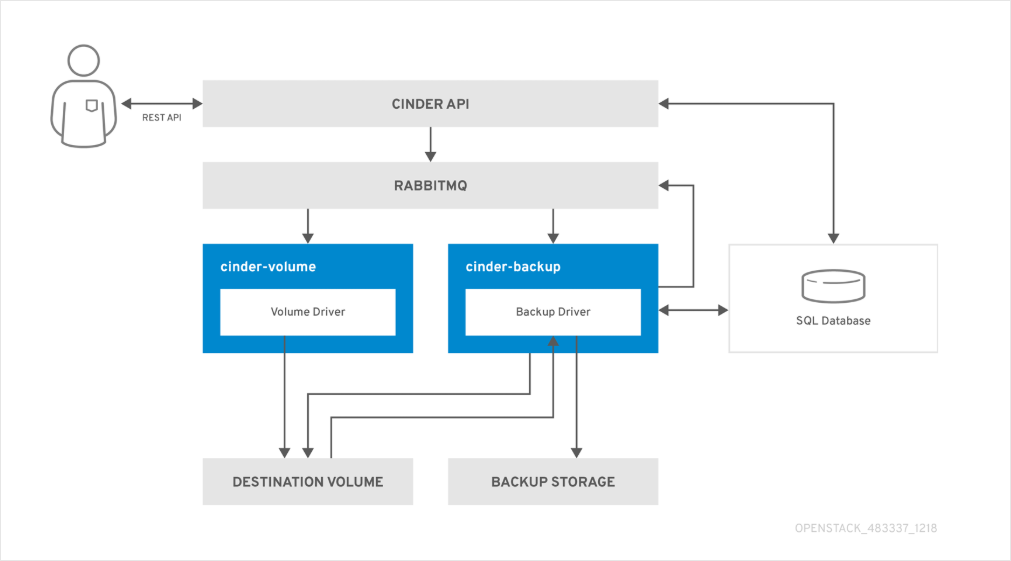
- Cinder backup provides optional backup and restore functionality
The architecture separates request handling, scheduling, and storage operations. This design allows the block storage system to scale while keeping storage management flexible.
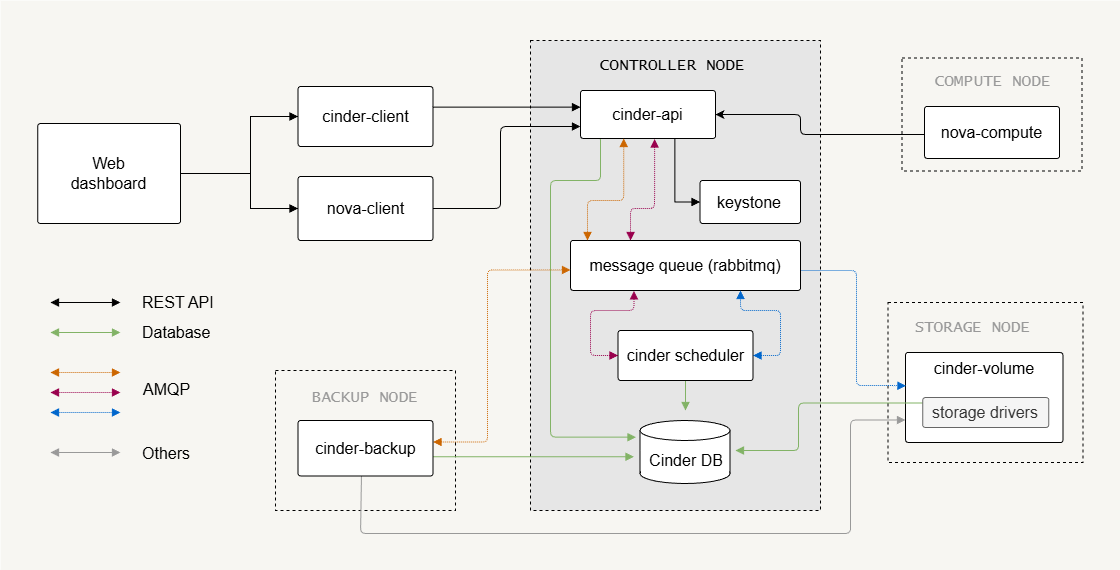
Control Plane Components
Control plane services handle API requests, scheduling, and communication between services.
- Cinder API receives block storage requests
- Cinder scheduler selects the storage backend
- Message queue enables communication between services
- SQL database stores service state
The Cinder API exposes REST endpoints that users or services call to create or manage volumes. Like most OpenStack services, Cinder stores state information in a SQL database and uses a message queue (such as RabbitMQ) for internal communication.
The Cinder scheduler decides which backend should host a new volume. This decision depends on backend capacity and configuration. These control components coordinate storage operations while keeping the architecture scalable.
Storage Nodes and Backends
Storage nodes provide the actual storage where volumes are created.
- Storage nodes host block storage backends
- Multiple backends can exist in one deployment
- Cinder volume service manages the backend pools
A single cinder-volume service can manage multiple storage backends. In small deployments, this service may run on the control node.
In larger environments, the cinder-volume usually run on dedicated storage nodes. The deployment design depends on storage performance requirements and the number of storage operations such as volume creation, deletion, and snapshots.

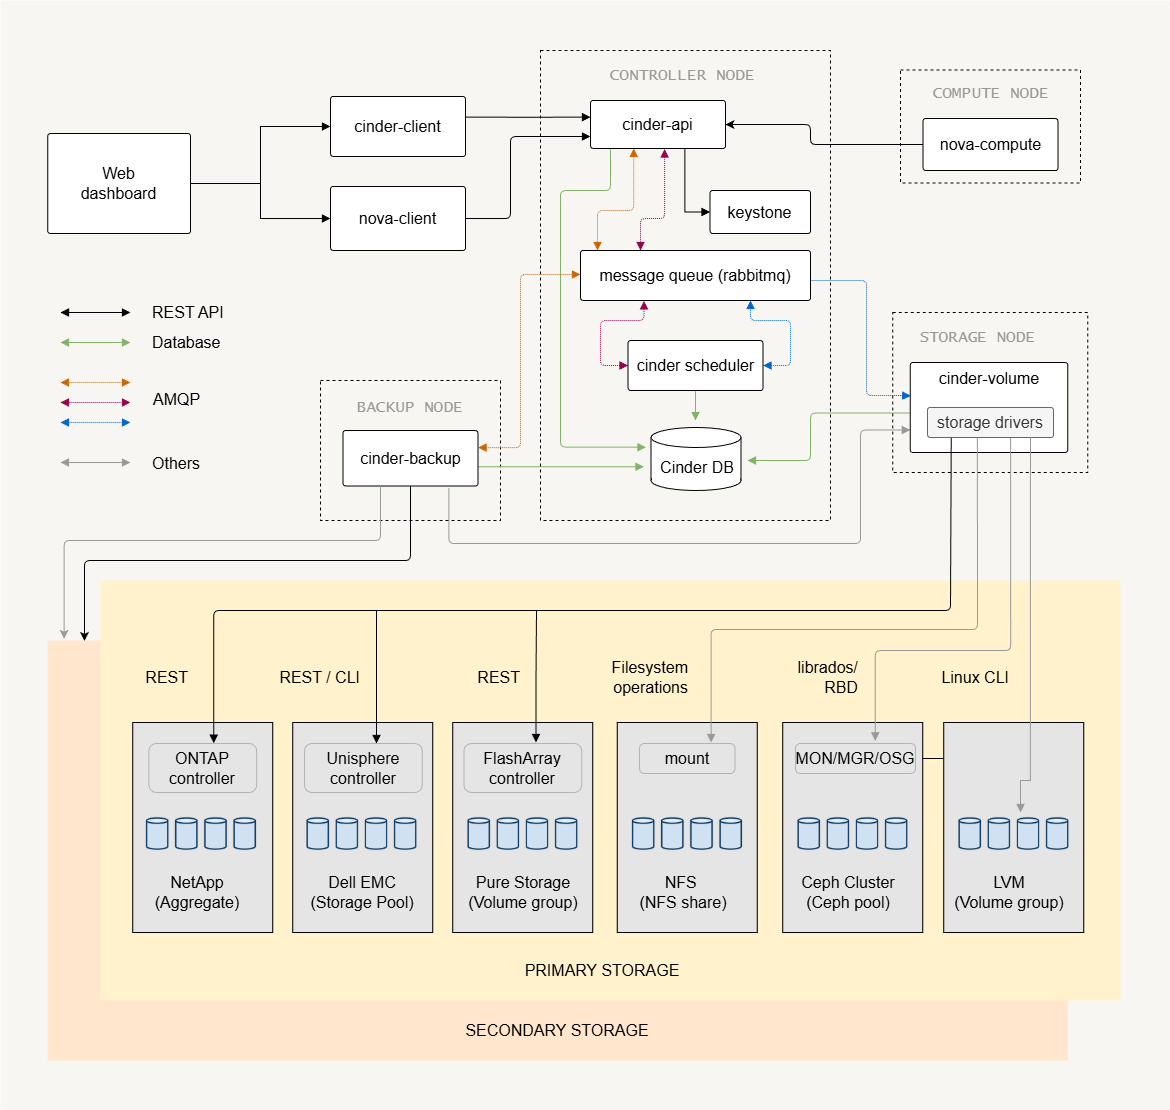
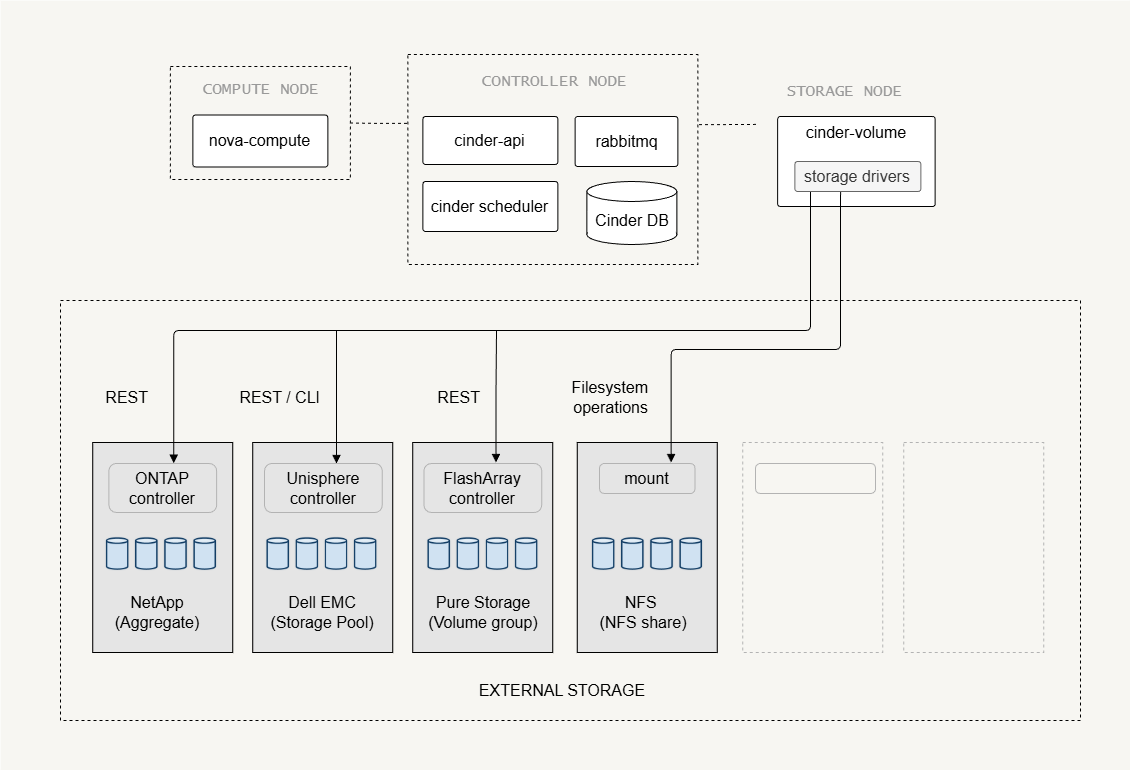
External Storage Backends
External disk arrays can act as block storage backends.
- Enterprise storage arrays provide external storage
- Cinder volume acts as a control interface
- Hypervisors connect directly to storage devices
In this setup, Cinder does not transfer the actual volume data. Instead, it sends commands to the storage array to create or delete volumes. The compute node hypervisor then connects directly to the storage device using protocols such as iSCSI or Fibre Channel. This design reduces load on the control plane and allows high-performance storage access.
Examples of external storage systems include arrays from vendors such as Dell, NetApp, and others that support iSCSI or Fibre Channel.
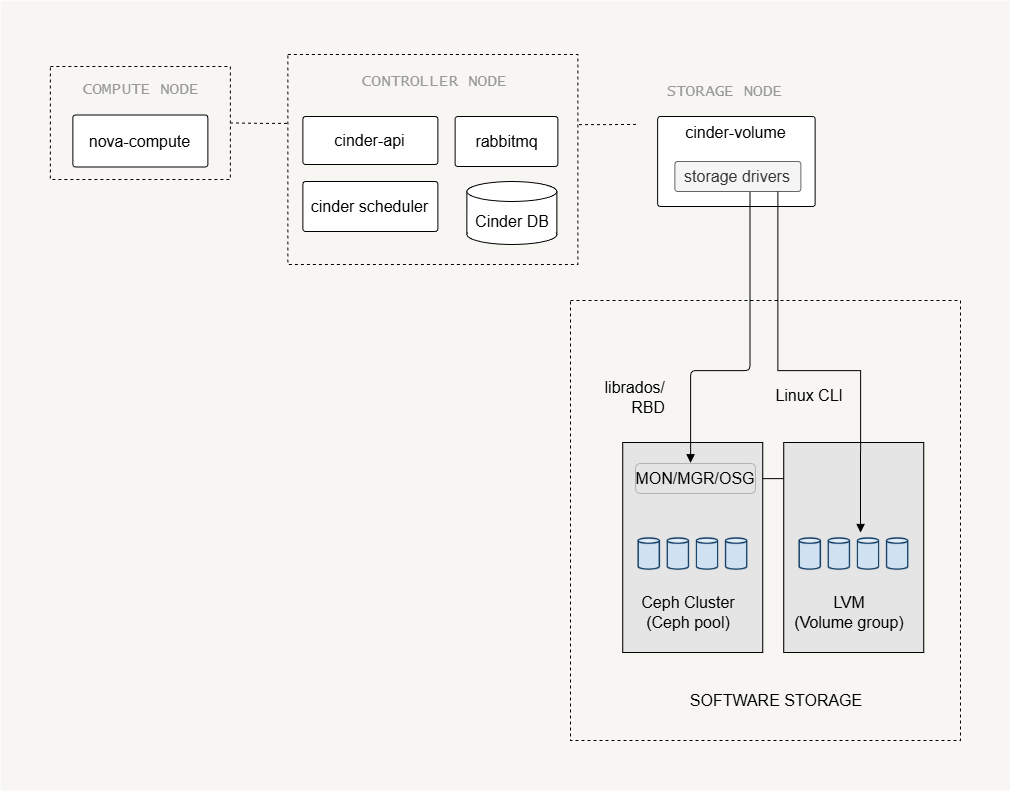
Software Storage Backends
Some storage backends are software-defined, meaning the storage is managed by software running on the storage nodes.
-
LVM
- A common backend for labs and small deployments
- Uses local disks to create logical volumes
- Volumes are exported to compute nodes, via iSCSI
-
Ceph
-
Provides distributed storage across many servers
-
Runs across multiple storage nodes
-
Supports replication, scalable storage pools, etc
infoFrom Cinder’s perspective, Ceph behaves like an external storage system, even though its software runs on the storage nodes.
-
Each backend has different hardware requirements, configuration complexity, and scalability characteristics, so the choice of backend determines how storage nodes are deployed, managed, and integrated into OpenStack.
Storage Network Connectivity
The storage traffic can be isolated on a dedicated network to improve performance and reliability.
- Storage network carries volume data traffic
- Management network handles control communication
- High traffic environments benefit from separate networks
Storage nodes must always connect to the management network because the Cinder service communicates with the control plane. If storage data traffic is large, it is recommended to use a separate storage network. This prevents storage traffic from affecting normal cloud operations.
Protocols used for storage transport:
- Fibre Channel - High performance, but requires specialized hardware
- iSCSI - Uses standard Ethernet, and is more widely used
Cinder Deployment
UPDATE: Modern OpenStack releases (including newer versions after Queens) still support Cinder architecture, but some configuration methods and drivers may have changed. Make sure to check the official OpenStack documentation for the release you are using before applying configuration steps.
Storage Node
The first step in setting up the storage nodes is installing the Cinder volume service.
The configuration file used by Cinder is:
/etc/cinder/cinder.conf
Several parameters must be defined so the service can communicate with other OpenStack components, including the database and authentication settings.
[DEFAULT]
transport_url = rabbit://openstack:password@controller
auth_strategy = keystone
my_ip = STORAGE_NODE_IP
glance_api_servers = http://controller:9292

[database]
connection = mysql+pymysql://cinder:password@controller/cinder

[keystone_authtoken]
auth_uri = http://controller:5000
memcached_servers = controller:11211

[oslo_concurrency]
lock_path = /var/lib/cinder/tmp
Key variables used in this configuration:
transport_urldefines the message queue connectionauth_strategyenables Keystone authenticationmy_ipspecifies the management IP of the storage nodeglance_api_serversallows access to image services
These parameters allow the storage node to communicate with the control plane and manage storage operations correctly.
Control Node
The control node manages the Cinder block storage services and coordinates the storage operations across the cloud.
Setup steps:
- Create the Cinder database
- Create the Cinder service user
- Register Cinder services in the service catalog
- Install Cinder API and scheduler
OpenStack Cinder provides two API versions, each with its own service endpoint that is typically registered:
- Cinder v2
- Cinder v3
After installing the packages, the control node must also configure Nova so instances can attach volumes created by Cinder. The configuration can be found in cinder.conf:
[DEFAULT]
transport_url = rabbit://openstack:PASSWORD-HERE@controller
auth_strategy = keystone

[database]
connection = mysql+pymysql://cinder:DBPASSWD@controller/cinder

[keystone_authtoken]
auth_uri = http://controller:5000
auth_url = http://controller:5000
memcached_servers = controller:11211
auth_type = password
project_domain_id = Default
user_domain_id = Default
project_name = service
username = cinder
password = CINDER_PASSWD
Storage Backend Examples
LVM Backend
LVM is commonly used in small environments, labs, or test deployments because it is simple to configure and requires only local disks.
-
Install LVM and thin provisioning tools.
A disk must be available exclusively for the LVM + iSCSI storage service.
Possible setups include:
Deployment Environment Storage Preparation Bare metal server Use a dedicated physical disk or partition. Linux storage node with existing LVM Create an empty logical volume to simulate a disk device. Virtual machine deployment Create a sparse file and attach it using a loop device to emulate a disk. -
Prepare a disk and create a volume group.
Example commands:
sudo pvcreate /dev/sdbsudo vgcreate cinder-volumes /dev/sdbExpected result:
Physical volume "/dev/sdb" successfully createdVolume group "cinder-volumes" successfully createdNotes:
pvcreateinitializes the disk as an LVM physical volume.vgcreatecreates the volume groupcinder-volumes.- This volume group will store Cinder volumes.
-
Configure the backend in
cinder.conf.Example configuration:
[DEFAULT]enabled_backends = lvm1## enabled_backends = lvm1, lvm2 # multiple backends can be enabled[lvm1]volume_driver = cinder.volume.drivers.lvm.LVMVolumeDrivervolume_group = cinder-volumesvolume_backend_name = LVM_BACKEND_Atarget_protocol = iscsitarget_helper = tgtadmiscsi_protocol = iscsiiscsi_helper = tgtadm[lvm2]volume_group = cinder-volumes-bvolume_backend_name = LVM_BACKEND_B## additional configuration as neededEach backend definition specifies the driver, volume group, and transport protocol used by Cinder.
External Storage Backend
Enterprise storage systems often provide dedicated Cinder drivers that allow OpenStack to communicate directly with the storage array.
For example, a NetApp storage backend may use the following configuration:
[DEFAULT]
enabled_backends = netapp_backend_a

[netapp_backend_a]
volume_driver = cinder.volume.drivers.netapp.common.NetAppDriver
netapp_storage_family = eseries
netapp_storage_protocol = iscsi
netapp_storage_pols = pool1,pool2
netapp_server_hostname = my_storage_device
netapp_server_port = 80
netapp_login = netapp_user
netapp_password = password
netapp_controller_ips = 10.0.2.21. 10.0.2.22
netapp_sa_password = mypassword
use_multipath_for_image_xfer = True
volume_backend_name = NETAPP_BACKEND
Important variables include:
netapp_server_hostname– identifies the storage arraynetapp_loginandnetapp_password– authentication credentialsnetapp_storage_protocol– defines the storage transport (e.g., iSCSI)volume_backend_name– exposes the backend to OpenStack
Using Multiple Backends
In Cinder, each backend configuration defines a volume_backend_name. Multiple backend sections can use the same backend name.
When this happens:
- The Cinder scheduler groups those backends together
- They behave like a single storage pool
The scheduler then chooses which backend actually stores the volume based on filters such as:
- available capacity
- capabilities
- scheduler weights
Example:
[DEFAULT]
enabled_backends = lvm1,lvm2

[lvm1]
volume_driver = cinder.volume.drivers.lvm.LVMVolumeDriver
volume_backend_name = LVM_BACKEND

[lvm2]
volume_driver = cinder.volume.drivers.lvm.LVMVolumeDriver
volume_backend_name = LVM_BACKEND
Both backends share LVM_BACKEND, so the scheduler will select either lvm1 or lvm2 when a volume is created.
This mechanism works for all backend types, including:
- LVM
- Ceph
- NetApp
- Dell EMC
- Pure Storage
- NFS
Cinder Backup Service
Cinder includes an optional backup component that allows allows administrators to protect persistent storage volumes and restore them when necessary.
- Cinder backup performs volume backups
- Backup data can be stored in object storage
- Multiple backup drivers are supported
Supported backup drivers:
- Swift
- Ceph
- GlusterFS
- NFS
- POSIX Filesystem
- Google Cloud Storage
- IBM Tivoli Storage Manager
To enable backups, install the backup service and configure it in cinder.conf.
[DEFAULT]
backup_driver = cinder.backup.drivers.swift.SwiftBackupDriver
backup_swift_url = http://controller:8080/v1/AUTH_
backup_swift_auth = per_user
backup_swift_auth_url = http://localhost:5000/v3
backup_swift_container = volumebackups
backup_compression_algorithm = zlib