Keystone
Overview
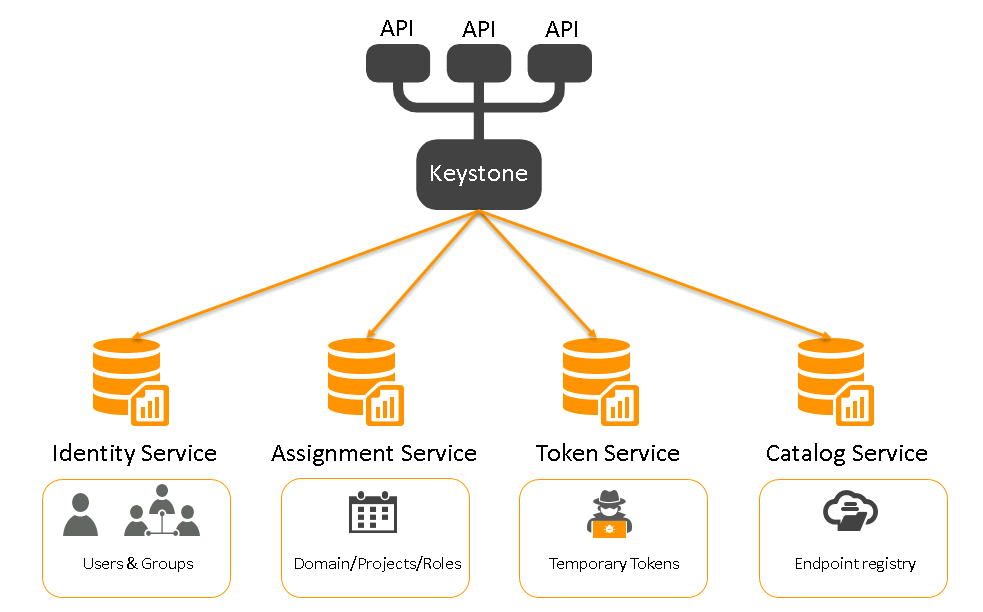
Keystone is OpenStack’s identity service that handles authentication and authorization. Every user must pass through Keystone before accessing any service.
- Identity manages users and groups
- Resource manages domains and projects
- Role assigns permissions inside projects
- Token issues authentication tokens
- Service catalog lists available services
Keystone connects users to projects using roles. This keeps access controlled and organized.
How Keystone Works
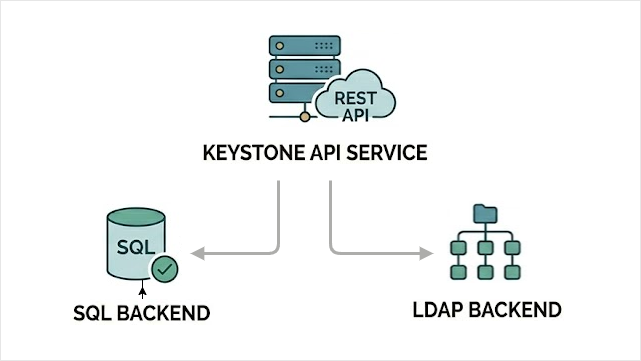
Keystone runs as a REST API service. Other OpenStack services talk to it to verify users.
- Runs as a server application
- Uses port 5000 by default
- Stores data in a backend database
- Supports SQL or LDAP identity backends
By default, Keystone uses an SQL database. This is the simplest and most common setup for labs.
Keystone can integrate with external identity systems. This allows users to log in using existing authentication providers instead of local SQL users.
- SAML v2
- OAuth v1.0a
- OpenID Connect
Keystone checks who you are, what project you belong to, and what role you have. That is how access is controlled.
Main Configuration File
This file controls how Keystone connects to the database and manages identity data.
/etc/keystone/keystone.conf
Example minimal configuration:
[database]
connection = mysql+pymysql://keystone:KEYSTONE_DBPASS@controller/keystone

[token]
provider = fernet

[identity]
driver = sql
domain_specific_drivers_enabled = True
domain_config_dir = /etc/keystone/domains

[catalog]
driver = sql
In this example:
KEYSTONE_DBPASSis the database passwordcontrolleris the database hostkeystoneis the database name
Note that sensitive information like the password is available in clear text in the Keystone configuration file, which is stored at each controller nodes.
Domain Specific Identity Configuration
Keystone allows different domains to use different identity backends. This means one domain can use SQL, while another can use LDAP.
- Each domain can use its own identity driver
- A domain can point to a specific LDAP server
- Different domains can use different LDAP servers
This increases isolation between domains and improves security separation.
To enable domain-specific configuration, set this in keystone.conf:
[identity]
domain_specific_drivers_enabled = true
domain_config_dir = /etc/keystone/domains
Then create a domain configuration file.
/etc/keystone/domains/keystone.my-domain.conf
Example content:
[identity]
driver = ldap

[ldap]
url = ldap://ldap-host
In this example:
my-domainis the domain nameldap-hostis the LDAP server addressdriver = ldaptells Keystone to use LDAP for this domain
Now this specific domain uses LDAP, while others can still use SQL. This allows flexible and secure identity separation inside the same OpenStack cloud.
Keystone Initialization
After configuration, Keystone must be initialized.
-
Initialize database:
sudo keystone-manage db_sync -
Set up Fernet tokens:
sudo keystone-manage fernet_setup \--keystone-user keystone \--keystone-group keystonesudo keystone-manage credential_setup \--keystone-user keystone \--keystone-group keystone -
Bootstrap Keystone with admin user and endpoints:
sudo keystone-manage bootstrap \--bootstrap-password ADMIN_PASS \--bootstrap-admin-url http://controller:5000/v3/ \--bootstrap-internal-url http://controller:5000/v3/ \--bootstrap-public-url http://controller:5000/v3/ \--bootstrap-region-id RegionOneIn this command:
ADMIN_PASSis the initial admin passwordcontrolleris your controller hostname
-
After bootstrap, change the admin password if needed.
Keystone is now ready to authenticate users and manage access in OpenStack.
For more information, please see Installing Keystone.