Agent Skills
Overview
Agent Skills are like a mix of custom prompts and tool integrations. Instead of stuffing everything into one prompt, you create small tools with instructions, scripts, and references. Copilot only loads them when it thinks they are useful, which keeps things fast and efficient.
- Break tasks into tools
- Load only when needed
- Reduce context usage
This is great for complex workflows that need multiple steps or different types of actions. Each skill can be focused on a specific part of the problem, which makes it easier for Copilot to help you.
Agent Skills vs MCP
Quick comparison of how agent skills and MCP handle context and loading.
| Feature | MCP | Agent Skills |
|---|---|---|
| Loading behavior | Loads everything upfront | Loads on demand |
| Context usage | High, can fill quickly | Low, loads only when needed |
| Initial data | Full tool data is loaded | Only short description is loaded |
| Efficiency | Less efficient for large setups | More efficient and scalable |
With MCP, all tools and their data are loaded into the context immediately, which can quickly consume the context window.
Agent Skills start with just a short description. The model decides if the skill is needed, and only then loads the full instructions or scripts.
What an Agent Skill Contains
Each skill is just a simple folder with a few parts.
skill.mddefines the skillScriptsrun actionsReferencesprovide extra info
The skill.md file is required and contains metadata like name and description. The description is important because Copilot uses it to decide when to use the skill.
Reference:
Installing Skills
You can install community skills, but make sure to only install skills from trusted providers.
Some skills can execute code on your machine, so only install from trusted sources.
For example, you can find skills in skills.sh, which has a collection of community-created skills.
-
Search for
skill-creatorby anthropics.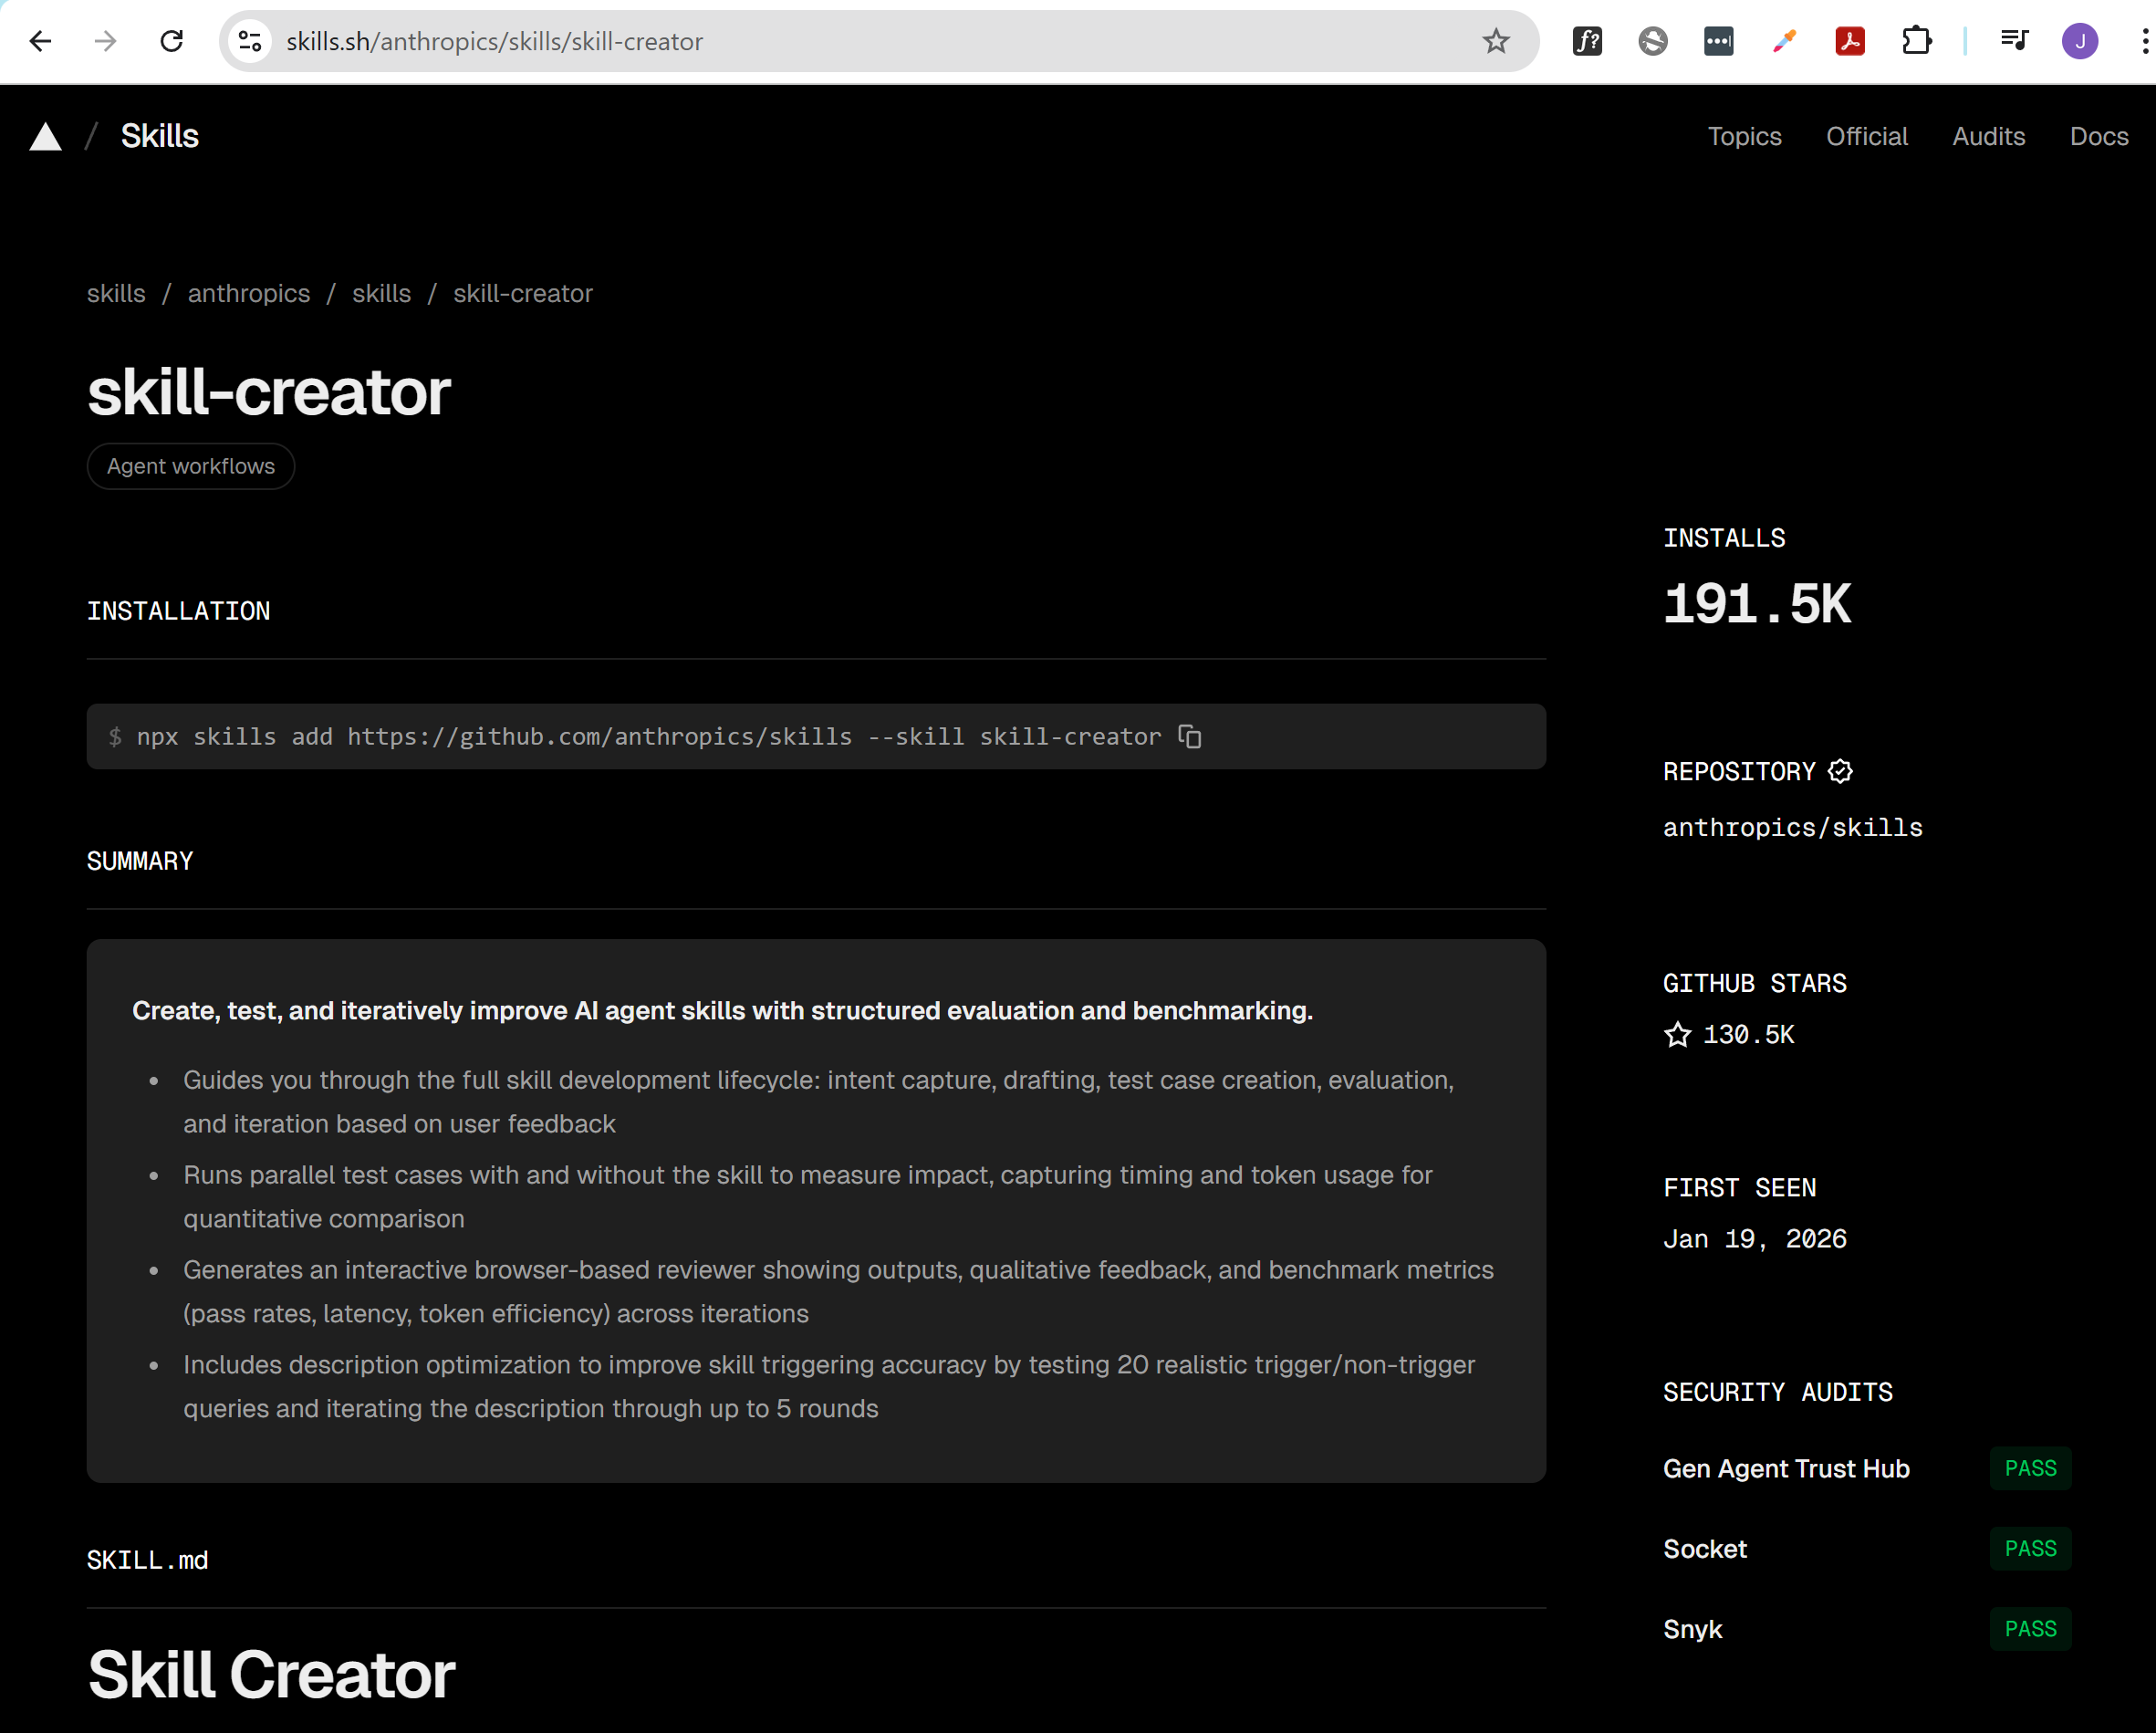
-
Copy the install command from the skill page, which looks like this:
npx skills add https://github.com/anthropics/skills --skill skill-creatorBack in your project, run the command to install the skill.
-
Press
yto confirm the installation.Need to install the following packages:skills@1.5.6Ok to proceed? (y) y -
You'll be prompted to choose the installation scope.
You can choose to install the skill for the current project or globally for all projects.
◆ Installation scope│ ● Project (Install in current directory (committed with your project))│ ○ GlobalFor this example, we will choose "Project" to keep it specific to our current project.
-
After confirming the scope, the skill will show the security assessment and ask for final confirmation.
Choose
Yesto complete the installation.◇ Security Risk Assessments ───────────────────────────────────╮│ ││ Gen Socket Snyk ││ skill-creator Safe 0 alerts Low Risk ││ ││ Details: https://skills.sh/anthropics/skills ││ │├───────────────────────────────────────────────────────────────╯│◆ Proceed with installation?│ ● Yes / ○ No└ -
You'll also be promtped to install the
find-skillstool, which is used to manage and list your installed skills.Choose
Yesto install it.◆ Install find-skills tool? It helps your agent discover and suggest skills.│ ● Yes / ○ No└ -
Once the installation is complete, it should return the following message:
Done! Review skills before use; they run with full agent permissions. -
You can verify that the skill is installed by running:
npx skills listOutput:
Project Skillsskill-creator ./.agents/skills/skill-creatorAgents: GitHub Copilot
/create-skill vs. /skill-creator
You might notice that there are two ways to create skills in your Copilot chat.
-
/create-skillis the default, built-in skill for creating new skills. It usually comes pre-installed with the skills framework or platform you’re using. It may have basic or limited features, and its interface or capabilities might not be as advanced. -
/skill-creatoris the enhanced, community-provided skill you installed (in your case, from anthropics). It typically offers a more user-friendly, guided, or feature-rich experience for creating skills. It may include templates, wizards, or additional options that make skill creation easier and more robust.
Which should you use?
- If you want the latest features, better guidance, and a smoother experience, use
/skill-creator. - If you want the most basic, default method, or if you have compatibility issues, use
/create-skill.
UPDATE: If your VS Code window is open in a parent directory that contains multiple repositories and skill-creator is installed on specific repositories, Copilot may not load the skill correctly as it looks for a .agent/skills directory in the current workspace/parent directory. You can do any of the steps below:
- Try opening the specific repository in its own VS Code window to ensure the skill is properly loaded.
- Install
skill-creatorglobally so it is available across all repositories.
Example
Creating a Chart Skill
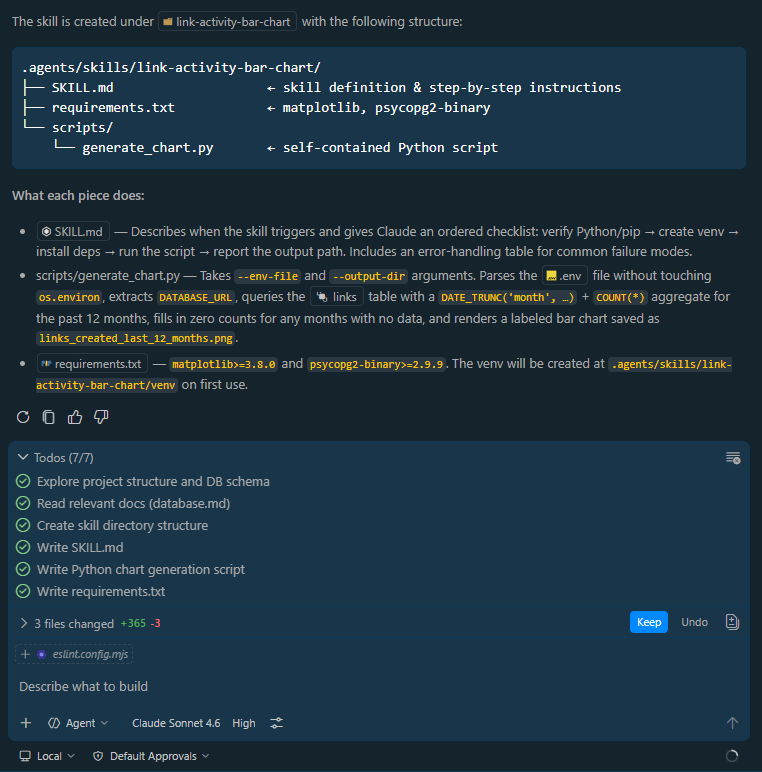
In this example, I used another project repository I have called linkshortener-using-nextjs which uses a database to store links.
I have installed /skill-creator in this project and used it to create a skill that generates a bar chart showing the number of links created per month over the last 12 months. The skill performs the following steps:
- Query database
- Generate chart
- Export PNG
Before running, I created the .env file with a variable called DATABASE_URL. This contains the connection URL for my Neon Postgres database, which is required for the skill to run.
To create the skill, I simply ran the /skill-creator command and provided the prompts from this page: Link Activity Bar Chart Creator Prompt
Once its done, it will print out the skill details and confirm that it was created successfully.
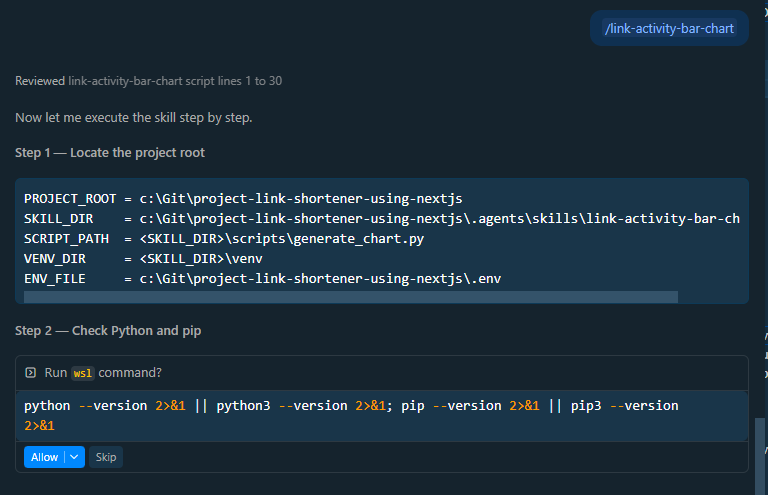
How Copilot Uses the Skill
Next, you can trigger the skill in two ways.
- Use a slash command (
/link-activity-bar-chart) to directly invoke the skill. - Use a natural prompt
In my case, I used the /link-activity-bar-chart command in the Copilot chat to run the skill. It proceeded to execute the steps defined in the skill.
UPDATE 1: I was having issues when I agent is trying to create a virtual environment and activating it because the terminal seems to be stuck and doesn't return the output, so I just added a manual step in the skill that prompts the user to run the command to create and activate the virtual environment themselves.
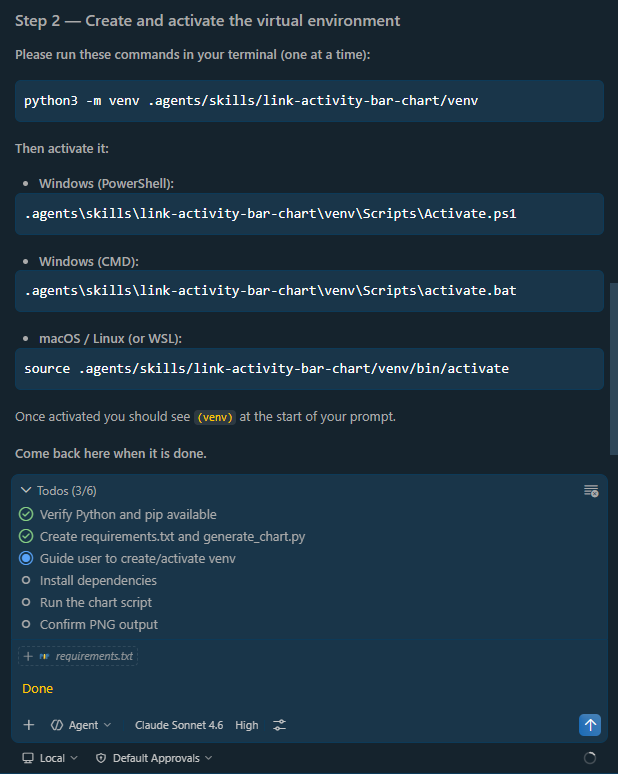
The agent will wait for the user to confirma that the virtual environment is activated before installing the required dependencies.
UPDATE 2: I initially used the GPT-4.1 model, but it did not produce the output that I expected so I switched to just using Claude Sonnet 4.6