Automount Filesystems
Automount
Automounting refers to the automatic mounting of filesystems upon access, rather than during system startup. This approach ensures on-demand availability of filesystems, reducing the need for manual intervention and enhancing overall system efficiency and user convenience.
Install autofs
It's good practice to search for the package first, then install.
[root@tstclient ~]# yum search autofs
Updating Subscription Management repositories.
Unable to read consumer identity

This system is not registered with an entitlement server. You can use subscription-manager to register.

Last metadata expiration check: 3:32:45 ago on Fri 07 Jan 2022 07:13:36 AM UTC.
=============================================== Name Exactly Matched: autofs ================================================
autofs.x86_64 : A tool for automatically mounting and unmounting filesystems
============================================== Name & Summary Matched: autofs ===============================================
libsss_autofs.x86_64 : A library to allow communication between Autofs and SSSD
yum install -y autofs
Before we enable autofs, here's our current directory.
[root@tstclient ~]# ls /
bin  boot  data  dev  etc  home  lib  lib64  media  mnt  opt  proc  root  run  sbin  srv  sys  tmp  usr  var
After enabling autofs, it will add some new directories inside. These directories are managed by automount.
[root@tstclient ~]# systemctl enable --now autofs
Created symlink /etc/systemd/system/multi-user.target.wants/autofs.service ➔ /usr/lib/systemd/system/autofs.service.
[root@tstclient ~]# ls /
bin   data  etc   lib    media  mnt  newfiles  proc  run   srv  tmp  var
boot  dev   home  lib64  misc   net  opt       root  sbin  sys  usr
Let's check the auto.master file. This contains the list of directories that automount manages. Here we see a sample directoy, misc.
[root@tstsvr /]# cat /etc/auto.m
auto.master    auto.master.d/ auto.misc
[root@tstsvr /]# cat /etc/auto.master
#
# Sample auto.master file
# This is a 'master' automounter map and it has the following format:
# mount-point [map-type[,format]:]map [options]
# For details of the format look at auto.master(5).
#
/misc   /etc/auto.misc

# NOTE: mounts done from a hosts map will be mounted with the
#       "nosuid" and "nodev" options unless the "suid" and "dev"
#       options are explicitly given.
#
/net    -hosts
#
# Include /etc/auto.master.d/*.autofs
# The included files must conform to the format of this file.
#
+dir:/etc/auto.master.d
#
# If you have fedfs set up and the related binaries, either
# built as part of autofs or installed from another package,
# uncomment this line to use the fedfs program map to access
# your fedfs mounts.
#/nfs4  /usr/sbin/fedfs-map-nfs4 nobind
#
# Include central master map if it can be found using
# nsswitch sources.
#
# Note that if there are entries for /net or /misc (as
# above) in the included master map any keys that are the
# same will not be seen as the first read key seen takes
# precedence.
#
+auto.master
Let's check the the auto.misc file. On the third column, we see the mountpoint. From the format of the first entry, we already learn that this is an NFS share. The succeeding entries are different formats.
Another thing to notice that some of the dev in the other column have a ':' before them. The colon signifies that its a device file
[root@tstsvr /]# cat /etc/auto.misc
#
# This is an automounter map and it has the following format
# key [ -mount-options-separated-by-comma ] location
# Details may be found in the autofs(5) manpage

cd              -fstype=iso9660,ro,nosuid,nodev :/dev/cdrom

# the following entries are samples to pique your imagination
#linux          -ro,soft                ftp.example.org:/pub/linux
#boot           -fstype=ext2            :/dev/hda1
#floppy         -fstype=auto            :/dev/fd0
#floppy         -fstype=ext2            :/dev/fd0
#e2floppy       -fstype=ext2            :/dev/fd0
#jaz            -fstype=ext2            :/dev/sdc1
#removable      -fstype=ext2            :/dev/hdd
Creating the automount directory
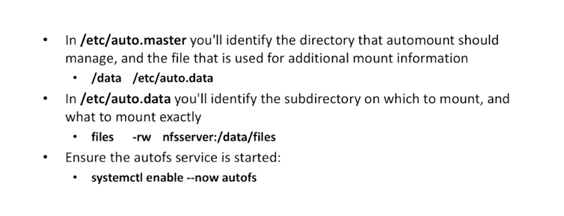
Note that automount is configured on the client machine. Let's edit the auto.master file to add our own directory. We add an entry for auto.file.
[root@tstclient ~]# vim /etc/auto.master
#
# Sample auto.master file
# This is a 'master' automounter map and it has the following format:
# mount-point [map-type[,format]:]map [options]
# For details of the format look at auto.master(5).
#
/misc   /etc/auto.misc
/files  /etc/auto.file
We can then create the actual auto.file. Here we will enter the defined directories.
[root@tstclient ~]# vim /etc/auto.files
nfsshare        -rw     tstsvr:/nfsshare
After restarting autofs, we'll see that the directory files are created.
[root@tstclient ~]# systemctl restart autofs
[root@tstclient ~]# ls /
bin   dev  files  lib    media  mnt  nfsshare  proc  run    sbin  sys  usr
boot  etc  home   lib64  misc   net  opt       root  samba  srv   tmp  var
We can see that the directory has no contents. But if you go to the Defined directories, they will be created.
[root@tstclient ~]# cd /newfiles/
[root@tstclient newfiles]# ll
total 0
[root@tstclient newfiles]# cd nfsshare
[root@tstclient newfiles]# ll
total 0
drwxrwxrwx. 2 root root 22 Jan  6 17:57 nfsshare
Checking the mounts:
[root@tstclient ~]# mount | grep newfiles
/etc/auto.newfiles on /newfiles type autofs (rw,relatime,fd=11,pgrp=9810,timeout=300,minproto=5,maxproto=5,indirect,pipe_ino=96483)
tstsvr:/nfsshare on /newfiles/nfsshare type nfs4 (rw,relatime,vers=4.2,rsize=131072,wsize=131072,namlen=255,hard,proto=tcp,timeo=600,retrans=2,sec=sys,clientaddr=10.0.0.68,local_lock=none,addr=10.0.0.98)
Automount for Home directories
This is one of the use-cases for automount. We can tell the system to create a home directory automatically for a roaming user that maybe working on this machine, then onto another the next day.
Note that this is specific for users who are created with no home directory on the local machine. TO simulate this, we'll create a user on the client. The user can still login using that account, but just can't access home dir.
[root@tstclient ~]# useradd --no-create-home audituser1
[root@tstclient ~]# passwd audituser1
Changing password for user audituser1.
New password:
Retype new password:
passwd: all authentication tokens updated successfully.

[root@tstclient ~]# su - audituser1
Last login: Fri Jan  7 11:42:49 UTC 2022 on pts/2
su: warning: cannot change directory to /home/audituser1: No such file or directory

[audituser1@tstclient root]$ ll
ls: cannot open directory '.': Permission denied
[audituser1@tstclient root]$
[audituser1@tstclient root]$ ls
ls: cannot open directory '.': Permission denied
What we'll do here is we'll actually set up the home directory not on the local machines/clients but instead set it up on the nfs server.
[root@tstsvr /]# vim /etc/exports
#/mnt/nfs_shares  *(rw,sync,no_all_squash,root_squash)
/nfsshare  *(rw,sync,no_all_squash,root_squash)

# Automount home dir for audituser.
/home/audituser1 *{rw)
Restart NFS.
root@tstsvr /]# systemctl restart nfs-server.service
[root@tstsvr /]# showmount  -e
Export list for tstsvr:
/nfsshare       *
/home/audituser1 *{rw)
Switching to the client, edit the auto.master
[root@tstclient ~]# vim /etc/auto.master

# Sample auto.master file
# This is a 'master' automounter map and it has the following format:
# mount-point [map-type[,format]:]map [options]
# For details of the format look at auto.master(5).
#
/misc                   /etc/auto.misc
/newfiles               /etc/auto.newfiles
/home/audituser1        /etc/auto.audituser1
Create the audituser file.
[root@tstclient ~]# vim /etc/auto.audituser1
*       -rw     tstsvr:/home/audituser1
Restart autofs. Then switch user.
[root@tstclient ~]# systemctl restart autofs
[root@tstclient ~]# su - audituser2