General System Check
Linux Hierarchy System
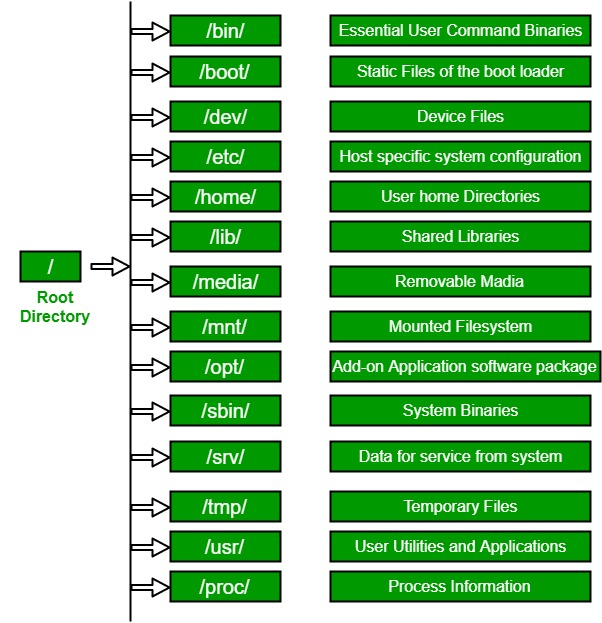
The Linux File Hierarchy Structure (FHS), maintained by the Linux Foundation, defines the directory structure and contents in Unix-like operating systems.
- According to the FHS, all files and directories are organized under the root directory (/), regardless of whether they reside on different physical or virtual devices.
- Certain directories are only present if specific subsystems, such as the X Window System, are installed.
- While most directories exist across all UNIX operating systems and serve similar purposes, the descriptions provided here are specific to the FHS and may not be authoritative for non-Linux platforms.
Commands
To see man page for hierarchy:
man hier
To check if 32-bit or 4-bit:
uname -a
To see what OS is running:
cat /etc/os-release
cat /etc/redhat-release
cat /etc/system-release
cat /etc/issue
To see processes:
top
To see IP addresses:
ip addr show
Show available memory:
free -m
Show free/available disk space:
df -h
Show mounted filesystems:
findmnt
To show history of commands:
history
To see previous commands in reverse:
ctrl-r
To display the full path of the current directory you are working in
pwd
To displays the username of the current user:
whoami
Piping - pass output of previous command. In the example below, we're getting the output of "ps -aux". And from that output, we're grepping for "java".
ps aux | grep java
Environment Variables
To get a list of your environment variables
env
To add a path to your $PATH variable:
[root@tstsvr ~]# echo $PATH
/usr/local/sbin:/usr/local/bin:/usr/sbin:/usr/bin:/root/bin
[root@tstsvr ~]# export PATH=$PATH:/tmp/archive
[root@tstsvr ~]# echo $PATH
/usr/local/sbin:/usr/local/bin:/usr/sbin:/usr/bin:/root/bin:/tmp/archive
Memory
Linux places as many files as possible in cache to guarantee fast access to the files.
- Linux memory often shows as saturated.
- Swap is used as an overflow buffer of emulated RAM on disk.
- The Linux kernel moves inactive memory to swap first.
To see free memory:
$ free
              total        used        free      shared  buff/cache   available
Mem:       16209956      741040    13031804       26564     2437112    15139920
Swap:             0           0           0
To see detailed memory information in megabytes:
$ free -m
              total        used        free      shared  buff/cache   available
Mem:          15830         723       12726          25        2380       14785
Swap:             0           0           0
Note that if used > free and there's some significant number for cached, then you're still running a bit of memory. Cached memory is used to speed up your file system.
To see free space in disk:
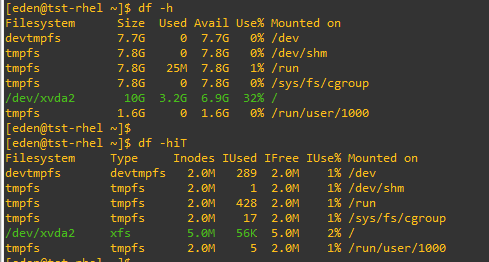
$ df -h
Filesystem      Size  Used Avail Use% Mounted on
devtmpfs        7.7G     0  7.7G   0% /dev
tmpfs           7.8G     0  7.8G   0% /dev/shm
tmpfs           7.8G   25M  7.8G   1% /run
tmpfs           7.8G     0  7.8G   0% /sys/fs/cgroup
/dev/xvda2       10G  3.2G  6.9G  32% /
tmpfs           1.6G     0  1.6G   0% /run/user/1000
To check disk usage in the current directory:
$ du
24      ./.ssh
12      ./data-bkup/data-bkup
16      ./data-bkup
8       ./1-transfers
8       ./2-receives
0       ./.config/procps
0       ./.config/htop
0       ./.config
716     .
To see disk usage in a human-readable format:
$ du -h
24K     ./.ssh
12K     ./data-bkup/data-bkup
16K     ./data-bkup
8.0K    ./1-transfers
8.0K    ./2-receives
0       ./.config/procps
0       ./.config/htop
0       ./.config
716K    .
To check disk space usage in specific directories:
[root@localhost eden]# du -sch /var/*
0       /var/adm
619M    /var/cache
0       /var/crash
0       /var/db
0       /var/empty
0       /var/ftp
0       /var/games
0       /var/gopher
0       /var/kerberos
226M    /var/lib
0       /var/local
0       /var/lock
27M     /var/log
0       /var/mail
0       /var/nis
0       /var/opt
0       /var/preserve
0       /var/run
20K     /var/spool
44K     /var/tmp
0       /var/yp
871M    total
inodes
Inodes are file references in the filesystem table. It's possible for the number of used inodes to exceed the configured number without filling up all the space.
To check inodes:
$ df -hiT
Filesystem     Type     Inodes IUsed IFree IUse% Mounted on
devtmpfs       devtmpfs   2.0M   289  2.0M    1% /dev
tmpfs          tmpfs      2.0M     1  2.0M    1% /dev/shm
tmpfs          tmpfs      2.0M   428  2.0M    1% /run
tmpfs          tmpfs      2.0M    17  2.0M    1% /sys/fs/cgroup
/dev/xvda2     xfs        5.0M   56K  5.0M    2% /
tmpfs          tmpfs      2.0M     5  2.0M    1% /run/user/1000
You'll also notice that the partition with largest size also has the largest configured inode.
CPU Load
To check system uptime and load averages:
$ uptime
 16:54:33 up 1 day, 18:27,  1 user,  load average: 0.00, 0.00, 0.00
For real-time updates of uptime and load averages:
$ watch uptime
Every 2.0s: uptime                                                                         tst-rhel: Sat Dec 25 16:56:00 2021

 16:56:00 up 1 day, 18:28,  1 user,  load average: 0.00, 0.00, 0.00
To display detailed CPU information:
$ lscpu
Architecture:        x86_64
CPU op-mode(s):      32-bit, 64-bit
Byte Order:          Little Endian
CPU(s):              4
On-line CPU(s) list: 0-3
Thread(s) per core:  1
Core(s) per socket:  4
Socket(s):           1
NUMA node(s):        1
Vendor ID:           GenuineIntel
CPU family:          6
Model:               79
Model name:          Intel(R) Xeon(R) CPU E5-2686 v4 @ 2.30GHz
Stepping:            1
CPU MHz:             2300.134
BogoMIPS:            4600.14
Hypervisor vendor:   Xen
Virtualization type: full
L1d cache:           32K
L1i cache:           32K
L2 cache:            256K
L3 cache:            46080K
NUMA node0 CPU(s):   0-3
Flags:               fpu vme de pse tsc msr pae mce cx8 apic sep mtrr pge mca cmov pat pse36 clflush mmx fxsr sse sse2 ht syscall nx pdpe1gb rdtscp lm constant_tsc rep_good nopl xtopology cpuid pni pclmulqdq ssse3 fma cx16 pcid sse4_1 sse4_2 x2apic movbe popcnt tsc_deadline_timer aes xsave avx f16c rdrand hypervisor lahf_lm abm cpuid_fault invpcid_single pti fsgsbase bmi1 avx2 smep bmi2 erms invpcid xsaveopt
Tuned
Tuned is a dynamic tuning daemon in Linux used to optimize system performance based on the current workload. It allows for automated, real-time adjustment of system settings to improve performance and efficiency, making it particularly useful in environments with varying workloads.
Key Features
- Dynamic Tuning: Automatically adjusts system settings based on the current load and usage patterns.
- Profiles: Predefined and customizable profiles for different use cases, such as high performance, power saving, and low latency.
- Pluggable Architecture: Easy to extend with custom plugins for specific tuning needs.
Usage
-
If Tuned is not already installed, you can install it using your package manager.
sudo yum install tuned # On RHEL-based systemssudo apt-get install tuned # On Debian-based systems -
Start the Tuned service and enable it to start automatically at boot.
sudo systemctl start tunedsudo systemctl enable tuned -
View the available tuning profiles.
sudo tuned-adm listAvailable profiles:- accelerator-performance - Throughput performance based tuning with disabled higher latency STOP states- balanced - General non-specialized tuned profile- desktop - Optimize for the desktop use-case- hpc-compute - Optimize for HPC compute workloads- intel-sst - Configure for Intel Speed Select Base Frequency- latency-performance - Optimize for deterministic performance at the cost of increased power consumption- network-latency - Optimize for deterministic performance at the cost of increased power consumption, focused on low latency network performance- network-throughput - Optimize for streaming network throughput, generally only necessary on older CPUs or 40G+ networks- optimize-serial-console - Optimize for serial console use.- powersave - Optimize for low power consumption- throughput-performance - Broadly applicable tuning that provides excellent performance across a variety of common server workloads- virtual-guest - Optimize for running inside a virtual guest- virtual-host - Optimize for running KVM guestsCurrent active profile: virtual-guest -
Change to a specific profile based on your needs.
sudo tuned-adm profile balanced # Applying the 'balanced' profile -
Check which profile is currently active.
sudo tuned-adm active
Date and Time
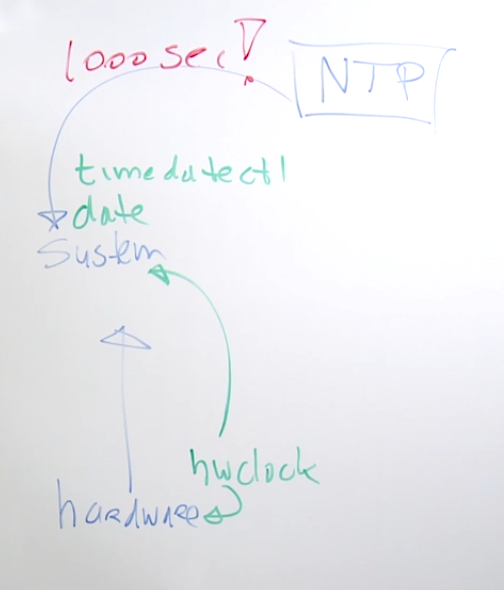
The system takes the time from the hardware clock when it boots. After the boot, system time is set based on the hardware clock.
- hwclock can be used to set the hardware clock or to sync it with system time. For system time, there are two commands:
- date - old command
- timedatectl - new command with more options
Almost all Linux systems are set to sync with an NTP Server, which provides the time and syncs all connected servers. However, if your system time is off by 1000 seconds or more, NTP time sync will not work, and you will need to troubleshoot the cause of the abnormal time gap.
date
The date command is used to display or set the system date and time.
To display the date and time:
date
To display just the time:
date +%T
To display the day (shortcut):
date +%a
To display the day (full):
date +%A
To check options:
man date
To specify a string like "now" or "tomorrow":
date -d "now"
date -d "tomorrow"
To check the last time a file was modified:
date -r <file>
To set the time:
date +%T -s "1:23:45"
To set the day:
date +%a -s "Mon"
date +%A -s "Monday"
To set the date and time:
date -s "1 Jul 1986 1:23:45"
timedatectl
The timedatectl command is used to query and change the system clock and its settings.
To display the current status:
timedatectl status
To list available timezones:
timedatectl list-timezones
To set the timezone:
sudo timedatectl set-timezone Asia/Singapore
To show detailed information:
timedatectl show
As an example, our system timezone is currrently set to PST. To change it to SGT:
$ timedatectl
               Local time: Sun 2021-12-26 19:41:25 PST
           Universal time: Sun 2021-12-26 11:41:25 UTC
                 RTC time: Sun 2021-12-26 11:41:25
                Time zone: Asia/Manila (PST, +0800)
System clock synchronized: yes
              NTP service: active
          RTC in local TZ: no

$ sudo timedatectl set-timezone Asia/
Asia/Aden           Asia/Bishkek        Asia/Hong_Kong      Asia/Kuching        Asia/Pyongyang      Asia/Tehran
Asia/Almaty         Asia/Brunei         Asia/Hovd           Asia/Kuwait         Asia/Qatar          Asia/Thimphu
Asia/Amman          Asia/Chita          Asia/Irkutsk        Asia/Macau          Asia/Qostanay       Asia/Tokyo
Asia/Anadyr         Asia/Choibalsan     Asia/Jakarta        Asia/Magadan        Asia/Qyzylorda      Asia/Tomsk
Asia/Aqtau          Asia/Colombo        Asia/Jayapura       Asia/Makassar       Asia/Riyadh         Asia/Ulaanbaatar
Asia/Aqtobe         Asia/Damascus       Asia/Jerusalem      Asia/Manila         Asia/Sakhalin       Asia/Urumqi
Asia/Ashgabat       Asia/Dhaka          Asia/Kabul          Asia/Muscat         Asia/Samarkand      Asia/Ust-Nera
Asia/Atyrau         Asia/Dili           Asia/Kamchatka      Asia/Nicosia        Asia/Seoul          Asia/Vientiane
Asia/Baghdad        Asia/Dubai          Asia/Karachi        Asia/Novokuznetsk   Asia/Shanghai       Asia/Vladivostok
Asia/Bahrain        Asia/Dushanbe       Asia/Kathmandu      Asia/Novosibirsk    Asia/Singapore      Asia/Yakutsk
Asia/Baku           Asia/Famagusta      Asia/Khandyga       Asia/Omsk           Asia/Srednekolymsk  Asia/Yangon
Asia/Bangkok        Asia/Gaza           Asia/Kolkata        Asia/Oral           Asia/Taipei         Asia/Yekaterinburg
Asia/Barnaul        Asia/Hebron         Asia/Krasnoyarsk    Asia/Phnom_Penh     Asia/Tashkent       Asia/Yerevan
Asia/Beirut         Asia/Ho_Chi_Minh    Asia/Kuala_Lumpur   Asia/Pontianak      Asia/Tbilisi
$
$ sudo timedatectl set-timezone Asia/Singapore
$
$ timedatectl
               Local time: Sun 2021-12-26 19:41:48 +08
           Universal time: Sun 2021-12-26 11:41:48 UTC
                 RTC time: Sun 2021-12-26 11:41:48
                Time zone: Asia/Singapore (+08, +0800)
System clock synchronized: yes
              NTP service: active
          RTC in local TZ: no
$ timedatectl show
Timezone=Asia/Singapore
LocalRTC=no
CanNTP=yes
NTP=yes
NTPSynchronized=yes
TimeUSec=Sun 2021-12-26 19:42:36 +08
RTCTimeUSec=Sun 2021-12-26 19:42:36 +08
tzselect
The tzselect command is an interactive utility that helps you select your time zone from a list of available time zones. It prompts you to select your geographical area and then your specific location within that area. This tool does not directly set the system's time zone but helps you determine the appropriate time zone string that can be used with other commands like timedatectl or for setting the TZ environment variable.
-
Run the command:
tzselect -
Follow the prompts to select your geographical area and location.
$ tzselectPlease identify a location so that time zone rules can be set correctly.Please select a continent or ocean.1) Africa2) Americas3) Antarctica4) Arctic Ocean5) Asia6) Atlantic Ocean7) Australia8) Europe9) Indian Ocean10) Pacific Ocean11) none - I want to specify the time zone using the Posix TZ format.#? 5Please select a country.1) Afghanistan 18) Israel 35) Palestine2) Armenia 19) Japan 36) Philippines3) Azerbaijan 20) Jordan 37) Qatar4) Bahrain 21) Kazakhstan 38) Russia5) Bangladesh 22) Korea (North) 39) Saudi Arabia6) Bhutan 23) Korea (South) 40) Singapore7) Brunei 24) Kuwait 41) Sri Lanka8) Cambodia 25) Kyrgyzstan 42) Syria9) China 26) Laos 43) Taiwan10) Cyprus 27) Lebanon 44) Tajikistan11) East Timor 28) Macau 45) Thailand12) Georgia 29) Malaysia 46) Turkmenistan13) Hong Kong 30) Mongolia 47) United Arab Emirates14) India 31) Myanmar (Burma) 48) Uzbekistan15) Indonesia 32) Nepal 49) Vietnam16) Iran 33) Oman 50) Yemen17) Iraq 34) Pakistan#? 40Please select one of the following time zone regions.1) Singapore#? 1The following information has been given:SingaporeTherefore TZ='Asia/Singapore' will be used.Local time is now: Sun Jun 30 19:41:45 +08 2024.Universal Time is now: Sun Jun 30 11:41:45 UTC 2024.Is the above information OK?1) Yes2) No#? 1You can make this change permanent for yourself by appending the lineTZ='Asia/Singapore'; export TZto the file '.profile' in your home directory; then log out and log in again.Here is that TZ value again, this time on standard output so that you canuse it directly in an assignment:Asia/Singapore
After running tzselect and following the prompts, you will get a time zone string like Asia/Singapore. You can use this string with timedatectl to set the system time zone:
sudo timedatectl set-timezone Asia/Singapore
Or set the TZ environment variable:
export TZ='Asia/Singapore'
To make the change permanent for your user session, add the following line to your .profile, .bashrc, or equivalent file in your home directory:
echo "export TZ='Asia/Singapore'" >> ~/.profile
Hardware Clock
The hardware clock is the underlying hardware's clock, which the server uses to get time during bootup.
To set the system time from the hardware clock:
hwclock -s
To set the hardware clock to the current system time:
hwclock -r
Timezones
To view the timezone file:
ll /etc/localtime
To view all timezones:
ll /usr/share/zoneinfo
To change the timezone (Method 1):
- Remove current time:
sudo rm /etc/localtime
- Go to zoneinfo:
cd /usr/share/zoneinfo
- Copy desired timezone to
/etc/localtime:cp America/New_York /etc/localtime - Verify:
date
To change the timezone (Method 2):
- Remove current time:
sudo rm /etc/localtime
- Create symlink:
ln -s /usr/share/zoneinfo/Chicago /etc/localtime
- Verify:
date
To change the timezone (Method 3):
- List all timezones:
timedatectl list-timezones
- Change to desired timezone:
timedatectl set-timezone Singapore
NTP
In RHEL7 and CentOS, NTP can be used to sync time to a server. In RHEL8, CHRONY is used.
To install NTP on RHEL7 and CentOS:
yum install -y ntp
To install CHRONY:
yum install -y chrony
To edit the NTP configuration:
vi /etc/ntp.conf
To edit the CHRONY configuration:
vi /etc/chrony.conf
There are two files for chrony in the /etc directory. If you are securely connecting to a time server, you will need to define the public key in the chrony.keys file.
To check the status of NTP:
service ntp status
To check the status of CHRONY:
systemctl status chronyd
To get more information:
ntpq -p
To check the NTP servers and see their status,
$ chronyc sources

MS Name/IP address         Stratum Poll Reach LastRx Last sample
===============================================================================
^* 169.254.169.123               3   4   377    13  +9414ns[  +10us] +/-  461us
To enter the chrony client,
$ chronyc
chrony version 4.1
Copyright (C) 1997-2003, 2007, 2009-2021 Richard P. Curnow and others
chrony comes with ABSOLUTELY NO WARRANTY.  This is free software, and
you are welcome to redistribute it under certain conditions.  See the
GNU General Public License version 2 for details.
To stop using the NTP server and set the time manually:
sudo timedatectl set-ntp false
Whenever you change the chrony.conf, it's recommended to restart the service to reload the config file.
sudo systemctl restart chronyc