Process Management
ps command
The ps command is used to display information about active processes. There are various options and flags to modify the output to suit your needs.
- the
pscommand has two different dialects: BSD and System5. ps -LandpsLare different commands.
Examples
To see the current processes running in the terminal:
$ ps
    PID TTY          TIME CMD
  42657 pts/1    00:00:00 bash
  43459 pts/1    00:00:00 nslookup
  43529 pts/1    00:00:00 ps
To see more detailed information about all processes:
[root@server home]# ps -aux
USER         PID %CPU %MEM    VSZ   RSS TTY      STAT START   TIME COMMAND
root           1  0.0  0.0 241556 14516 ?        Ss   Nov17   0:07 /usr/lib/systemd/systemd --system --deserialize 21
root           2  0.0  0.0      0     0 ?        S    Nov17   0:00 [kthreadd]
root           3  0.0  0.0      0     0 ?        I<   Nov17   0:00 [rcu_gp]
root           4  0.0  0.0      0     0 ?        I<   Nov17   0:00 [rcu_par_gp]
root           6  0.0  0.0      0     0 ?        I<   Nov17   0:00 [kworker/0:0H-events_highpri]
To see processes in tree-view:
[root@server home]# ps af
   PPID     PID    PGID     SID TTY        TPGID STAT   UID   TIME COMMAND
      1    5969    5969    5969 ?             -1 Ss       0   0:00 sshd: eden [priv]
   5969    5980    5969    5969 ?             -1 S     1000   0:01  \_ sshd: eden@pts/1
   5980    5981    5981    5981 pts/1      49357 Ss    1000   0:00      \_ -bash
   5981    6015    6015    5981 pts/1      49357 T        0   0:00          \_ sudo yum install https://dl.fedoraproject.org/
   6015    6017    6015    5981 pts/1      49357 T        0   0:04          |   \_ /usr/libexec/platform-python /bin/yum inst
   5981   36086   36086    5981 pts/1      49357 T        0   0:00          \_ sudo yum install https://dl.fedoraproject.org/
  36086   36088   36086    5981 pts/1      49357 T        0   0:03          |   \_ /usr/libexec/platform-python /bin/yum inst
The -fax combination displays all processes in a hierarchical tree format, including processes without a terminal and those of other users. This is useful for understanding the parent-child relationships between processes.
[root@server home]# ps -fax
  PID  TTY      STAT   TIME COMMAND
    1  ?        Ss     0:07 /sbin/init
    2  ?        S      0:00  \_ [kthreadd]
    3  ?        I<     0:00      \_ [rcu_gp]
    4  ?        I<     0:00      \_ [rcu_par_gp]
  458  ?        Ss     0:00 /usr/sbin/sshd -D
  489  pts/0    Ss     0:00  \_ /bin/bash
  510  pts/0    R+     0:00      \_ ps -fax
The -ef combination provides a comprehensive list of all processes in the system with detailed information. It does not show the hierarchical tree structure but is more detailed about each process's attributes.
[root@server home]# ps -ef
    PID TTY      STAT   TIME COMMAND
  48963 pts/1    S      0:00 sudo su LS_COLORS=rs=0:di=01;34:ln=01;36:mh=00:pi=40;33:so=01;35:do=01;35:bd=40;33;01:cd=40;33;01:or=40;31;01:mi=01;05;37;41:su=37
  48965 pts/1    S      0:00  \_ su LS_COLORS=rs=0:di=01;34:ln=01;36:mh=00:pi=40;33:so=01;35:do=01;35:bd=40;33;01:cd=40;33;01:or=40;31;01:mi=01;05;37;41:su=37;
  36120 pts/1    T      0:00 sudo yum install https://dl.fedoraproject.org/pub/epel/epel-release-latest-8.noarch.rpm -y LS_COLORS=rs=0:di=01;34:ln=01;36:mh=00:
  36088 pts/1    T      0:03  \_ /usr/libexec/platform-python /bin/yum install https://dl.fedoraproject.org/pub/epel/epel-release-latest-8.noarch.rpm LS_COLORS
   6015 pts/1    T      0:00 sudo yum install https://dl.fedoraproject.org/pub/epel/epel-release-latest-8.noarch.rpm LS_COLORS=rs=0:di=01;34:ln=01;36:mh=00:pi=
   6017 pts/1    T      0:04  \_ /usr/libexec/platform-python /bin/yum install https://dl.fedoraproject.org/pub/epel/epel-release-latest-8.noarch.rpm LS_COLORS
   1145 tty1     Ss+    0:00 /sbin/agetty -o -p -- \u --noclear tty1 linux PATH=/usr/local/sbin:/usr/local/bin:/usr/sbin:/usr/bin INVOCATION_ID=8b2bcd3d8abf440
To list full-format details of processes owned by user Ted:
[root@server home]# ps -fU Ted

UID        PID  PPID  C STIME TTY          TIME CMD
Ted       1234     1  0 12:00 ?        00:00:00 /usr/bin/bash
To show a tree view --forest of sshd processes and their children in full format:
[root@server home]# ps -f --forest -C sshd

UID        PID  PPID  C STIME TTY          TIME CMD
root       101   100  0 10:00 ?        00:00:00 sshd
root       102   101  0 10:01 ?        00:00:00  \_ sshd: root@pts/0
To list all the currently available format specifiers:
[root@server home]# ps L

%cpu         %CPU
%mem         %MEM
_left        LLLLLLLL
_left2       L2L2L2L2
_right       RRRRRRRR
_right2      R2R2R2R2
_unlimited   U
_unlimited2  U2
To dsplay all processes with specified columns: process ID, parent process ID, user, and command
[root@server home]# ps -eo pid,ppid,user,cmd
    PID    PPID USER     CMD
      1       0 root     /sbin/init
      2       1 root     /init
     11       2 root     plan9 --control-socket 6 --log-level 4 --server-fd 7 --pipe-fd 9 --log-truncate
     70       1 root     /lib/systemd/systemd-journald
     96       1 root     /lib/systemd/systemd-udevd
Using grep
To find the process ID (PID) of a specific process using pgrep:
[root@server home]# pgrep bash
5900
5981
48966
To display specific process information using grep:
[root@server home]# ps aux | grep bash
eden        5900  0.0  0.0  24120  3976 pts/0    Ss+  05:58   0:00 -bash
eden        5981  0.0  0.0  24120  4020 pts/1    Ss   06:00   0:00 -bash
root       48966  0.0  0

.0  26328  4116 pts/1    S    09:46   0:00 bash
root       49389  0.0  0.0  12136  1120 pts/1    S+   11:18   0:00 grep --color=auto bash
To exclude the grep process from the output:
[root@server home]# ps aux | grep bash | grep -v grep
eden        5900  0.0  0.0  24120  3976 pts/0    Ss+  05:58   0:00 -bash
eden        5981  0.0  0.0  24120  4020 pts/1    Ss   06:00   0:00 -bash
root       48966  0.0  0.0  26328  4116 pts/1    S    09:46   0:00 bash
To see all processes running http:
[root@server home]# ps aux | grep http
root        6015  0.0  0.0 143304  7912 pts/1    T    06:00   0:00 sudo yum install https://dl.fedoraproject.org/pub/epel/epel-release-latest-8.noarch.rpm
root        6017  0.0  0.9 581472 162040 pts/1   T    06:00   0:04 /usr/libexec/platform-python /bin/yum install https://dl.fedoraproject.org/pub/epel/epel-release-latest-8.noarch.rpm
root       36086  0.0  0.0 143328  8124 pts/1    T    06:05   0:00 sudo yum install https://dl.fedoraproject.org/pub/epel/epel-release-latest-8.noarch.rpm
root       49004  0.0  0.0  12136  1100 pts/1    S+   09:50   0:00 grep --color=auto http
To count how many processes are running http:
[root@server home]# ps aux | grep http | wc -l
4
Managing Startup Processes
In Linux, managing startup processes can differ based on the init system used by the distribution. Here are examples for Ubuntu using Upstart and RHEL using systemd.
Ubuntu (Upstart)
To check the config files of services running during boot:
[root@server home]# ll /etc/init.d
lrwxrwxrwx. 1 root root 11 Jul 27 15:12 /etc/init.d -> rc.d/init.d
RHEL (systemd)
To check the systemd configuration directory:
[root@server home]# ll /etc/systemd
total 28
-rw-r--r--.  1 root root  615 Jun 22  2018 coredump.conf
-rw-r--r--.  1 root root 1027 Jun 22  2018 journald.conf
-rw-r--r--.  1 root root 1052 May  5  2021 logind.conf
-rw-r--r--.  1 root root  631 Sep 23 18:50 resolved.conf
drwxr-xr-x. 14 root root 4096 Sep 23 18:51 system
-rw-r--r--.  1 root root 1722 Sep 23 18:50 system.conf
drwxr-xr-x.  2 root root    6 Sep 23 18:51 user
-rw-r--r--.  1 root root 1130 Jun 22  2018 user.conf
Managing Services with systemd
Check status of a service:
systemctl status <service>
Stop a service:
systemctl stop <service>
Start a service:
systemctl start <service>
Restart a service:
systemctl restart <service>
Disable a service from starting automatically on boot:
systemctl disable <service>
Enable a service to start automatically on boot:
systemctl enable <service>
Example
Disabling and enabling the crond service:
[root@server home]# systemctl disable crond
Removed /etc/systemd/system/multi-user.target.wants/crond.service.
[root@server home]#

[root@server home]# systemctl enable crond
Created symlink /etc/systemd/system/multi-user.target.wants/crond.service ➔ /usr/lib/systemd/system/crond.service.
Jobs and Processes
Shell Jobs
In Linux, a "job" refers to a process that is started by the shell. Jobs can be managed directly from the shell, and this includes running processes in the background, bringing them to the foreground, and stopping or resuming them.
- All tasks are started as processes.
- Processed have a PID.
- Common process management tasks include scheduling priority and sending signals.
- Some processes start multiple thread.
- Individual threads cannot be managed.
- Tasks managed from a shell can be managed as jobs.
- Jobs can be started in the foreground or background.
Basic Job Commands
- &: Run a command in the background.
- jobs: List all current jobs.
- fg: Bring a job to the foreground.
- bg: Resume a stopped job in the background.
- Ctrl+Z: Suspend the current foreground job.
- kill: Terminate a job by sending a signal.
Examples
-
Running a Process in the Background
The "&" symbol runs
long_running_commandin the background, allowing you to continue using the shell.1is the job number, and12345is the process ID (PID).$ long_running_command &[1] 12345 -
Listing Jobs
The
jobscommand lists all active jobs. The+indicates the current job, and the job number is1.$ jobs[1]+ Running long_running_command & -
Bringing a Job to the Foreground
The
fgcommand followed by the job number brings job1to the foreground.$ fg %1 -
Running a Stopped Job in the Background
The
bgcommand resumes a stopped job in the background. This is useful after usingCtrl+Zto suspend a job.$ bg %1 -
Suspending a Foreground Job
Press
Ctrl+Zto suspend the current foreground job. The job is now stopped and can be resumed withfgorbg.$ long_running_commandCtrl+Z[1]+ Stopped long_running_command -
Terminating a Job
The
killcommand followed by the job number terminates the specified job. You can also use the PID instead of the job number.$ kill %1$ kill 12345
Job Control Example
$ sleep 1000 &
[1] 12345
$ jobs
[1]+  Running                 sleep 1000 &
$ fg %1
sleep 1000
Ctrl+Z
[1]+  Stopped                 sleep 1000
$ bg %1
[1]+ sleep 1000 &
$ kill %1
[1]+  Terminated              sleep 1000
In this example:
sleep 1000 &runs thesleepcommand in the background.jobslists the active job.fg %1brings the job to the foreground.Ctrl+Zsuspends the job.bg %1resumes the job in the background.kill %1terminates the job.
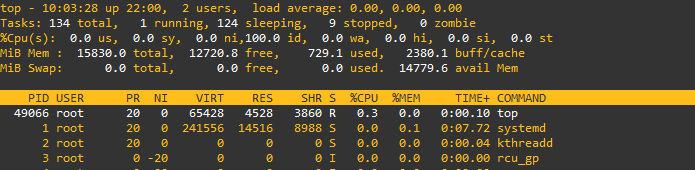
top and htop
Using top
The top command provides real-time information about system processes and resource usage. It displays details such as CPU utilization, memory usage, and process statistics.
- Press
fto show and select from available fields. - Type
Mto filter on memory usage. - Press
Wto save new display settings
Explaining the output:
-
Time and System Status:
22:21:00 up 3:05 2 users load ave: 0.00, 0.00, 0.00where:
22:21:00: Current timeup 3:05: System uptime2 users: Number of logged-in usersload ave: 0.00, 0.00, 0.00: CPU load averages over 1, 5, and 15 minutes
-
Load Averages:
- The three numbers represent load averages over different timeframes (1 minute, 5 minutes, and 15 minutes).
-
N.I. Value:
- NICE VALUE determines the priority of processes.
- A value of
-20indicates the highest priority, while19or20indicates the lowest.
-
Init Process:
- The first process in any Linux system is typically the
initprocess (PID 1), which manages other processes.
- The first process in any Linux system is typically the
In this example, systemd runs as PID1 because it is the init process. It's the first process. The bulk of functionality provided by the systemd project, however, does not reside in PID1, but in a variety of services launched by init
top commands
-
Sorting:
- Press
Shift + Mto sort processes by memory usage. - Press
Shift + Rto sort processes by CPU usage.
- Press
-
Process Management:
- To kill a process: Press
kfollowed by the process ID (PID). Confirm with the signal (default is15). - To set process priority: Press
rand enter the process ID (PID) and desired priority.
- To kill a process: Press
Priorities and Niceness
Niceness values affect process scheduling. A lower niceness value means a higher priority for the process.
- By default, Linux processes are started with the same priority.
- Real-time processes are started, which will always be handled with highest priority.
- To change priorities, use
niceandrenice. - Nice values range from -20 to 19.
- Negative nice values indicates increased priority.
- Positive nice values indicates decreased priority.
- Process priority can be set by users, but you need root access to do this.
To set priority:
r: 12345 -20
- set process-id 12345 with prio equals to (-20)
- this means highest prio
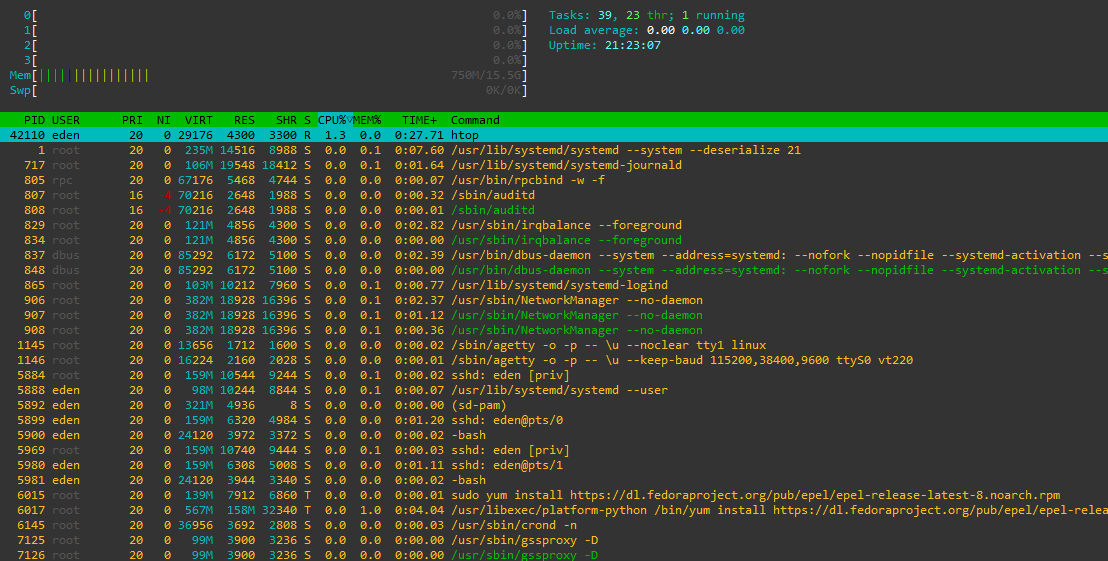
Using htop
If htop is not installed, it can be installed using the following commands:
sudo yum install -y https://dl.fedoraproject.org/pub/epel/epel-release-latest-8.noarch.rpm
sudo yum update -y
sudo yum install -y htop
Sample htop output:
Killing Processes
Processes can be managed and terminated using various signals (SIGTERM, SIGKILL, etc.):
- A signal allows the OS to interrupt a process and ask it to do something.
- Interrupts are similar to signals, but are generated from hardware.
- Not all signals work in all cases.
- The
killcommand is used to send signals to PID's. - You can also use
kfromtop.
Commands:
kill <PID>      # Sends default signal (SIGTERM)
kill -9 <PID>   # Sends SIGKILL to force termination
Example:
# Here we search for cron first then kill it
[root@server home]# ps aux | grep cron
root        6145  0.0  0.0  36956  3692 ?        Ss   06:01   0:00 /usr/sbin/crond -n
root       49411  0.0  0.0  12136  1136 pts/1    S+   11:22   0:00 grep --color=auto cron
[root@server home]#
[root@server home]# ps aux | grep cron | grep -v grep
root        6145  0.0  0.0  36956  3692 ?        Ss   06:01   0:00 /usr/sbin/crond -n
[root@server home]#
[root@server home]# kill 6145
[root@server home]# ps aux | grep cron | grep -v grep
[root@server home]#
To see all the signals we can send:
[root@server home]# kill -l
 1) SIGHUP       2) SIGINT       3) SIGQUIT      4) SIGILL       5) SIGTRAP
 6) SIGABRT      7) SIGBUS       8) SIGFPE       9) SIGKILL     10) SIGUSR1
11) SIGSEGV     12) SIGUSR2     13) SIGPIPE     14) SIGALRM     15) SIGTERM
16) SIGSTKFLT   17) SIGCHLD     18) SIGCONT     19) SIGSTOP     20) SIGTSTP
21) SIGTTIN     22) SIGTTOU     23) SIGURG      24) SIGXCPU     25) SIGXFSZ
26) SIGVTALRM   27) SIGPROF     28) SIGWINCH    29) SIGIO       30) SIGPWR
31) SIGSYS      34) SIGRTMIN    35) SIGRTMIN+1  36) SIGRTMIN+2  37) SIGRTMIN+3
38) SIGRTMIN+4  39) SIGRTMIN+5  40) SIGRTMIN+6  41) SIGRTMIN+7  42) SIGRTMIN+8
43) SIGRTMIN+9  44) SIGRTMIN+10 45) SIGRTMIN+11 46) SIGRTMIN+12 47) SIGRTMIN+13
48) SIGRTMIN+14 49) SIGRTMIN+15 50) SIGRTMAX-14 51) SIGRTMAX-13 52) SIGRTMAX-12
53) SIGRTMAX-11 54) SIGRTMAX-10 55) SIGRTMAX-9  56) SIGRTMAX-8  57) SIGRTMAX-7
58) SIGRTMAX-6  59) SIGRTMAX-5  60) SIGRTMAX-4  61) SIGRTMAX-3  62) SIGRTMAX-2
63) SIGRTMAX-1  64) SIGRTMAX
Parent Process (PPID)
The PPID (Parent Process ID) in Linux identifies the parent process that started another process. This relationship forms a hierarchical structure where each process (except for the init process with PPID 0) has a parent process.
Example
-
Identifying PPID Using
psCommand:Use the
pscommand to display process information, including the PPID:ps -eo pid,ppid,cmdOutput example:
PID PPID CMD1 0 /usr/lib/systemd/systemd --system --deserialize 21456 1 /usr/sbin/sshd -D457 456 sshd: user@pts/0- In the example above:
PID 1(/usr/lib/systemd/systemd) is the init process (PPID 0).PID 456(/usr/sbin/sshd -D) is started by the init process (PPID 1).PID 457(sshd: user@pts/0) is a child process ofPID 456.
- In the example above:
-
Understanding Parent-Child Relationship:
When a parent process starts a child process:
- The child process inherits certain attributes from the parent, such as environment variables and resource limits.
- The parent process is responsible for managing its child processes and may wait for them to complete (if necessary).
-
Practical Use Cases:
- Monitoring: Identifying the PPID helps in understanding the origin and relationship of processes, useful for troubleshooting and monitoring system behavior.
- Process Control: Some operations, like terminating a group of processes, can be efficiently handled by targeting processes with the same PPID.
which, where, whereis
These commands are used to locate the paths of executables and man pages for commands.
-
whichThe
whichcommand shows the path of the executable that would have been executed when you type the command name in the terminal.which <command> -
whereThe
wherecommand (on some systems like Windows, butwhereisis more commonly used in Unix-like systems) lists all the locations in the system's PATH where the command is found. -
whereisThe
whereiscommand locates the binary, source, and manual page files for a command.whereis <command>
locate
The locate command quickly finds file paths by searching a pre-built database.
-
To install
locatefor CentOS:yum install -y locate -
To install
locatefor RHEL 8:yum install -y mlocate -
To manually update the database used by
locate:sudo updatedb -
To search for a file using
locate:locate <file>
find
The find command is more powerful and flexible, allowing you to specify detailed search criteria and perform actions on the files found.
-
Find all files with "motd" inside the /etc directory
find /etc -name 'motd' -
Search in the current directory for files with type "file" (
f) that start with "cron.."find . -type f -name "cron*" -
Search in the current directory for directories (
d) that start with "cron.."find . -type d -name "cron*" -
Search in the root directory for all files with permission of 777
find / -perm 777Note: 777 grants EVERYONE read-write-execute permissions, which is very INSECURE.
-
Execute
chmod 744on all files with permission 777find / -perm 777 -exec chmod 744 {} \;This makes the files secure. The command that follows
-execis applied to the results of thefindcommand. The{}refers to each file found, meaning the command is executed on each file found. -
Find all files modified in the past 24 hours or more
find / -mtime +1 -
Find all files modified less than a day ago
find / -mtime -1 -
Find all files accessed in the past 24 hours or more
find / -atime +1 -
Find all files accessed less than a day ago
find / -atime -1 -
Find all files owned by a specific group
find / -group <groupname> -
Find all files with a size of 512 bytes
find / -size 512c -
Find all files with a size of 1 megabyte
find / -size 1M -
Ignore the case of the filename; it could return an uppercase or lowercase match
find / -iname <filename> -
Find all files EXCEPT the specified filename
find / -not -name <filename> -
Find all files owned by a specific user
find /usr/bin -user <username>