Boot Procedure
The Bootup
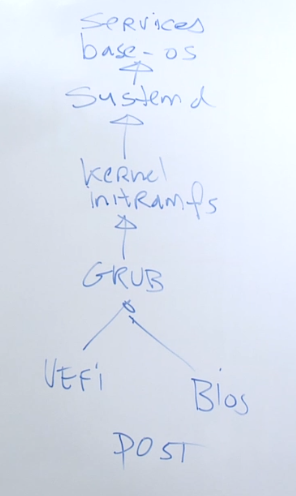
The boot procedure of a Linux system involves several stages, from powering on the machine to reaching the login prompt. Each step ensures that the system hardware and software are initialized and configured correctly for use.
Steps:
- POST - Power-On Self Test: This initial step checks the hardware components and ensures everything is functioning correctly.
- BIOS/UEFI - Reads from BIOS (older systems) or UEFI (newer systems), initializing hardware and identifying the boot device.
- GRUB Bootloader - Loads the kernel. The GRUB (GRand Unified Bootloader) allows you to choose which operating system or kernel version to boot.
- Kernel - The core of the Linux operating system, along with its helper,
initramfs. - initramfs - The initial RAM file system contains a temporary root file system and necessary drivers to start Linux.
- systemd Process - Takes over after the kernel and
initramfsare loaded, managing the system's initialization and service start-up.- Phase 1 - Base OS: Essential components of the OS are loaded.
- Phase 2 - Services: System services and daemons are started.
- Login Process - The final step, allowing the user to log in.
Grub2 Runtime Parameters
GRUB2 is a powerful bootloader used in many Linux distributions. It allows you to modify boot parameters at runtime, providing flexibility in system boot options.
During bootup, press c to open the GRUB command line interface. Press Esc to return to the boot menu.


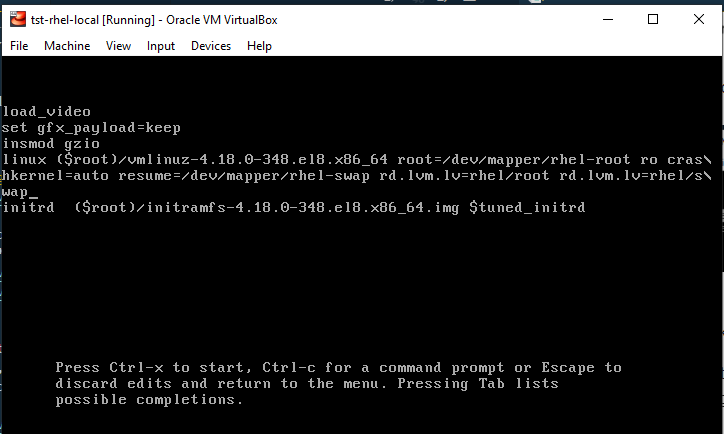
To modify the default kernel parameters, press e.

The important line to note is:
linux($root)/vmlinuz...- Specifies the kernel to be loaded.vmlinuz- The kernel image.ro- Mounts the filesystem as read-only initially.crashkernel=auto- Enables kdump for crash logs.rhgb- Red Hat graphical boot.quiet- Suppresses verbose output during boot.initrd- Specifies the initial RAM disk image.
You can remove rhgb and quiet for a more verbose boot process. Press Ctrl-X to boot with the modified parameters.
Grub2 Persistent Parameters
To make persistent changes to GRUB2 boot parameters, you need to modify the GRUB configuration files. This ensures the changes remain across reboots.
To check if your system uses BIOS or EFI:
mount | grep '^/' | grep -i efi
For systems using BIOS, modify the appropriate GRUB configuration file. The parameters you see during runtime can also be found here, allowing you to remove rhgb and quiet.
EC2 Instance GRUB Configuration
Note that different EC2 instances may have different configuration files.
$ vim /etc/default/grub

GRUB_TIMEOUT=1
GRUB_DISTRIBUTOR="$(sed 's, release .*$,,g' /etc/system-release)"
GRUB_DEFAULT=saved
GRUB_DISABLE_SUBMENU=true
GRUB_TERMINAL_OUTPUT="console"
GRUB_CMDLINE_LINUX="console=ttyS0,115200n8 console=tty0 net.ifnames=0 rd.blacklist=nouveau nvme_core.io_timeout=4294967295 crashkernel=auto"
GRUB_DISABLE_RECOVERY="true"
GRUB_ENABLE_BLSCFG=true
Local VM GRUB Configuration
For local VMs such as those created through VirtualBox, the configuration may look different.
$ vim /etc/default/grub

GRUB_TIMEOUT=5
GRUB_DISTRIBUTOR="$(sed 's, release .*$,,g' /etc/system-release)"
GRUB_DEFAULT=saved
GRUB_DISABLE_SUBMENU=true
GRUB_TERMINAL_OUTPUT="console"
GRUB_CMDLINE_LINUX="crashkernel=auto resume=/dev/mapper/rhel-swap rd.lvm.lv=rhel/root rd.lvm.lv=rhel/swap rhgb quiet"
GRUB_DISABLE_RECOVERY="true"
GRUB_ENABLE_BLSCFG=true
To apply the changes, generate the new GRUB configuration file. Note that direct editing of the grub.cfg file is not recommended. Always make changes through /etc/default/grub.
[root@localhost ~]# grub2-mkconfig -o /boot/grub2/grub.cfg
Generating grub configuration file ...
done