Resizing LVMs
Resizing Logical Volume Management (LVM) allows you to increase the storage capacity of your logical volumes as needed. This is particularly useful when you start running out of space on your disks.
To check the current disk usage, you can use the df -h command, which shows how much space is available on your disks in a human-readable format.
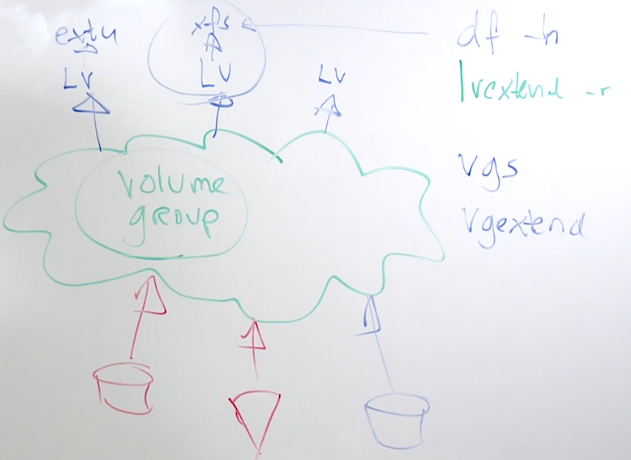
If you find that a logical volume needs more space, you can use the lvextend command to increase its size. However, before doing so, you must ensure that there is enough free space in the volume group and the underlying physical volumes to support the size increase. Note that shrinking is not possible on XFS volumes.
Method 1: Longer version
We can expand the filesystem by adding another disk. Recall that in our setup, we have three disks:
/dev/xvdb- added to LV group/dev/xvd- added to LV group/dev/xvd
1. Unmount
Before expanding the filesystem, make sure that the LV group is not mounted:
eden@tst-rhel:mnt $ df -h
Filesystem                    Size  Used Avail Use% Mounted on
devtmpfs                      7.7G     0  7.7G   0% /dev
tmpfs                         7.8G     0  7.8G   0% /dev/shm
tmpfs                         7.8G   17M  7.8G   1% /run
tmpfs                         7.8G     0  7.8G   0% /sys/fs/cgroup
/dev/xvda2                     10G  2.8G  7.3G  28% /
tmpfs                         1.6G     0  1.6G   0% /run/user/1000
/dev/mapper/myvolumes-group1   97G   61M   92G   1% /mnt/disklvm
eden@tst-rhel:mnt $ sudo umount disklvm
eden@tst-rhel:mnt $ df -h
Filesystem      Size  Used Avail Use% Mounted on
devtmpfs        7.7G     0  7.7G   0% /dev
tmpfs           7.8G     0  7.8G   0% /dev/shm
tmpfs           7.8G   17M  7.8G   1% /run
tmpfs           7.8G     0  7.8G   0% /sys/fs/cgroup
/dev/xvda2       10G  2.8G  7.3G  28% /
tmpfs           1.6G     0  1.6G   0% /run/user/1000
2. Extend volume group (vgextend)
To add more space to a volume group, you can add a new physical volume (disk) to it. We can add the third disk, /dev/xvdd1, to the volume group. This allows the volume group to have more space, which can then be allocated to logical volumes.
eden@tst-rhel:mnt $ sudo vgextend myvolumes /dev/xvdd1
  Volume group "myvolumes" successfully extended
If we check again:
eden@tst-rhel:mnt $ sudo pvscan
  PV /dev/xvdb1   VG myvolumes       lvm2 [<100.00 GiB / 1020.00 MiB free]
  PV /dev/xvdc1   VG myvolumes       lvm2 [<100.00 GiB / <100.00 GiB free]
  PV /dev/xvdd1   VG myvolumes       lvm2 [<100.00 GiB / <100.00 GiB free]
  Total: 3 [<299.99 GiB] / in use: 3 [<299.99 GiB] / in no VG: 0 [0   ]

eden@tst-rhel:mnt $ sudo lvscan
  ACTIVE            '/dev/myvolumes/group1' [99.00 GiB] inherit

eden@tst-rhel:mnt $ sudo lvdisplay
  --- Logical volume ---
  LV Path                /dev/myvolumes/group1
  LV Name                group1
  VG Name                myvolumes
  LV UUID                FyzEp5-LFr8-A6xD-6aju-EPKq-W3V0-LUBRfR
  LV Write Access        read/write
  LV Creation host, time tst-rhel, 2021-12-06 13:15:50 +0800
  LV Status              available
  # open                 0
  LV Size                99.00 GiB
  Current LE             25344
  Segments               1
  Allocation             inherit
  Read ahead sectors     auto
  - currently set to     8192
  Block device           253:0
3. Extend the LV group (lvextend)
Once the volume group has enough space, you can extend the logical volume using the lvextend command. This step increases the size of the logical volume, making more space available for the file system that resides on it.
eden@tst-rhel:mnt $ sudo lvextend /dev/myvolumes/group1 /dev/xvdd1
  Size of logical volume myvolumes/group1 changed from 99.00 GiB (25344 extents) to <199.00 GiB (50943 extents).
  Logical volume myvolumes/group1 successfully resized.

eden@tst-rhel:mnt $ sudo lvdisplay
  --- Logical volume ---
  LV Path                /dev/myvolumes/group1
  LV Name                group1
  VG Name                myvolumes
  LV UUID                FyzEp5-LFr8-A6xD-6aju-EPKq-W3V0-LUBRfR
  LV Write Access        read/write
  LV Creation host, time tst-rhel, 2021-12-06 13:15:50 +0800
  LV Status              available
  # open                 0
  LV Size                <199.00 GiB
  Current LE             50943
  Segments               2
  Allocation             inherit
  Read ahead sectors     auto
  - currently set to     8192
  Block device           253:0
4. Resize the filesystem
After extending the logical volume, the file system must be resized to utilize the newly available space. For ext4 file systems, you can use the resize2fs command. For other file systems, use the appropriate resize command.
eden@tst-rhel:mnt $ sudo resize2fs /dev/myvolumes/group1
resize2fs 1.45.6 (20-Mar-2020)
Please run 'e2fsck -f /dev/myvolumes/group1' first.
eden@tst-rhel:mnt $ e2fsck -f /dev/myvolumes/group1
e2fsck 1.45.6 (20-Mar-2020)
e2fsck: Permission denied while trying to open /dev/myvolumes/group1
You must have r/w access to the filesystem or be root
eden@tst-rhel:mnt $ sudo e2fsck -f /dev/myvolumes/group1
e2fsck 1.45.6 (20-Mar-2020)
Pass 1: Checking inodes, blocks, and sizes
Pass 2: Checking directory structure
Pass 3: Checking directory connectivity
Pass 4: Checking reference counts
Pass 5: Checking group summary information
/dev/myvolumes/group1: 11/6488064 files (0.0% non-contiguous), 553670/25952256 blocks
eden@tst-rhel:mnt $ sudo resize2fs /dev/myvolumes/group1
resize2fs 1.45.6 (20-Mar-2020)
Resizing the filesystem on /dev/myvolumes/group1 to 52165632 (4k) blocks.
The filesystem on /dev/myvolumes/group1 is now 52165632 (4k) blocks long.
5. Finally, mount back
Finally, you can mount the logical volume back to make it available for use. This ensures that the logical volume is accessible and ready for storing data with its newly increased size.
eden@tst-rhel:mnt $ df -h
Filesystem      Size  Used Avail Use% Mounted on
devtmpfs        7.7G     0  7.7G   0% /dev
tmpfs           7.8G     0  7.8G   0% /dev/shm
tmpfs           7.8G   17M  7.8G   1% /run
tmpfs           7.8G     0  7.8G   0% /sys/fs/cgroup
/dev/xvda2       10G  2.8G  7.3G  28% /
tmpfs           1.6G     0  1.6G   0% /run/user/1000
eden@tst-rhel:mnt $ sudo mount -t ext3 /dev/myvolumes/group1 /mnt/disklvm
eden@tst-rhel:mnt $ df -h
Filesystem                    Size  Used Avail Use% Mounted on
devtmpfs                      7.7G     0  7.7G   0% /dev
tmpfs                         7.8G     0  7.8G   0% /dev/shm
tmpfs                         7.8G   17M  7.8G   1% /run
tmpfs                         7.8G     0  7.8G   0% /sys/fs/cgroup
/dev/xvda2                     10G  2.8G  7.3G  28% /
tmpfs                         1.6G     0  1.6G   0% /run/user/1000
/dev/mapper/myvolumes-group1  196G   60M  186G   1% /mnt/disklvm
Method 2: Shorter version
1. Check First
To start with, we need to prepare to extend the LVM. First, we will run df -h to check the available space (Avail) for the LVM. Suppose we want to extend it by adding another 1 GB.
[root@tst-rhel ~]# df -h
Filesystem                 Size  Used Avail Use% Mounted on
devtmpfs                   7.7G     0  7.7G   0% /dev
tmpfs                      7.8G     0  7.8G   0% /dev/shm
tmpfs                      7.8G  512K  7.8G   1% /run
tmpfs                      7.8G     0  7.8G   0% /sys/fs/cgroup
/dev/xvda2                  50G   11G   40G  21% /
tmpfs                      7.8G  4.0K  7.8G   1% /tmp
tmpfs                      1.6G     0  1.6G   0% /run/user/1000
/dev/mapper/vgdata-lvdata  946M   39M  908M   5% /mnt/diskblvm
Next, we need to check if the underlying volume group has enough space to support the increase. By running vgs, we can see that there is zero available space under VFree. This means we need to extend the volume group first.
[root@tst-rhel ~]# vgs
  VG     #PV #LV #SN Attr   VSize   VFree
  vgdata   1   1   0 wz--n- 952.00m    0
2. Extend VG
Since our LVM is on partition 3, we can extend it by adding partition 4, /dev/xvdb4. We run vgextend followed by the volume group name and the new partition to be added. Linux will handle the rest, including running pvcreate and assigning it to the volume group vgdata.
[root@tst-rhel ~]# lsblk
NAME              MAJ:MIN RM  SIZE RO TYPE MOUNTPOINT
xvda              202:0    0   50G  0 disk
├─xvda1           202:1    0    1M  0 part
└─xvda2           202:2    0   50G  0 part /
xvdb              202:16   0   10G  0 disk
├─xvdb1           202:17   0  953M  0 part
├─xvdb2           202:18   0  954M  0 part [SWAP]
├─xvdb3           202:19   0  954M  0 part
│ └─vgdata-lvdata 253:0    0  952M  0 lvm  /mnt/diskblvm
└─xvdb4           202:20   0    1G  0 part
xvdc              202:32   0    9G  0 disk
[root@tst-rhel ~]# vgextend vgdata /dev/xvdb4
  Physical volume "/dev/xvdb4" successfully created.
  Volume group "vgdata" successfully extended
Checking the volume groups again:
[root@tst-rhel ~]# vgs
  VG     #PV #LV #SN Attr   VSize  VFree
  vgdata   2   1   0 wz--n- <1.93g 1020.00m
Although the volume group has been extended, the additional space is not yet reflected when we check the block devices. To update this, we need to extend the logical volume and resize the file system.
[root@tst-rhel ~]# lsblk
NAME              MAJ:MIN RM  SIZE RO TYPE MOUNTPOINT
xvda              202:0    0   50G  0 disk
├─xvda1           202:1    0    1M  0 part
└─xvda2           202:2    0   50G  0 part /
xvdb              202:16   0   10G  0 disk
├─xvdb1           202:17   0  953M  0 part
├─xvdb2           202:18   0  954M  0 part [SWAP]
├─xvdb3           202:19   0  954M  0 part
│ └─vgdata-lvdata 253:0    0  952M  0 lvm  /mnt/diskblvm
└─xvdb4           202:20   0    1G  0 part
xvdc              202:32   0    9G  0 disk
3. Extend LV and Filesystem
After extending the volume group, the next step is to extend the logical volume and resize the filesystem. We'll use lvextend to increase the size of the logical volume and include the -r option to resize the filesystem automatically.
First, check the volume groups again to see the available space:
[root@tst-rhel ~]# vgs
  VG     #PV #LV #SN Attr   VSize  VFree
  vgdata   2   1   0 wz--n- <1.93g 1020.00m
Now, we'll extend the logical volume lvdata within the volume group vgdata by 1020M:
[root@tst-rhel ~]# lvextend /dev/vgdata/lvdata -r -L +1020M
  Size of logical volume vgdata/lvdata changed from 952.00 MiB (238 extents) to <1.93 GiB (493 extents).
  Logical volume vgdata/lvdata successfully resized.
meta-data=/dev/mapper/vgdata-lvdata isize=512    agcount=4, agsize=60928 blks
         =                       sectsz=512   attr=2, projid32bit=1
         =                       crc=1        finobt=1, sparse=1, rmapbt=0
         =                       reflink=1
data     =                       bsize=4096   blocks=243712, imaxpct=25
         =                       sunit=0      swidth=0 blks
naming   =version 2              bsize=4096   ascii-ci=0, ftype=1
log      =internal log           bsize=4096   blocks=1566, version=2
         =                       sectsz=512   sunit=0 blks, lazy-count=1
realtime =none                   extsz=4096   blocks=0, rtextents=0
data blocks changed from 243712 to 504832
Verify the block devices to confirm the changes:
[root@tst-rhel ~]# lsblk
NAME              MAJ:MIN RM  SIZE RO TYPE MOUNTPOINT
xvda              202:0    0   50G  0 disk
├─xvda1           202:1    0    1M  0 part
└─xvda2           202:2    0   50G  0 part /
xvdb              202:16   0   10G  0 disk
├─xvdb1           202:17   0  953M  0 part
├─xvdb2           202:18   0  954M  0 part [SWAP]
├─xvdb3           202:19   0  954M  0 part
│ └─vgdata-lvdata 253:0    0  1.9G  0 lvm  /mnt/diskblvm
└─xvdb4           202:20   0    1G  0 part
  └─vgdata-lvdata 253:0    0  1.9G  0 lvm  /mnt/diskblvm
xvdc              202:32   0    9G  0 disk
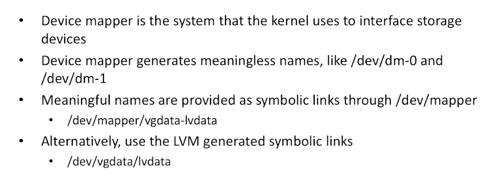
Device Mapper and LVM Device Names
The names used for LVM volumes can sometimes be confusing, as they both point to the same device mapper name, which in this case is dm-0. It's important to note that the device mapper name can change and should not be used for persistent configurations. Instead, use the LVM symbolic links or device mapper symbolic links for consistency and reliability.
[root@tst-rhel ~]# ls -la /dev/vgdata/lvdata /dev/mapper/vgdata-lvdata
lrwxrwxrwx. 1 root root 7 Dec 31 14:46 /dev/mapper/vgdata-lvdata -> ../dm-0
lrwxrwxrwx. 1 root root 7 Dec 31 14:46 /dev/vgdata/lvdata -> ../dm-0
The image below shows the symbolic links pointing to the device mapper name.
System Storage Manager (SSM)
System Storage Manager (SSM) is a powerful tool for managing LVM configurations and routine storage tasks within the RHEL distribution. While it's not installed by default, SSM offers streamlined features similar to other tools we've used, enhancing ease of use and efficiency.
To install SSM, use the following command:
sudo dnf install -y system-storage-manager
Listing and View
To obtain a comprehensive summary of your storage devices:
$ ssm list
---------------------------------------
Device          Free  Used
---------------------------------------
/dev/xvda   10.00 GB  PARTITIONED
/dev/xvda1   1.00 MB
/dev/xvda2  10.00 GB  /
/dev/xvdb   10.00 GB  PARTITIONED
/dev/xvdb1  10.00 GB
/dev/xvdc   10.00 GB
/dev/xvdd   10.00 GB
---------------------------------------
-------------------------------------------------------------------
Volume             Pool  Volume size       FS  FS size  Free  Type
-------------------------------------------------------------------
/dev/xvda2     10.00 GB  xfs  9.99 GB  6.82 GB  part  /
/dev/xvdb1     10.00 GB  xfs  9.99 GB  9.99 GB  part
-------------------------------------------------------------------
To list only the volumes managed by SSM:
$ ssm list volumes
-------------------------------------------------------------------
Volume             Pool  Volume size       FS  FS size  Free  Type
-------------------------------------------------------------------
/dev/xvda2     10.00 GB  xfs  9.99 GB  6.82 GB  part  /
/dev/xvdb1     10.00 GB  xfs  9.99 GB  9.99 GB  part
-------------------------------------------------------------------
Volume operations
With SSM, creating an LVM becomes a straightforward task with a single command:
ssm create -s 20G \
-n website \
--fstype xfs \
-p vg1 /dev/xvdb1 /dev/xvdc1 \
/mnt/website
In the above example, we'll create a volume group named vg1 utilizing storage from both xvdb1 and xvdc1, format it with an XFS filesystem labeled website, and mount it to /mnt/website.
We can also perform a filesystem check on a specific volume:
ssm check /dev/vg1/website
To remove an entire volume group managed by SSM:
ssm remove vg1
File System Snapshots
File system snapshots provide a quick way to back up data and restore it when needed. They are particularly useful in virtualized environments where virtual machines (VMs) use virtual hard drives, making snapshotting straightforward due to built-in functionalities in virtualization platforms.
However, if you're running RHEL on bare-metal hardware or physical servers, there is no inherent snapshot functionality available. In such cases, you can utilize the XFS file system's snapshot feature.
What really happens when taking a snapshot?
When you take a snapshot, it doesn't really do anything. It freezes whatever's written at that particular moment in time and new data will be written somewhere else on the harddrive. This would mean that there should be a space in the disk where the new data will be written.
As an example, we have a volume group vg1 which we created in the previous lab. This volume group is mounted on /mnt/website.
$ vgs
  VG  #PV #LV #SN Attr   VSize  VFree
  vg1   2   1   0 wz--n- 19.99g    0
$ mount | grep vg
/dev/mapper/vg1-website on /mnt/website type xfs (rw,relatime,seclabel,attr2,inode64,logbufs=8,logbsize=32k,noquota)
To take a snapshot of the volume group:
ssm snapshot /dev/vg1/website
To list down the snapshots:
ssm list snapshots