Encrypted Partitions
Overview
Encrypting partitions ensures data security on your systems. By encrypting partitions, you protect sensitive data from unauthorized access. In this guide, we'll set up encrypted partitions using dm_crypt, a Linux kernel module that provides transparent encryption of block devices.
Outline:
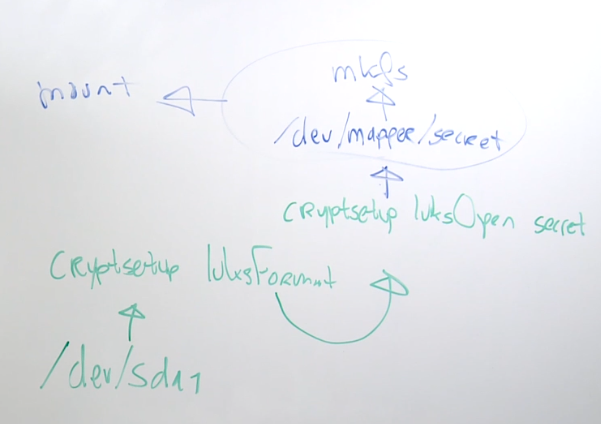
- Use
partedto create partitions. - Use
cryptsetup luksFormatto format the device. - Run
cryptsetup luksOpento open device and create a device mapper name. - Mount resulting device mapper name.
- To automate
cryptsetup luksOpen, add an entry to/etc/crypttab. - To automate mounting, add an entry to
/etc/fstab.
Lab Setup
I'm performing this lab on an EC2 instance with multiple EBS volumes attached. I also used this same setup for the Stratis and VDO labs. We'll specifically use the /dev/xvdf disk to test out partition encryption.
$ lsblk
NAME    MAJ:MIN RM SIZE RO TYPE MOUNTPOINT
xvda    202:0    0  10G  0 disk
├─xvda1 202:1    0   1M  0 part
└─xvda2 202:2    0  10G  0 part /
xvdb    202:16   0  10G  0 disk
xvdf    202:16   0  10G  0 disk
Encryption is supported
First, ensure your system supports encryption by checking if the dm_crypt module is compiled and loaded into your kernel.
Check the current kernel version:
$ uname -r

4.18.0-348.2.1.el8_5.x86_64
$ ll /boot/config-$(uname -r)

-rw-r--r--. 1 root root 193933 Nov  9 03:36 /boot/config-4.18.0-348.2.1.el8_5.x86_64
Check if CONFIG_DM_CRYPT is enabled in the kernel configuration:
$ grep -i config_dm_crypt /boot/config-$(uname -r)

CONFIG_DM_CRYPT=m
Check the status of loaded modules, specifically looking for dm_crypt:
$ lsmod | grep dm

dm_multipath           40960  0
dm_mirror              28672  0
dm_region_hash         20480  1 dm_mirror
dm_log                 20480  2 dm_region_hash,dm_mirror
dm_mod                151552  7 dm_multipath,dm_log,dm_mirror
If dm_crypt is not loaded, load it using modprobe:
modprobe dm_crypt
If modprobe fails due to permission issues, use sudo:
$ modprobe dm_crypt
modprobe: ERROR: could not insert 'dm_crypt': Operation not permitted
sudo modprobe dm_crypt
Verify that dm_crypt is now loaded:
$ lsmod | grep dm_crypt

dm_crypt               49152  0
dm_mod                151552  8 dm_crypt,dm_multipath,dm_log,dm_mirror
Steps to Encrypt Partitions
1. Format Partition
Formatting a partition is a necessary step to prepare it for use. In this example, we'll create and format a new partition on /dev/xvdf.
$ lsblk
NAME    MAJ:MIN RM SIZE RO TYPE MOUNTPOINT
xvda    202:0    0  10G  0 disk
├─xvda1 202:1    0   1M  0 part
└─xvda2 202:2    0  10G  0 part /
xvdb    202:16   0  10G  0 disk
xvdf    202:16   0  10G  0 disk
First, check the existing partition layout on /dev/xvdf:
$ sudo fdisk /dev/xvdf -l

Disk /dev/xvdf: 10 GiB, 10737418240 bytes, 20971520 sectors
Units: sectors of 1 * 512 = 512 bytes
Sector size (logical/physical): 512 bytes / 512 bytes
I/O size (minimum/optimal): 512 bytes / 512 bytes
Create a new partition on /dev/xvdf using fdisk:
sudo fdisk /dev/xvdf
Within the fdisk interface, follow these steps:
-
Create a new partition:
- Press
nto create a new partition. - Select
pfor primary partition (default). - Press
Enterto accept the default partition number. - Press
Enterto accept the default first sector. - Press
Enterto accept the default last sector (uses the entire disk).
Command (m for help): nPartition typep primary (0 primary, 0 extended, 4 free)e extended (container for logical partitions)Select (default p): pPartition number (1-4, default 1):First sector (2048-20971519, default 2048):Last sector, +sectors or +size{K,M,G,T,P} (2048-20971519, default 20971519):Created a new partition 1 of type 'Linux' and of size 10 GiB. - Press
-
Verify the partition:
Command (m for help): v -
Write the changes to the disk:
Command (m for help): wThe partition table has been altered.Calling ioctl() to re-read partition table.Syncing disks.
2. Setup Partition Using cryptsetup
Encrypting a partition involves setting up LUKS (Linux Unified Key Setup) on the partition. Note that this process will overwrite any existing data on the partition. For this lab, we're using a 10GB disk.
First, install cryptsetup:
sudo yum install -y cryptsetup
Set up LUKS format for the partition using cryptsetup:
cryptsetup -y luksFormat /dev/xvdf1
If you encounter a permission error, use sudo:
$ cryptsetup -y luksFormat /dev/xvdf1
Device /dev/xvdf1 does not exist or access denied.
sudo cryptsetup -y luksFormat /dev/xvdf1
You'll be prompted to confirm the operation and create a passphrase:
WARNING!
========
This will overwrite data on /dev/xvdf1 irrevocably.

Are you sure? (Type 'yes' in capital letters): YES
Enter passphrase for /dev/xvdf1:
Verify passphrase:
To verify the encryption details, you can read /proc/crypto (this will return a long output):
cat /proc/crypto
3. Open Partition and Format
To access the encrypted partition, we need to open it and assign it a name. Then, we can format it with a filesystem.
Open the encrypted partition with cryptsetup and give it a name:
$ sudo cryptsetup luksOpen /dev/xvdf1 myencryption

Enter passphrase for /dev/xvdf1:
Format the opened partition. Note that you must use the name you assigned (in this case, myencryption):
sudo mkfs -t ext4 /dev/mapper/myencryption
Attempting to format the raw partition directly will result in an error:
sudo mkfs -t ext4 /dev/xvdf1
mke2fs 1.45.6 (20-Mar-2020)
/dev/xvdf1 contains a crypto_LUKS file system
Proceed anyway? (y,N) y
/dev/xvdf1 is apparently in use by the system; will not make a filesystem here!
4. Mount the Partition
After opening and formatting the encrypted partition, the next step is to mount it to a directory so that it can be used like any other filesystem.
Create a mount directory and mount the encrypted partition to it:
sudo mkdir /mnt/diskencrypt
Verify the creation of the directory:
$ ll /mnt

total 4
drwxr-xr-x. 2 root root    6 Dec  6 06:08 diskb1
drwxr-xr-x. 2 root root    6 Dec  6 06:26 diskc1
drwxr-xr-x. 2 root root    6 Dec  6 06:26 diskc2
drwxr-xr-x. 2 root root    6 Dec  6 06:26 diskc3
drwxr-xr-x. 2 root root    6 Dec  7 14:04 diskencrypt
drwxr-xr-x. 3 root root 4096 Dec  6 13:22 disklvm
Mount the encrypted partition:
sudo mount /dev/mapper/myencryption /mnt/diskencrypt/
Check the mounted filesystems:
$ df -h

Filesystem                    Size  Used Avail Use% Mounted on
devtmpfs                      7.7G     0  7.7G   0% /dev
tmpfs                         7.8G     0  7.8G   0% /dev/shm
tmpfs                         7.8G   17M  7.8G   1% /run
tmpfs                         7.8G     0  7.8G   0% /sys/fs/cgroup
/dev/xvda2                     10G  2.8G  7.3G  28% /
tmpfs                         1.6G     0  1.6G   0% /run/user/1000
/dev/mapper/myvolumes-group1  196G   60M  186G   1% /mnt/disklvm
/dev/mapper/myencryption      9.8G   37M  9.3G   1% /mnt/diskencrypt
Nice. Disk is ready to use.
To close it, unmount it first then use the cryptsetup tool.
sudo umount /mnt/diskencrypt/
sudo cryptsetup luksClose myencryption
5. Ready to Use
The real benefit of the encryption is that no one can simply access the files in the encrypted partition. To access the file, you must do the following steps.
- Open the disk using cryptsetup.
- Mount the partition to the mountpoint.
- Once you're done, unmount the partition.
- Close the disk using cryptsetup.
For example, initially, the directory /mnt/diskencrypt is empty:
$ ll /mnt/
total 4
drwxr-xr-x. 2 root root    6 Dec  6 06:08 diskb1
drwxr-xr-x. 2 root root    6 Dec  6 06:26 diskc1
drwxr-xr-x. 2 root root    6 Dec  6 06:26 diskc2
drwxr-xr-x. 2 root root    6 Dec  6 06:26 diskc3
drwxr-xr-x. 2 root root    6 Dec  7 14:04 diskencrypt
drwxr-xr-x. 3 root root 4096 Dec  6 13:22 disklvm

$ ll /mnt/diskencrypt/
total 0
Open the encrypted partition and mount it:
$ sudo cryptsetup luksOpen /dev/xvdf1 myencryption
Enter passphrase for /dev/xvdf1:
sudo mount /dev/mapper/myencryption /mnt/diskencrypt/
Create a file inside the mounted directory:
cd /mnt/diskencrypt/
sudo touch treadstonefile
Verify the file creation:
$ ll
total 16
drwx------. 2 root root 16384 Dec  7 14:01 lost+found
-rw-r--r--. 1 root root     0 Dec  7 14:20 treadstonefile
Go back one directory and unmount and close the encrypted partition:
cd ..
sudo umount /mnt/diskencrypt/
sudo cryptsetup luksClose myencryption
Attempting to access the encrypted partition without opening it will result in an error:
$ sudo mount /dev/xvdf1 /mnt/diskencrypt/
mount: /mnt/diskencrypt: unknown filesystem type 'crypto_LUKS'.
$ sudo mount /dev/xvdf1 /mnt/diskb1
mount: /mnt/diskb1: unknown filesystem type 'crypto_LUKS'.
$ sudo mount /dev/xvdf1 /mnt/diskc1
mount: /mnt/diskc1: unknown filesystem type 'crypto_LUKS'.
$ sudo mount /dev/xvdf1 /mnt/disklvm
mount: /mnt/disklvm: unknown filesystem type 'crypto_LUKS'.
Shortcut Version for Encrypted Partitions
This is a quick guide to setting up encrypted partitions using LUKS (Linux Unified Key Setup) on a block device.
1. Create Label and Partition
First, we identify the block device to be partitioned and create a new partition label.
$ lsblk
NAME    MAJ:MIN RM SIZE RO TYPE MOUNTPOINT
xvda    202:0    0  10G  0 disk
├─xvda1 202:1    0   1M  0 part
└─xvda2 202:2    0  10G  0 part /
xvdb    202:16   0  10G  0 disk
Enter parted Utility:
$ parted /dev/xvdb
GNU Parted 3.2
Using /dev/xvdb
Welcome to GNU Parted! Type 'help' to view a list of commands.
(parted)
Create GPT Label:
(parted) mklabel gpt
Create Partition:
(parted) mkpart
Partition name?  []? luks1
File system type?  [ext2]?
Start? 1GiB
End? 2GiB
Print New Partition Table:
(parted) print
Model: Xen Virtual Block Device (xvd)
Disk /dev/xvdb: 10.7GB
Sector size (logical/physical): 512B/512B
Partition Table: gpt
Disk Flags:
Number  Start   End     Size    File system  Name   Flags
 1      1074MB  2147MB  1074MB  ext2         luks1
(parted) quit
Information: You may need to update /etc/fstab.
2. Configure Encryption
Use cryptsetup to format the partition with LUKS encryption.
Format Partition with LUKS:
$ cryptsetup luksFormat /dev/xvdb1
WARNING: Device /dev/xvdb1 already contains a 'xfs_external_log' superblock signature.

WARNING!
========
This will overwrite data on /dev/xvdb1 irrevocably.

Are you sure? (Type 'yes' in capital letters): YES
Enter passphrase for /dev/xvdb1:
Verify passphrase:
3. Open Encrypted Device
Open the encrypted partition and map it to a name.
$ cryptsetup luksOpen /dev/xvdb1 mysecretplace
Enter passphrase for /dev/xvdb1:
Verify Mapping:
$ ll /dev/mapper/
total 0
crw-------. 1 root root 10, 236 Jan  2 16:19 control
lrwxrwxrwx. 1 root root       7 Jan  2 16:47 mysecretplace -> ../dm-0
4. Create Filesystem
Create an XFS filesystem on the mapped encrypted device.
$ mkfs.xfs /dev/mapper/mysecretplace
meta-data=/dev/mapper/mysecretplace isize=512    agcount=4, agsize=64512 blks
         =                       sectsz=512   attr=2, projid32bit=1
         =                       crc=1        finobt=1, sparse=1, rmapbt=0
         =                       reflink=1
data     =                       bsize=4096   blocks=258048, imaxpct=25
         =                       sunit=0      swidth=0 blks
naming   =version 2              bsize=4096   ascii-ci=0, ftype=1
log      =internal log           bsize=4096   blocks=1566, version=2
         =                       sectsz=512   sunit=0 blks, lazy-count=1
realtime =none                   extsz=4096   blocks=0, rtextents=0
5. Create Mountpoint and mount
Create a directory to mount the encrypted partition.
$ mkdir /mnt/disksecret
$ ll /mnt/
total 0
drwxr-xr-x. 2 root root 6 Jan  2 15:39 diskfs
drwxr-xr-x. 2 root root 6 Jan  2 15:33 diskfs2
drwxr-xr-x. 2 root root 6 Jan  2 16:50 disksecret
drwxr-xr-x. 2 root root 6 Jan  2 16:24 diskvdo
Update the /etc/fstab file to mount the encrypted partition automatically.
$ vim /etc/fstab

UUID=d35fe619-1d06-4ace-9fe3-169baad3e421 /                       xfs     defaults        0 0

# EDEN: STRATIS
# UUID="55355676-5973-4250-a5c3-b12d6c06b313"   /mnt/diskfs       xfs     nofail,x-systemd.device-timeout=1ms 0 0

# EDEN: VDO
#/dev/mapper/vdo1                        /mnt/diskvdo             xfs     x-systemd.requires=vdo.service      0 0

# EDEN: LUKS
/dev/mapper/mysecretplace                /mnt/disksecret          xfs     defaults        0 0
Mount All Filesystems:
mount -a
Add an entry in crypttab:
$ vim /etc/crypttab
mysecretplace   /dev/xvdb1      none
Close the encrypted device:
$ cryptsetup luksClose mysecretplace
Automount LUKS Encrypted Device
-
Create LUKS keyfile:
dd if=/dev/random of=/etc/lukskey bs=32 count=1 -
Add passphrase to LUKS keyfile:
cryptsetup luksAddKey /dev/xvdc2 /etc/lukskey -
Close drive first if its open. Then verify you can open it using the keyfile:
# secret is the name of crytsetup luksOpen storagecryptsetup luksClose secret# Now try to open it using the keyfilecryptsetup luksOpen /dev/xvdc2 --key-file /etc/lukskey -
Add entry to
/etc/crypttab:$ vim /etc/crypttabsecret /dev/xvdc2 /etc/lukskey -
Add entry to
/etc/fstab:$ vim /etc/fstab/dev/mapper/secret /mount/secret xfs defaults,nofail 0 0 -
Try to mount:
mount -a -
Reboot and cross-fingers.
sudo reboot -
When it comes back up, verify.
lsblk