Deploying Jenkins
Overview
This lab deploys Jenkins with Ansible and prepares the server for CI automation work.
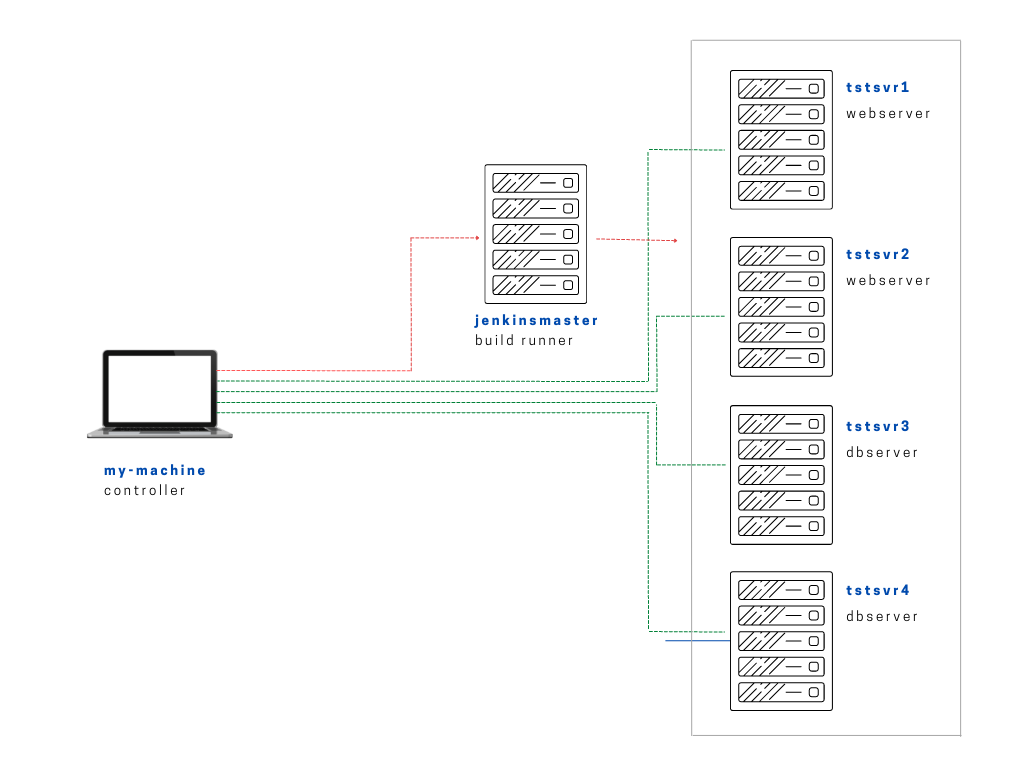
Diagram:
The tree-structure of our Project One currently looks like this. Don't worry if you see that there's already a lot of files in the directory. These are the files from the previous labs in this series. The only ones we'll really really need are also provided below.
Project One
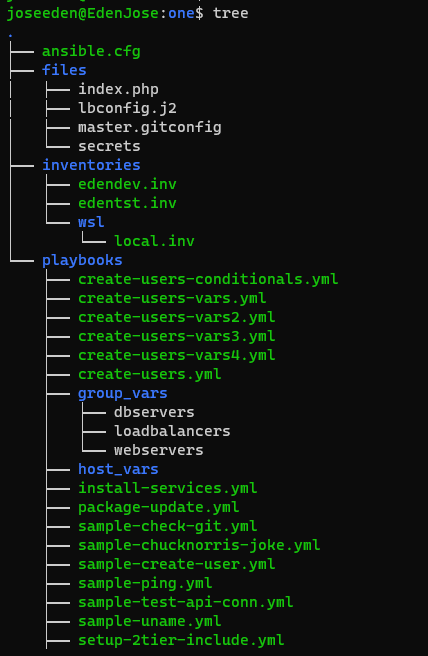
ansible.cfg
 [defaults]
# E: variables for my personal lab
inventory = ~/proj-ansible-1/one/inventories/edendev.inv
remote_user = eden
private_key_file = ~/.ssh/id_rsa
host_key_checking = False
retry_files_enabled = False
timeout = 24
gather_facts = smart

[privilege_escalation]
become_method = sudo
become=True
become_user=root
become_ask_pass=True

#ansible_managed = "# This file is managed by Ansible, all local changes will be lost !"
#allow_world_readable_tmpfiles = True
#precedence = all_plugins_play, all_inventory, groups_plugins_play, groups_inventory, all_plugins_inventory, groups_plugins_inventory
#any_errors_fatal = True
#timeout = 24

[paramiko_connection]
#record_host_keys = False

[ssh_connection]
scp_if_ssh = True
pipelining = True
symlink in root directory pointing to projects folder
$ ls -la | grep "\->"
lrwxrwxrwx  1 joseeden joseeden    70 Jan 14 23:03 proj-ansible-1 -> /mnt/c/Users/Eden Jose/4-Projects
For this lab, we'll create a new inventory file named edenjen.inv. We've completely removed the loadbalancer, and added a new server called jenkinsmaster which will serve as our dedicated buid runner. We will be referring to this inventory file when we run the playbook.
edenjen.inv
[webservers]
app1    ansible_host=13.251.146.254
app2    ansible_host=122.248.203.239
app3    ansible_host=52.76.189.254
app4    ansible_host=54.255.28.202

[jenkins]
jenkinsmaster     ansible_host=13.228.99.157

[local]
localhost   ansible_connection=local
This is a particularly simple lab since this is more of a Jenkins lab. I might post my notes on it in a few days as well.
The steps I followed are in the official Jenkins documentation.. The outline of the steps are:
# Steps
sudo wget -O /etc/yum.repos.d/jenkins.repo \
    https://pkg.jenkins.io/redhat-stable/jenkins.repo
sudo rpm --import https://pkg.jenkins.io/redhat-stable/jenkins.io.key
sudo yum upgrade
sudo yum install -y epel-release
sudo yum install -y java-11-openjdk-devel
sudo yum install -y jenkins
sudo systemctl daemon-reload

# # If wget is not installed,
sudo yum install -y wget

# If the epel-release install step errors, try step below.
sudo dnf install https://dl.fedoraproject.org/pub/epel/epel-release-latest-8.noarch.rpm
From the outline above, we build our playbook piece by piece. After some trial and error, I have arrive to this final playbook.
install-jenkins.yml
# installs jenkins
---

- name: Install jenkins
  hosts: jenkins
  become: true
  tasks:

    - name: Download files
      get_url:
        url: https://pkg.jenkins.io/redhat-stable/jenkins.repo
        dest: /etc/yum.repos.d/jenkins.repo

    - name: Download apt_key
      ansible.builtin.rpm_key:
        key: https://pkg.jenkins.io/redhat-stable/jenkins.io.key
        state: present

    - name: Upgrade all packages
      yum:
        name: '*'
        state: latest

    - name: Ensure epel repo is present
      yum:
        name: https://dl.fedoraproject.org/pub/epel/epel-release-latest-8.noarch.rpm
        state: present

    - name: Install Jenkins and Java using yum
      yum:
        name:
          - jenkins
          - java-11-openjdk-devel
        state: present

    - name: Force systemd to reread configs
      systemd:
        daemon_reload: yes

    - name: Ensures Jenkins is started
      systemd:
        name: jenkins
        enabled: yes
        state: started

    # Uncomment play below if you have firewalld
    # - name: FirewallD rules
    #   firewalld:
    #     permanent: yes
    #     immediate: yes
    #     service:
    #       - jenkins
    #       - http
    #     port: 8080/tcp
    #     zone: public
    #     state: enabled
To run the playbook,
$ ansible-playbook playbooks/install-jenkins-on-lb1.yml
Once it's done, get the IP of the machine and paste it to your web browser, followed by ":8080".
http://13.228.99.157:8080/
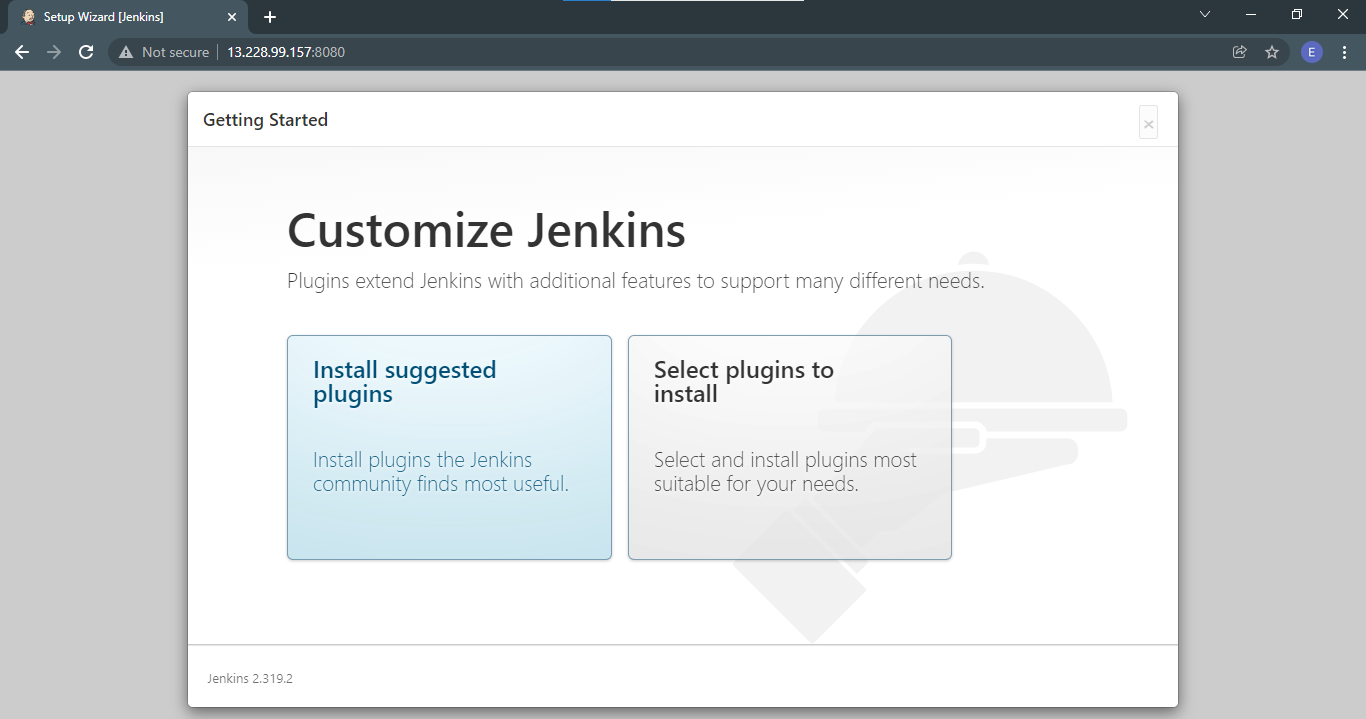
During the first time, Jenkins will display a Getting Started page where you will need to follow an instruction. Paste the password in the field.

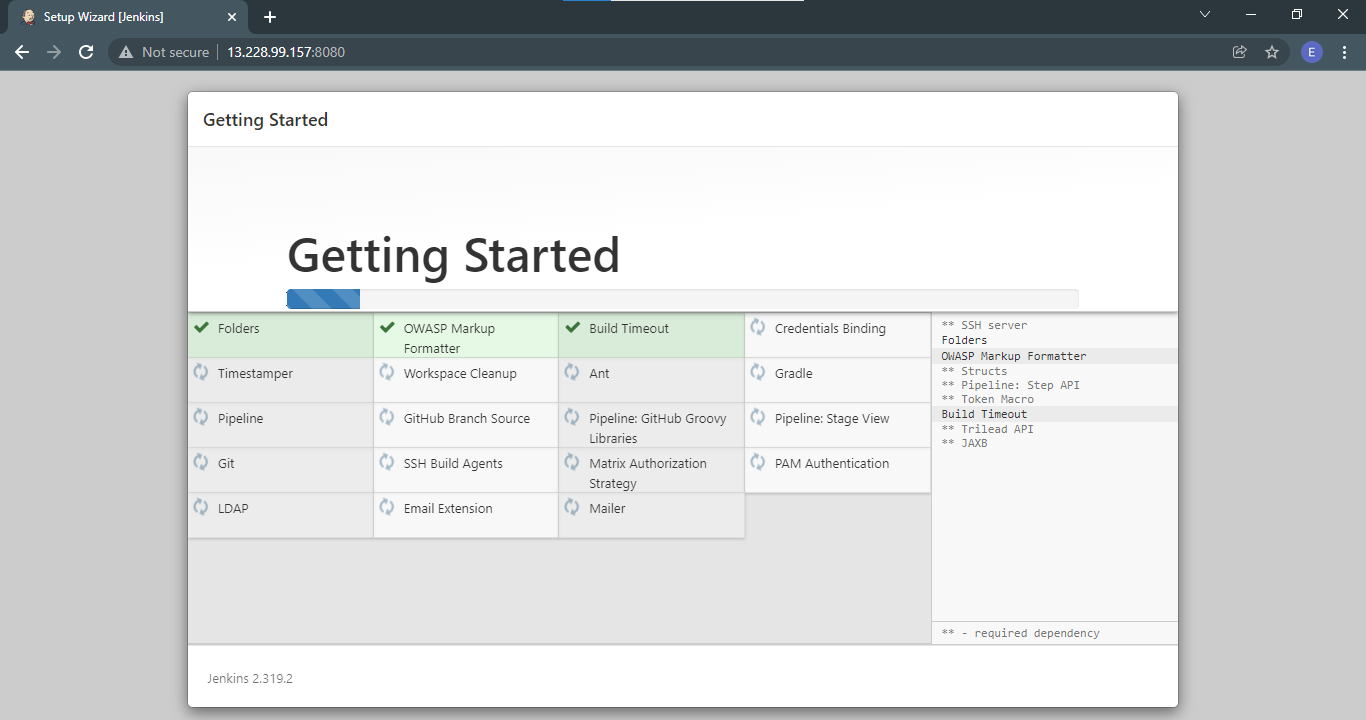
On the next page, you're given a choice to select the plugins to install or go with the suggested ones. For now we'll go with the suggested plugins.
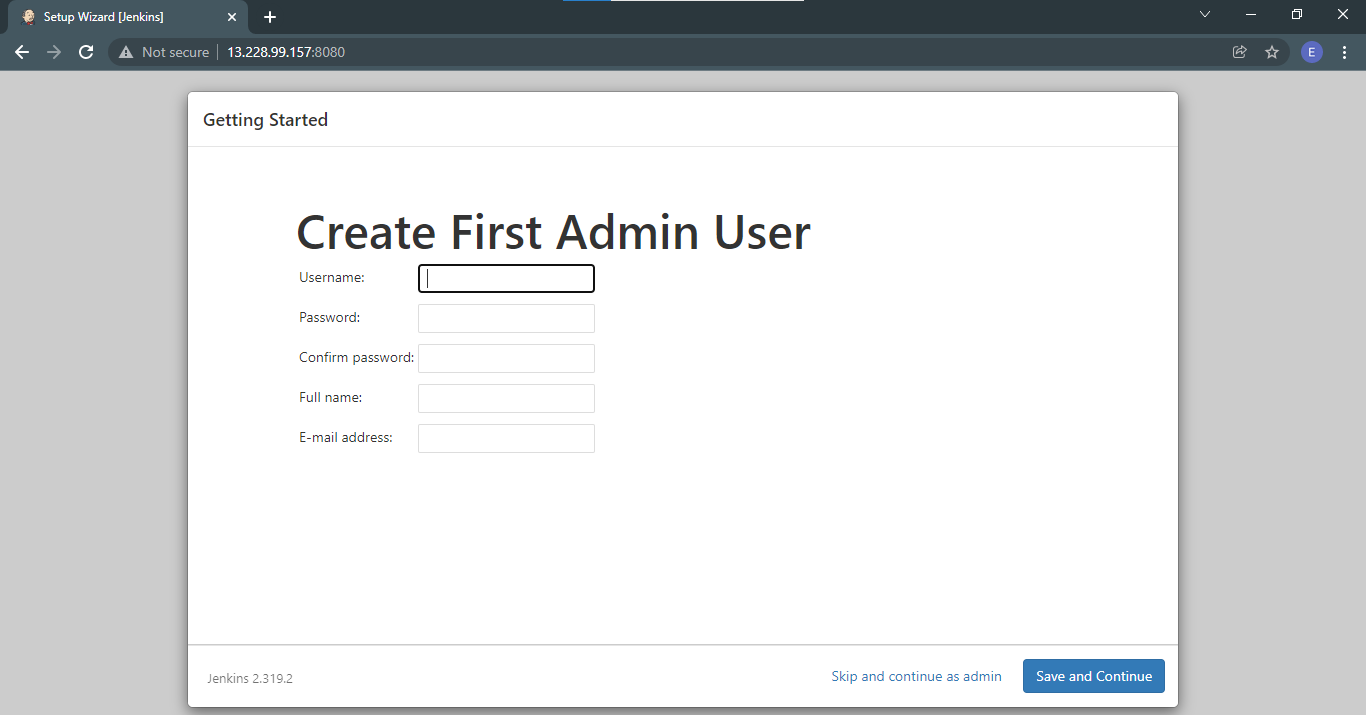
After the plugins are installed, Jenkins will now prompt you to create the first admin user.
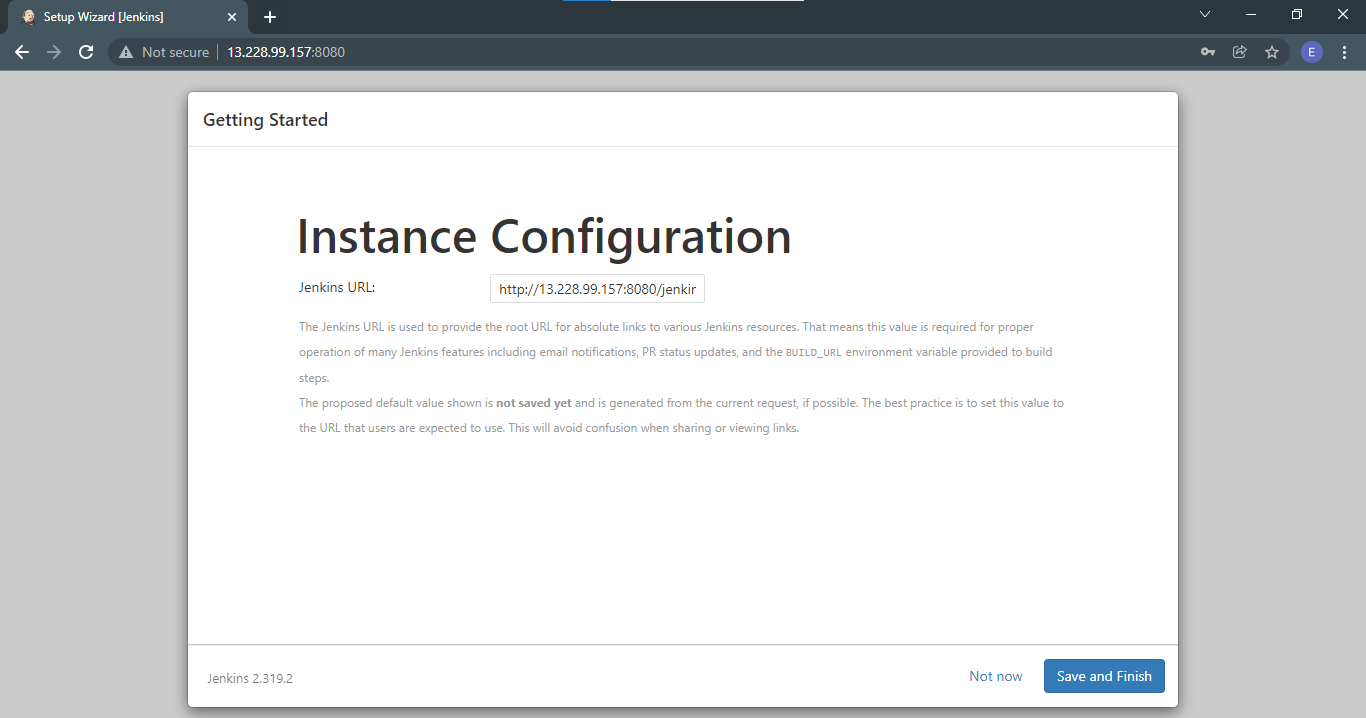
Next, you will need to configure the URL. I added the jenkins-lab so it's easy to remember. Afterwards click Save and Finish.
http://13.228.99.157:8080/jenkins-lab
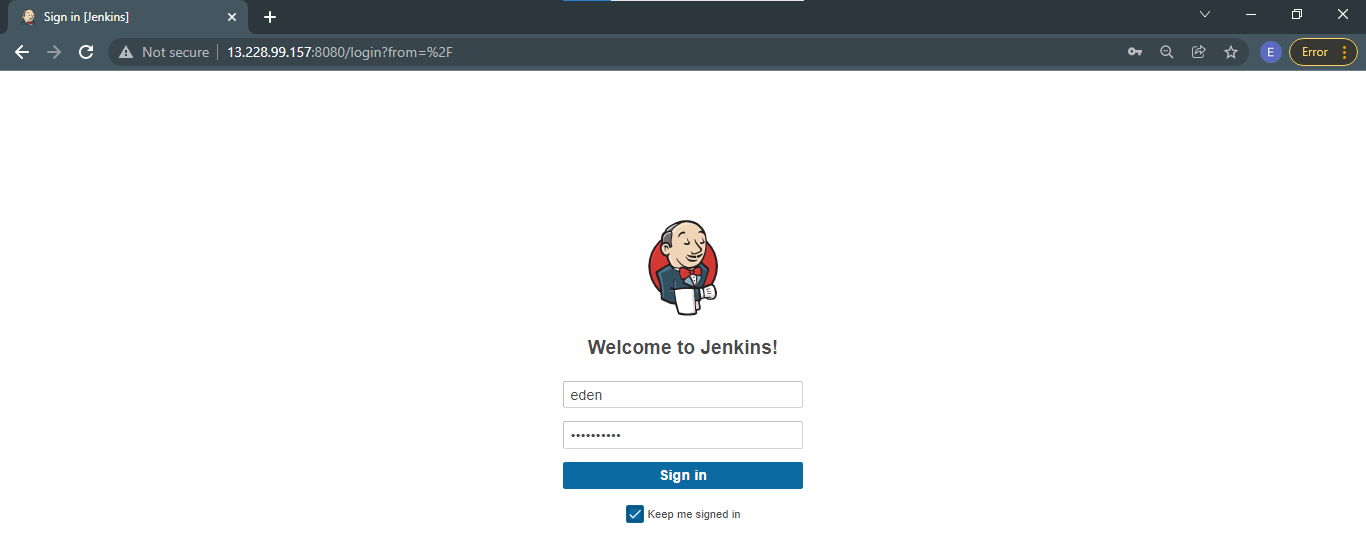
Once this is done, you'll be brought to the Jenkins login page. Login using the username and password you set.
Now, before we forget, we must also setup the Jenkins user account.
Build Accounts
Configure the jenkins user
The default user that Jenkins uses is a non-interactive user. This can be seen when you grep for Jenkins in the /etc/passwd file.
$ cat  /etc/passwd | grep jenkins
jenkins:x:994:990:Jenkins Automation Server:/var/lib/jenkins:/bin/false
We can modify this so that we can login using Jenkins username on the terminal when we need to do some troubleshooting.
$ sudo sed -i "s/jenkins:\/bin\/false/jenkins:\/bin\/bash/" /etc/passwd
$ cat  /etc/passwd | grep jenkins
jenkins:x:994:990:Jenkins Automation Server:/var/lib/jenkins:/bin/bash
Next, setup the password for the jenkins user.
$ sudo passwd jenkins